Check if Consent Mode is Enabled & Fix for Free Using Consent Mode Monitor
Google Consent Mode (now Google Consent Mode V2) uses Consent Management Platforms (CMPs) to register consent choices of users and deploy tags according to these choices. It’s now the law to ensure this is setup properly and you can face some hefty fines if you don’t. So it’s important to check if consent mode is enabled.
To confirm if Consent Mode is correctly set up, consider these reliable checks:
- Use Consent Mode Monitor to detect and fix consent mode issues.
- Check the consent tab in GTM Preview.
- Review default consent settings in GTM.
- Verify consent states in the dataLayer.
You can follow any of the abovementioned methods to ensure Consent Mode works correctly. Before going forward, make sure you’ve set up Consent Mode V2 using your Consent Management Platform. Then, you can follow any of the ways outlined here:
How to check if consent mode is enabled
Use Consent Mode Monitor to identify and fix consent mode issues
There is a free-to-use tool called Consent Mode Monitor that can check if consent mode is enabled and fix any issues with your setup.
How does Consent Mode Monitor work?
Consent Mode Monitor works by analysing your GTM setup and providing you with a list of tags with missing or incorrect consent. The tool parses your site and does not require any permissions. Nor does it change anything about your GTM setup.
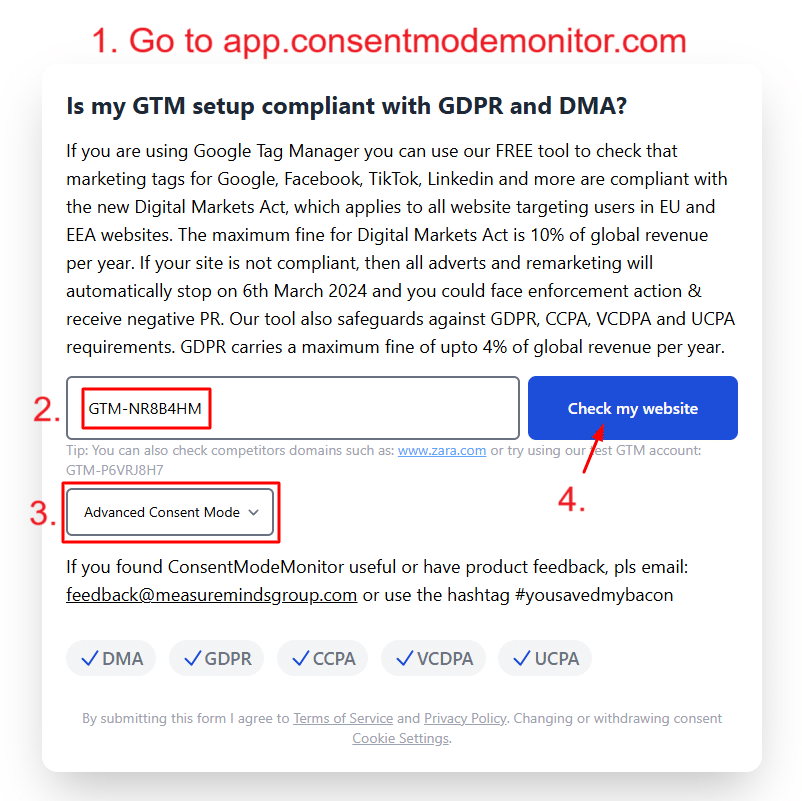
How to use the Consent Mode Monitor
- Go to Consent Mode Monitor.
- Enter your domain name or GTM container ID (it’s best to use your GTM container ID).
- Using the drop-down menu, select whether you’d like to check if advanced or basic consent mode is enabled (we recommend checking advanced).
- Click check my website.
The Consent Mode Monitor will start checking your website/GTM container. You can enter in your email address to receive a copy of your results when the scan is complete. Just make sure to tick the box. Finally, click ‘Get results’.
How the results of Consent Mode Monitor are displayed
A screen will appear detailing:
- The number of tags scanned from your container.
- Which tags if any have missing consent
- What type of tags they are.
- How many there are.
- Gatekeeper?
- Whether any action is required.
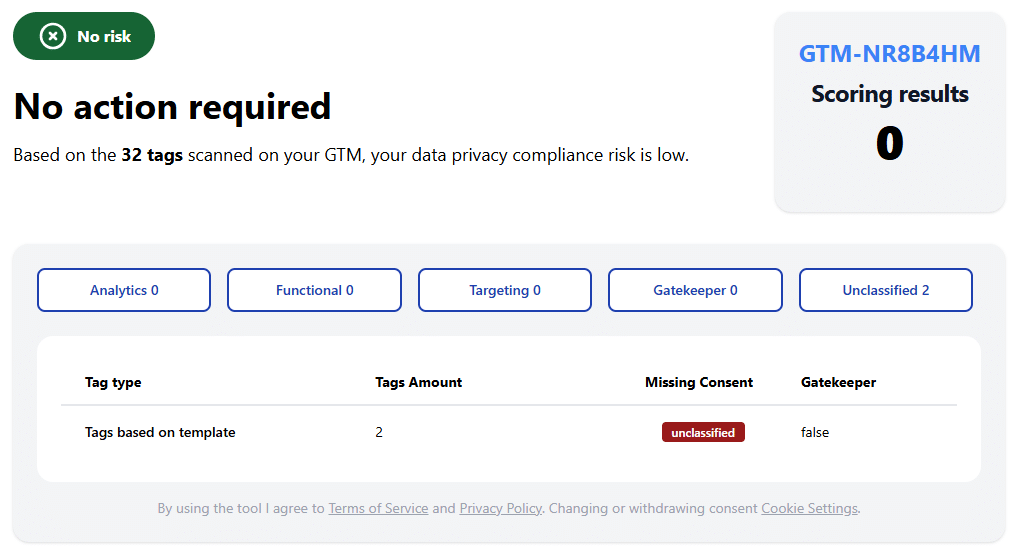
Hopefully, no action is required, but if it is, you can choose to use the premium feature to fix any errors instantly.
Use the Chrome Extension for faster checks
There is a Consent Mode Monitor Chrome extension that allows you to check sites faster, and even directly on the page. Using the Chrome Extension means that you won’t get blocked by Cloudflare or similar systems either. This can sometimes happen when using the normal version.
How to check if Consent Mode is enabled via Google Tag Manager preview
Follow these straightforward steps to verify if Google Consent Mode is correctly configured using Google Tag Manager (GTM) preview mode:
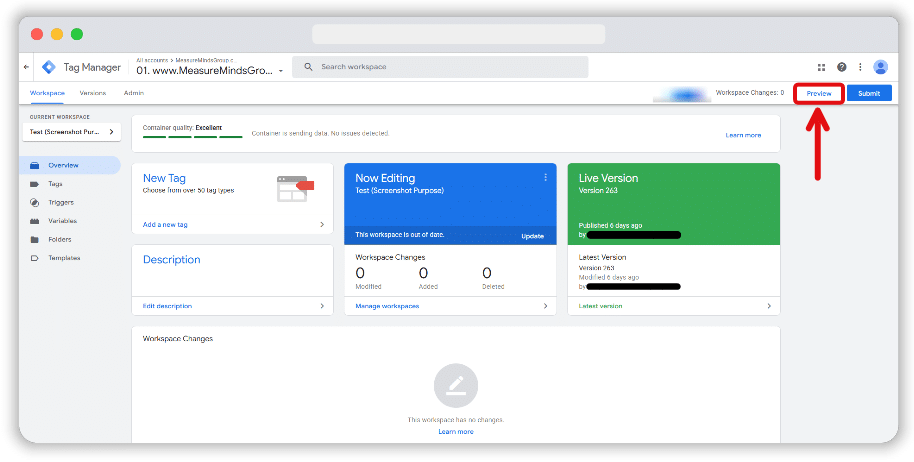
Step 1: Launch GTM preview mode
Log into your GTM account and navigate to your workspace. Click the Preview button found at the top-right corner.
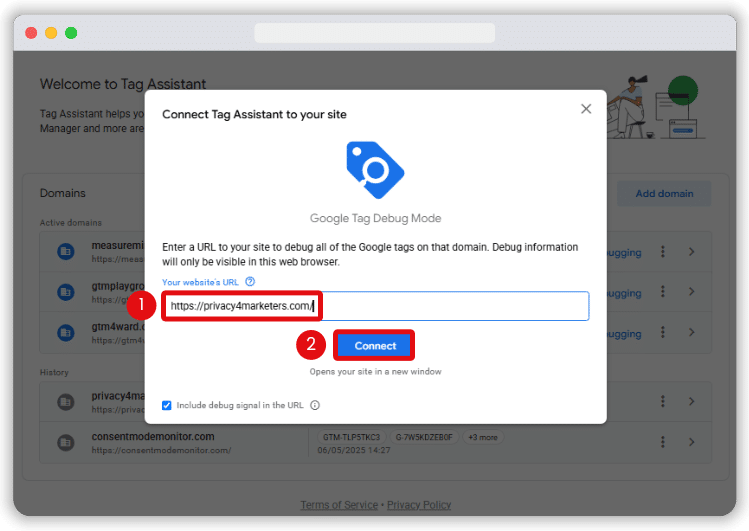
Enter your website URL and select Connect to activate the GTM preview.
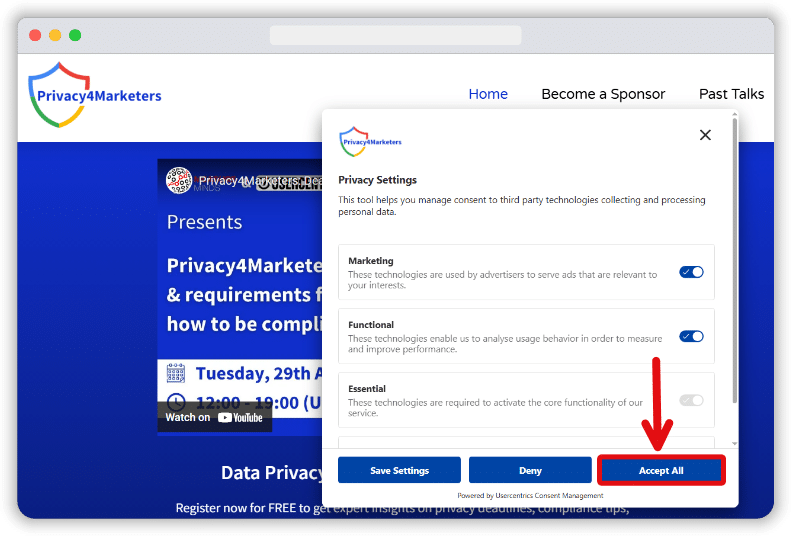
If you’ve set up your CMP correctly, then your website’s cookie banner will load now. Once it loads, accept all cookies.
Sometimes, if your GTM container or Google tag was blocked by your browser initially, Tag Assistant should now successfully connect.
Step 3: Verify default consent
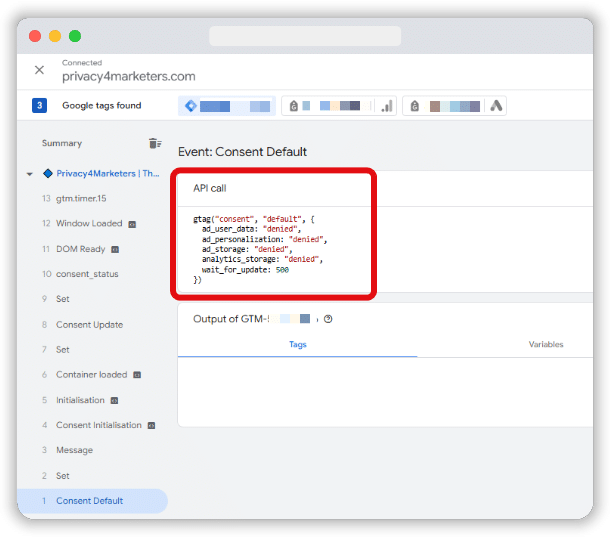
In Tag Assistant, select the earliest Consent event from the Summary column. In this case, it’s the Consent Default event.
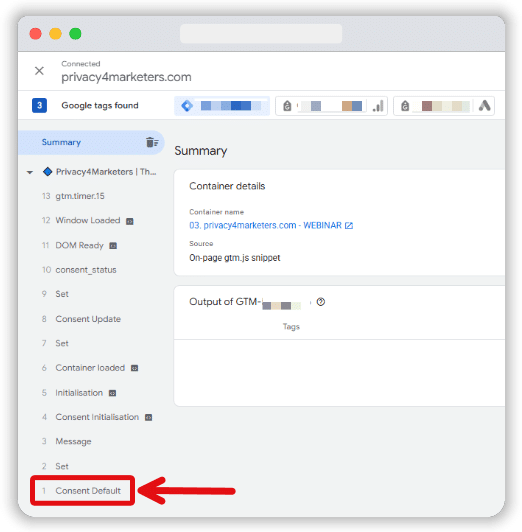
Within the API call section, confirm the following parameters are set to ‘denied‘:
- ad_storage
- ad_personalization
- ad_user_data
- analytics_storage
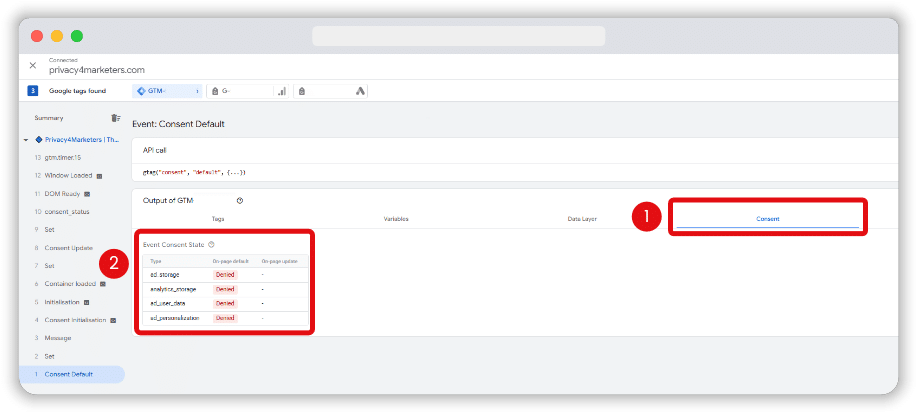
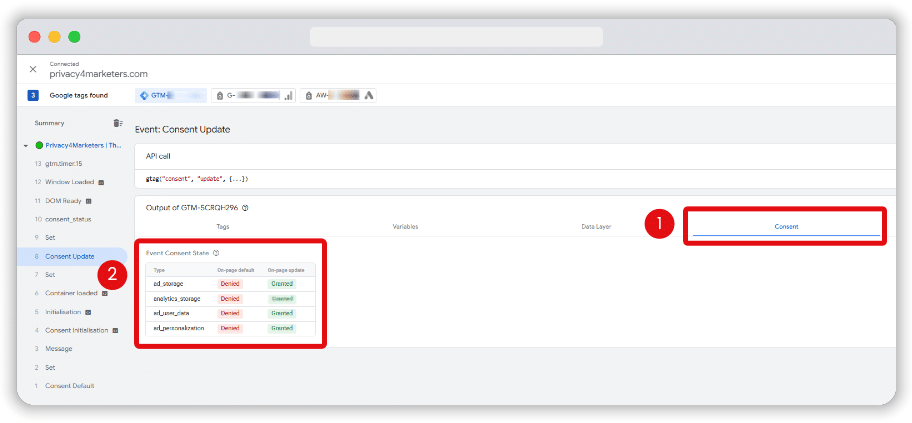
Alternatively, navigate to the Output section of your tag, select the Consent tab, and inspect the consent status under the On-page default column of the Event Consent State table.
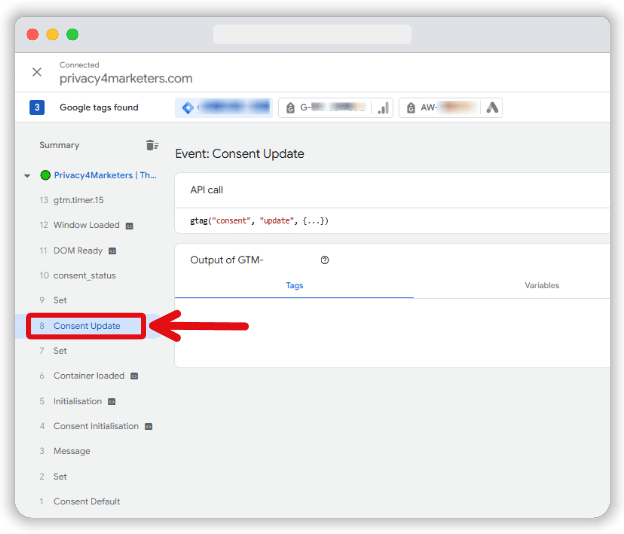
In Tag Assistant’s Summary tab, pick the most recent Consent event. In this example, it’s the Consent Update event.
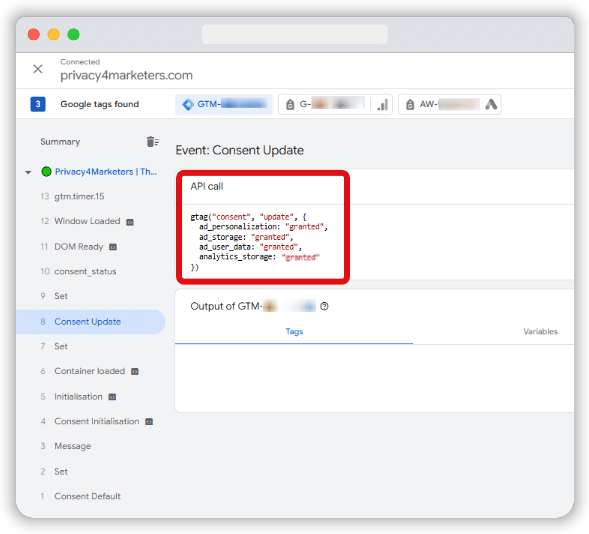
Again, review the API call section to confirm that consent statuses (ad_storage, ad_personalization, ad_user_data, analytics_storage) are now shown as “granted,” reflecting your cookie banner selections.
You can also verify these updates in the Consent tab of the tag output section, under the On-page update column of the Event Consent State table.
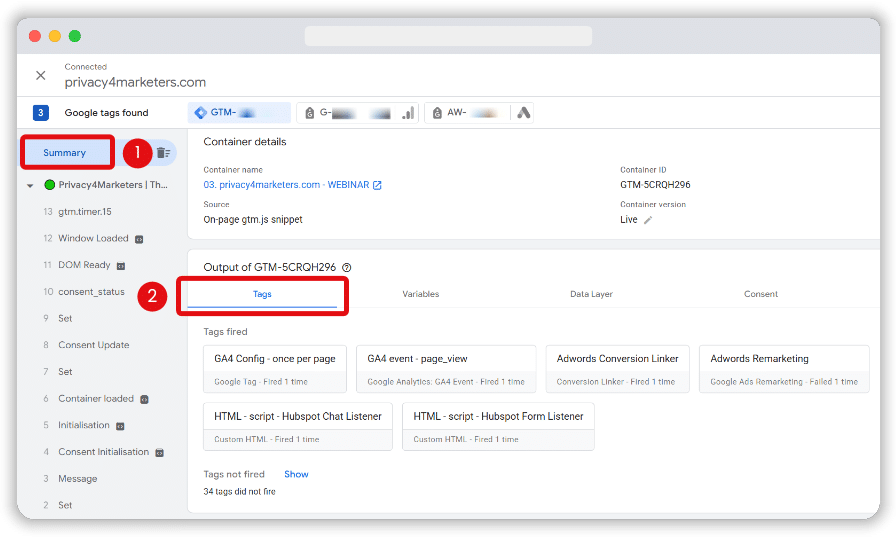
Step 5: Validate tag behavior based on consent
Within the Summary tab, select the Tags option. Click on each tag that has been fired to determine whether it was fired according to the correct consent state.
If any issues arise during these checks, further investigate your GTM and CMP setup to avoid common consent mode mistakes.
Review default consent settings using browsers
If you’re using a Consent Management Platform (CMP) via a GTM template, default consent states aren’t directly viewable in the data layer. Instead, GTM stores them internally. To review these settings accurately, use your browser’s console.
Open your website, but do not initially interact with the cookie consent banner. Access the browser’s developer console (usually by pressing F12 or right-clicking and selecting “Inspect“). Then, paste the following JavaScript snippet designed for retrieving consent states.
(function showConsentStates() {
  // Header for your snippet
  console.log(
    "%cCode Snippet from MeasureMinds Group",
    "font-weight: bold; font-size: 1rem;"
  );

  // Safely grab the consent entries
  const entries = window.google_tag_data?.ics?.entries;
  if (!entries) {
    console.warn("No Consent Mode data available");
    return;
  }

  // Helpers to map boolean/undefined to labels and styles
  const labelFor = v =>
    v === undefined ? "" : v ? "granted" : "denied";
  const styleFor = label =>
    label === "granted" ? "color: #0C0" : label === "denied" ? "color: #C00" : "";

  console.log("%cConsent Mode settings:", "font-size: 1rem;");

  let foundDefault = false;

  Object.entries(entries).forEach(([key, vals]) => {
    const defLabel = labelFor(vals.default);
    const updLabel = labelFor(vals.update);

    if (!defLabel && !updLabel) return;

    // Track if at least one default state was printed
    if (defLabel) foundDefault = true;

    // Build the format string and style array dynamically
    let fmt = `\t${key}:`;
    const styles = [];

    if (defLabel) {
      fmt += `\n\t\tDefault: %c${defLabel}%c`;
      styles.push(styleFor(defLabel), "");
    }
    if (updLabel) {
      fmt += `\n\t\tUpdate: %c${updLabel}%c`;
      styles.push(styleFor(updLabel), "");
    }

    console.log(fmt, ...styles);
  });

  if (!foundDefault) {
    console.log("No default Consent settings found");
  }
})();
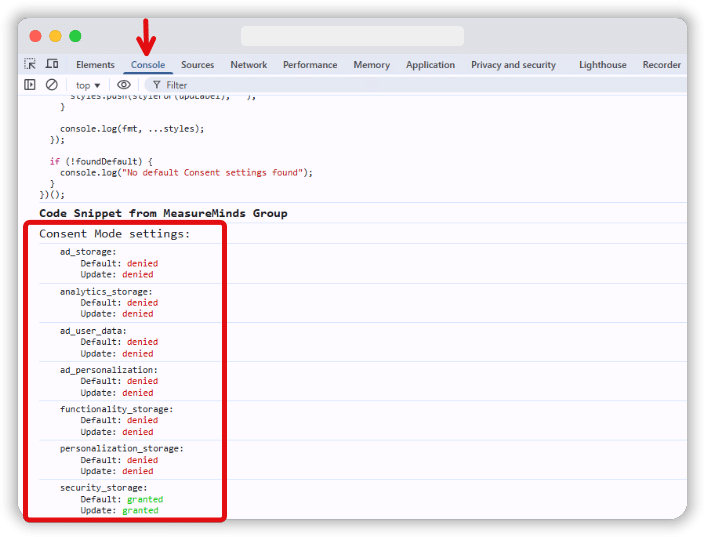
Execute the above code snippet by pressing Enter on your keyboard. Then, verify the results by checking whether all the default consent settings appear as “denied“.
Next, interact with the cookie banner, accept all consents, and repeat the previous steps. Paste and rerun the JavaScript snippet in the console. The updated consent settings should now reflect the “granted” status if the consent mode was correctly configured.
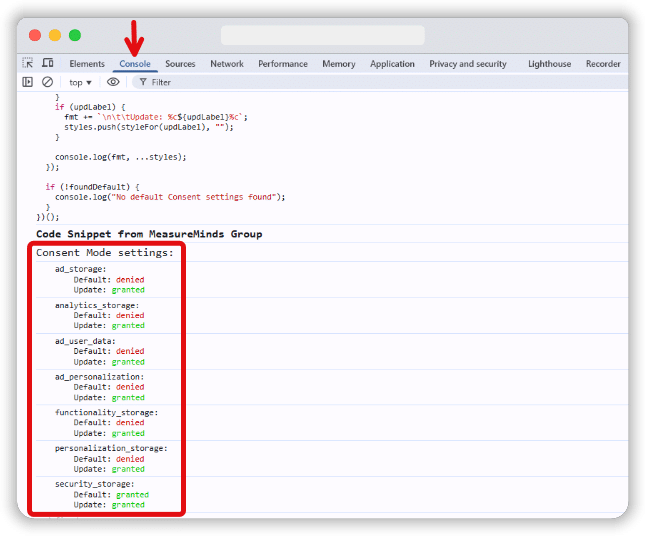
This process confirms that your Consent Mode settings accurately reflect user interactions as configured in your Google Tag Manager setup.
Verify consent states in the dataLayer
Another reliable method to inspect consent settings is by examining the dataLayer. Follow these steps to check the consent states from the data layer:
- Open your website, press F12, or right-click to select “Inspect” to open your browser’s developer console.
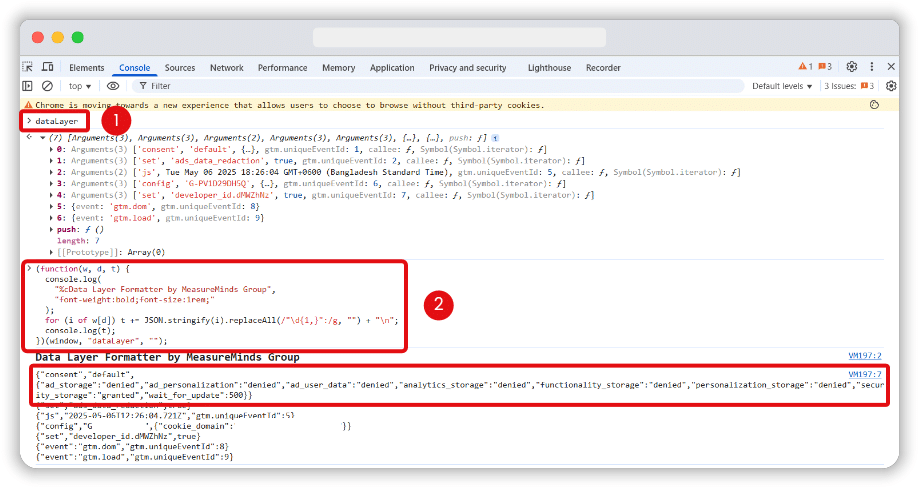
- Type and execute the command dataLayer directly in the console, or use a formatted JavaScript snippet for better readability.
(function(w, d, t) { console.log( "%cData Layer Formatter by MeasureMinds Group", "font-weight:bold;font-size:1rem;" ); for (i of w[d]) t += JSON.stringify(i).replaceAll(/"\d{1,}":/g, "") + "\n"; console.log(t); })(window, "dataLayer", ""); - Initially, you should observe that all consent states (ad_storage, ad_personalization, ad_user_data, analytics_storage) appear as denied by default.
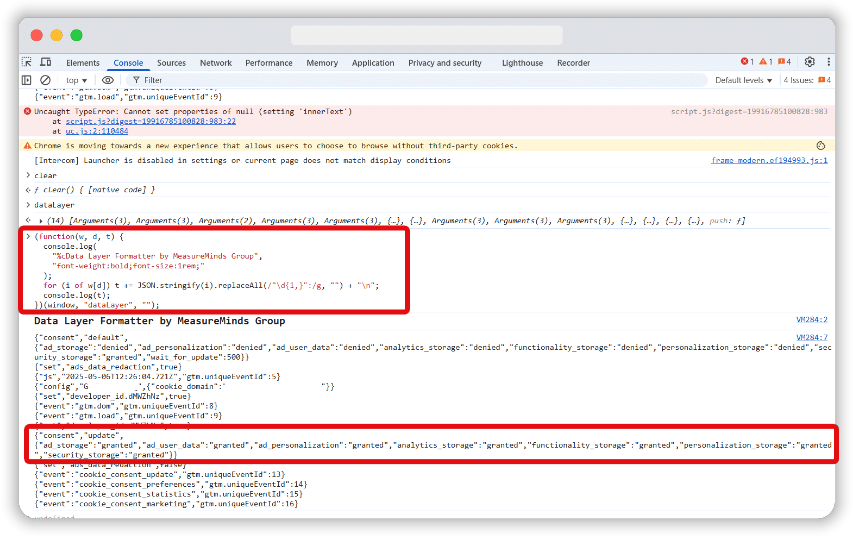
Now, grant all cookie consents via your cookie banner, then re-execute the dataLayer inspection process:
- Enter the same command or JavaScript snippet again.
- You should now see updated consent states reflecting your updated permissions as granted.
This verification helps ensure your consent mode setup appropriately responds to user preferences, maintaining compliance with privacy regulations.
Need a CMP first?
If you haven’t picked a CMP yet, we’ve arranged a 40% discount on Cookiebot CMP, which is perfect for bringing your site in line with all the global privacy regulations.
Next step: run your site through Consent Mode Monitor, apply any fixes, and enjoy a compliant user tracking setup that respects your visitors from the very first page view.

- How to Run a Google Tag Manager (GTM) Audit - 26/11/2025
- How to Run a Web Analytics Audit: Examples & Tools - 30/10/2025
- How to Run a Cookie Audit: Examples and Tools - 23/10/2025