How to Run a Web Analytics Audit: Examples & Tools

Data-driven decision-making must be built on actionable insights. That’s why it’s important to carry out regular web analytics audits. Wondering where to start? Read on…
Best practices for running a web analytics audit
In this guide, we’ll focus on running a Google Analytics audit, as this is the most popular digital analytics solution.
Understand your needs
What are your website analytics goals? Answering this question is key to an effective web analytics audit. It’s not realistic to track everything, as your team will struggle to keep up and your website performance might be affected.
Instead, focus on the insights that matter to you and align with your overall business objectives. For example, you might focus on user experience tracking if you’re looking to improve customer satisfaction.
Ultimately, data collection should be about finding the effectiveness of your marketing activities & whether you’re targeting the right audience over time. It isn’t wise to collect too much data. Equally, though, if you collect too little, you’ll struggle to get the insights you need.
Focus on quantitative and qualitative data
There are two crucial forms of data that you’ll want to collect from web analytics. Both reveal different insights about how users interact with your site.
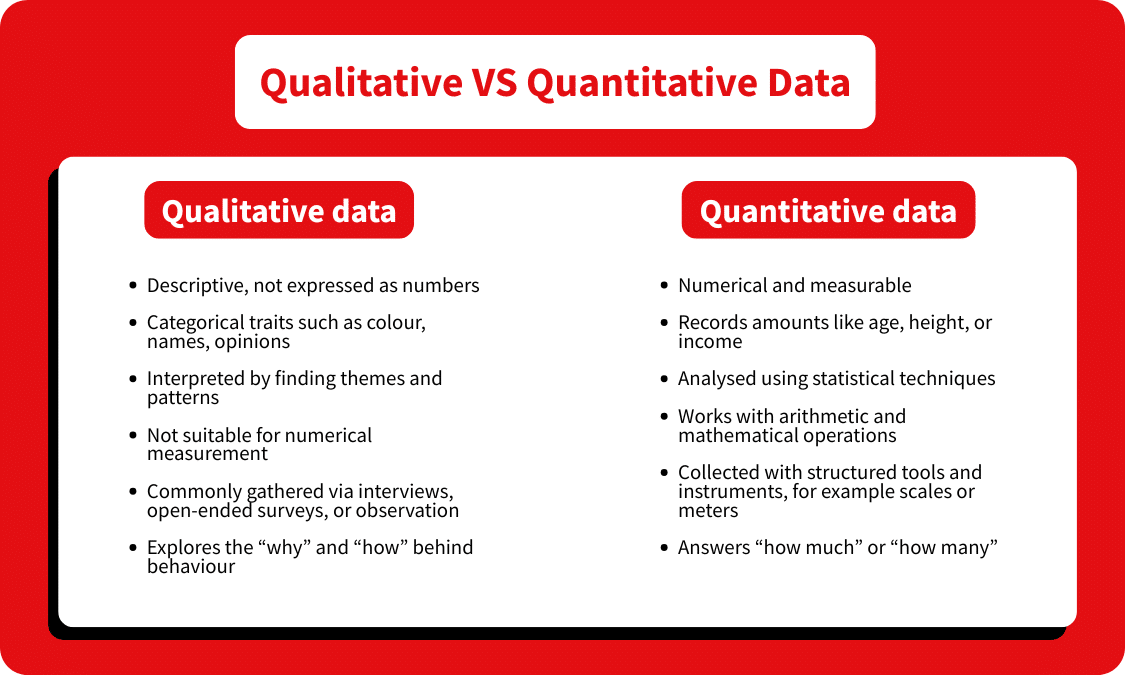
Quantitative data is measured using numbers. This includes your conversion rate, session count, and bounce rate. This form of data is crucial for benchmarking and tracking improvements over time.
Qualitative data helps answer why users behave in the way they do. Each time you receive customer feedback, for instance, you’re gathering qualitative data. This data helps clarify what your customers expect from your site’s user experience.
Together, these data sources complement each other. For instance, quantitative data might show that the bounce rate is high on a particular page. A qualitative data source, such as a session recording, could show that users struggle to click certain elements on the page.
To get a complete picture. It’s essential to ensure your web analytics audit accounts for quantitative and qualitative data equally.
Check that the tracking code is implemented correctly
Tools such as Google Analytics use a JavaScript tracking script. If code is added incorrectly or not being triggered, it will damage data reliability.
Even if the tracking code was deployed correctly initially, there’s a chance it could have been damaged since then. Tool updates and mistakes made during website edits can damage your Google Analytics setup.
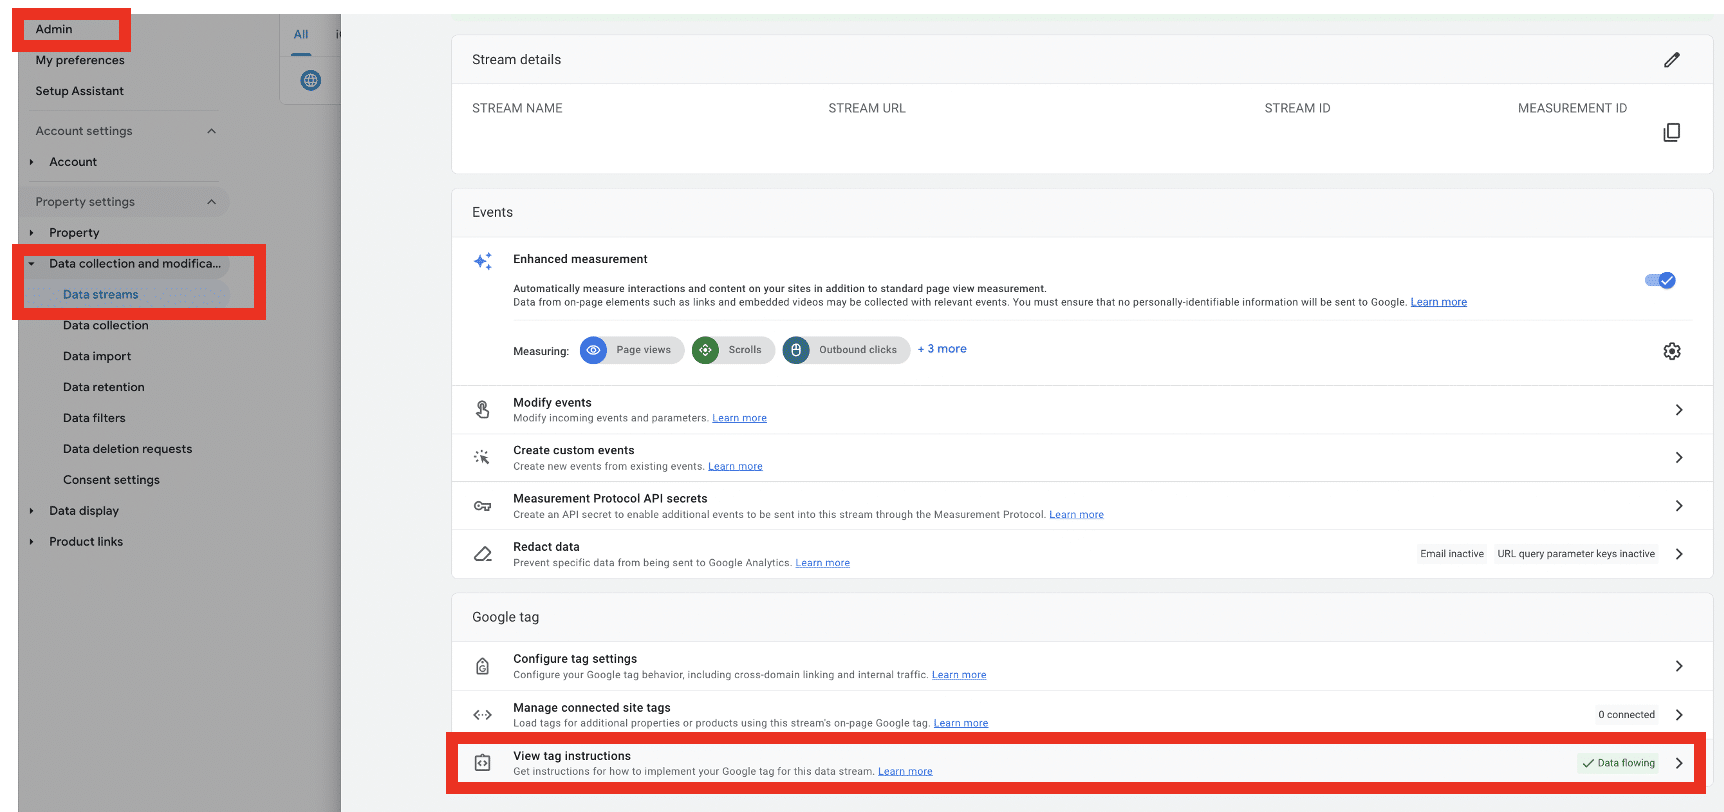
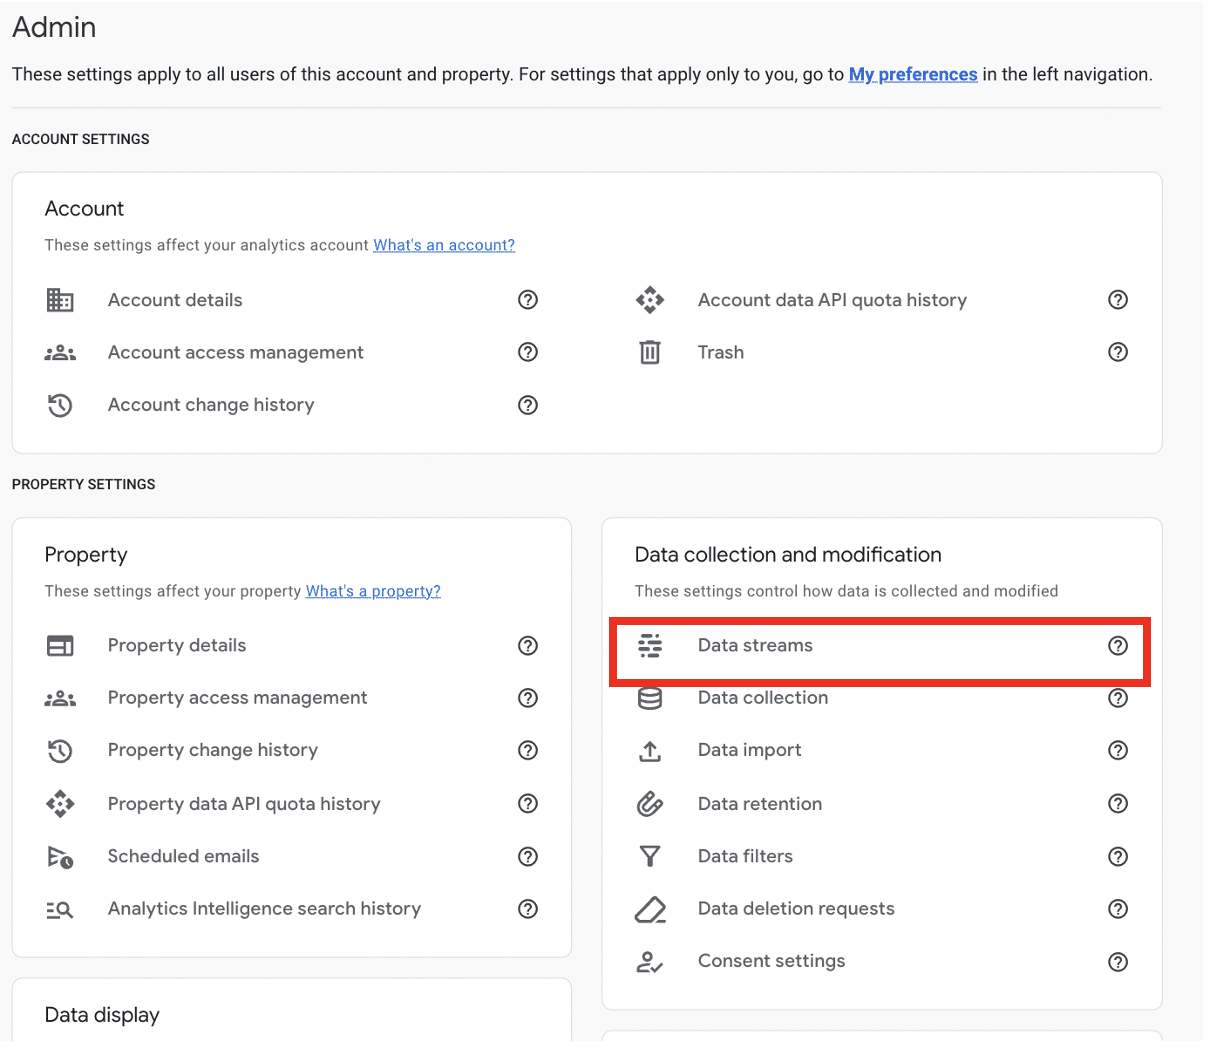
To verify that data is being appropriately collected in Google Analytics, head to your ‘Admin’ tab. From there, choose data streams and select your GA4 property.
Lastly, choose ‘View tag instructions.’ If JavaScript is set up correctly, you should see a message that reads ‘Data Flowing.’ If data isn’t being collected, you’ll need to reapply your JavaScript code.
Ensure a steady flow of real-time data
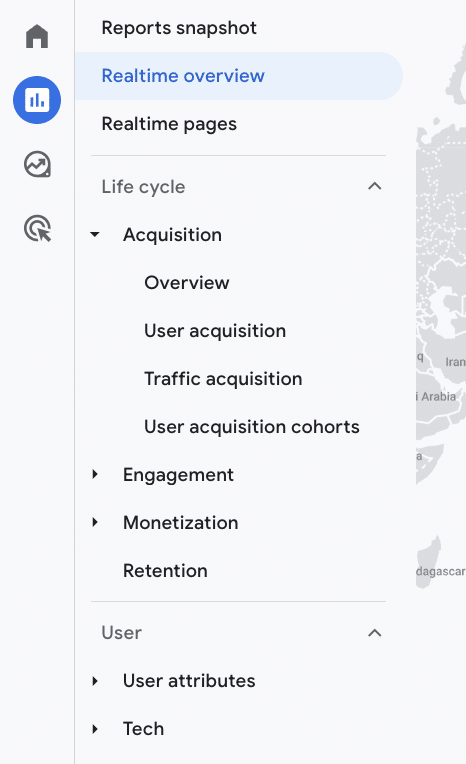
One of the best features of GA4 is that it can deliver data as soon as user interactions are recorded on your site. Part of your web analytics audit should be making sure you’re collecting real-time data correctly.
To find your real-time report, choose Reports>Real-time overview. From here, you’ll be able to track any session recorded in the last 30 minutes. Just open your site in a new tab and check if your session is recorded.
If no data comes through, there’s likely an error with your analytics implementation.
Note: It’s best to stick to one method when implementing GA4. A mixture of methods is likely to lead to errors. The most straightforward option is to connect Google Tag Manager and Google Analytics.
Monitor diagnostic notices
GA4 provides regular diagnostic notices to alert users to potential tracking issues. They’re easy to miss, as you’ll need to click the bell icon in the top right of your screen to view them. These notices can be extremely useful and draw your attention to various issues. These include:
- Notifying whether the tracking code is found on all your pages, and whether the code is configured correctly.
- Notifying if e-commerce data is being logged as it should be.
- Drawing your attention to configuration anomalies.
- Alerting you if you’re exceeding your data limits.
Check your industry category
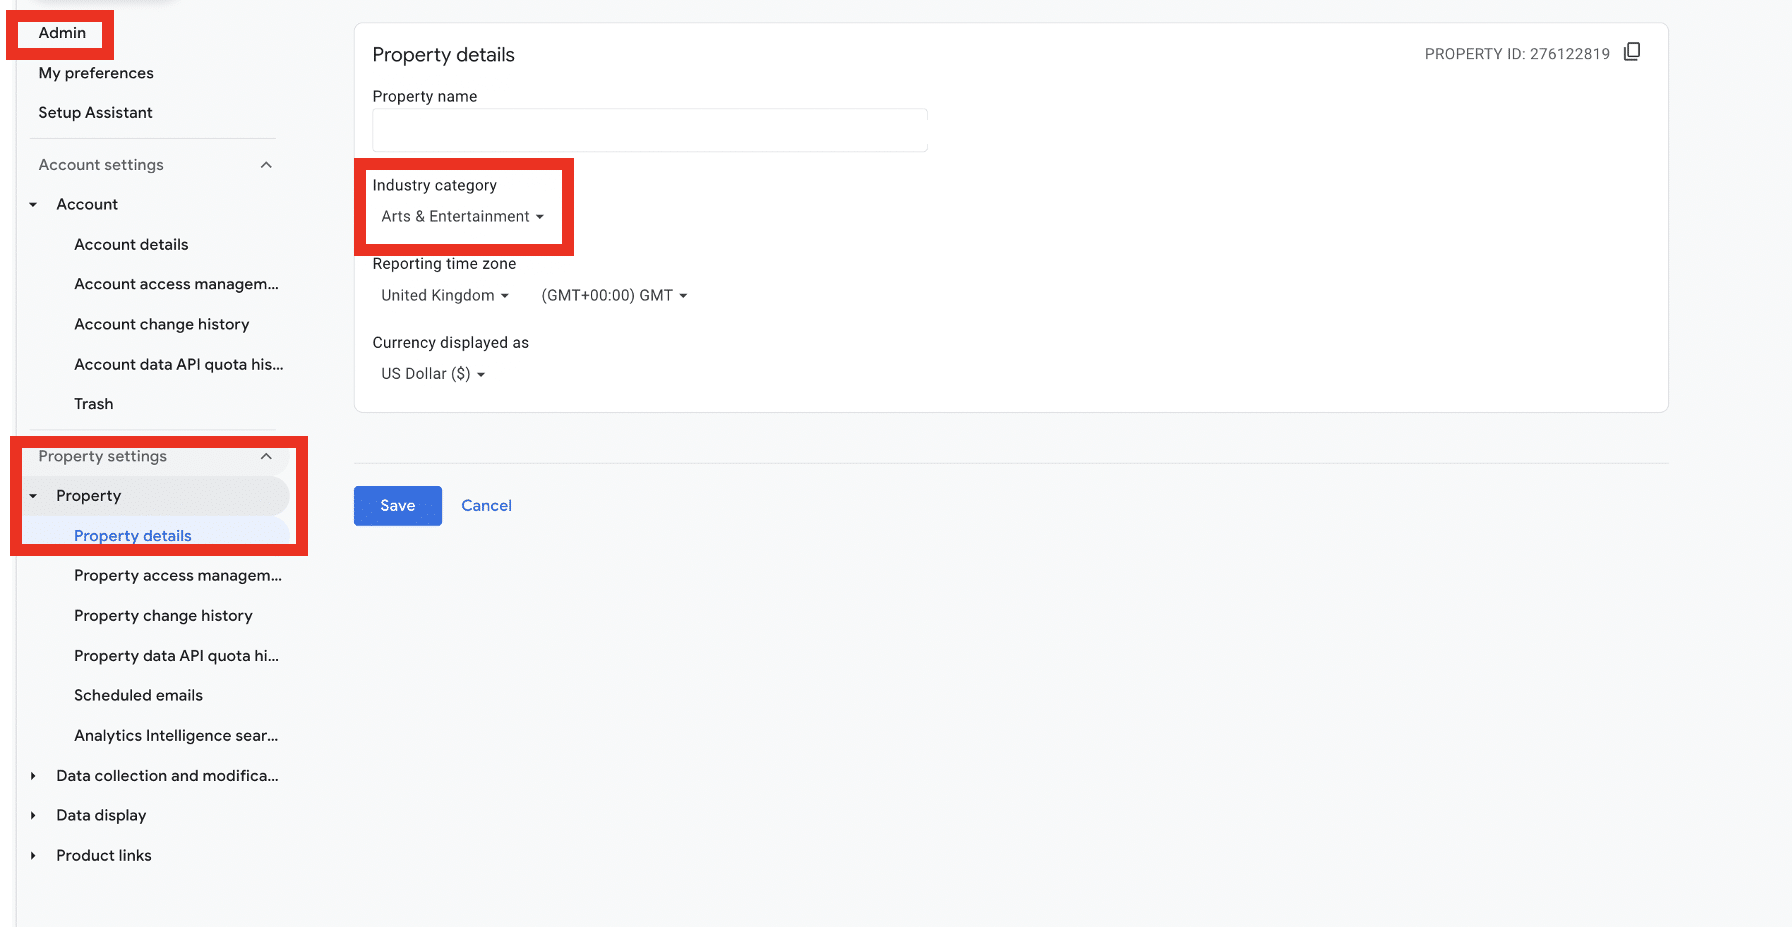
In GA4, you can set a category that aligns with your industry. This is a handy feature that enables you to create audiences aligned with your business goals. Choosing an industry category also unlocks benchmarking, allowing you to compare your business performance against others in your industry.
Again, this is a feature that’s very easy to overlook, as it’s buried in your property’s settings. You can access this option by going to Admin > Property Details. From there, you can choose a category from the drop-down menu.
Review your data security
Data privacy is an ever-growing topic. To maintain customer trust, the data stored in your GA4 account must be kept secure. With new data privacy regulations constantly arriving, any errors can have costly consequences.
Consider how you control access to different levels of data. Data should only be accessible on a ‘need to know’ basis. The more people who have access to sensitive information, the larger the scope for errors and data leaks.
In GA4, you can easily control access to your data from the ‘Account access management’ tab. This can be found under Admin. From here, you can assign different permissions to different users.
Note: Pay particular care if you work with external agencies. When you stop working together, third parties will still have access to your data unless you revoke their access.
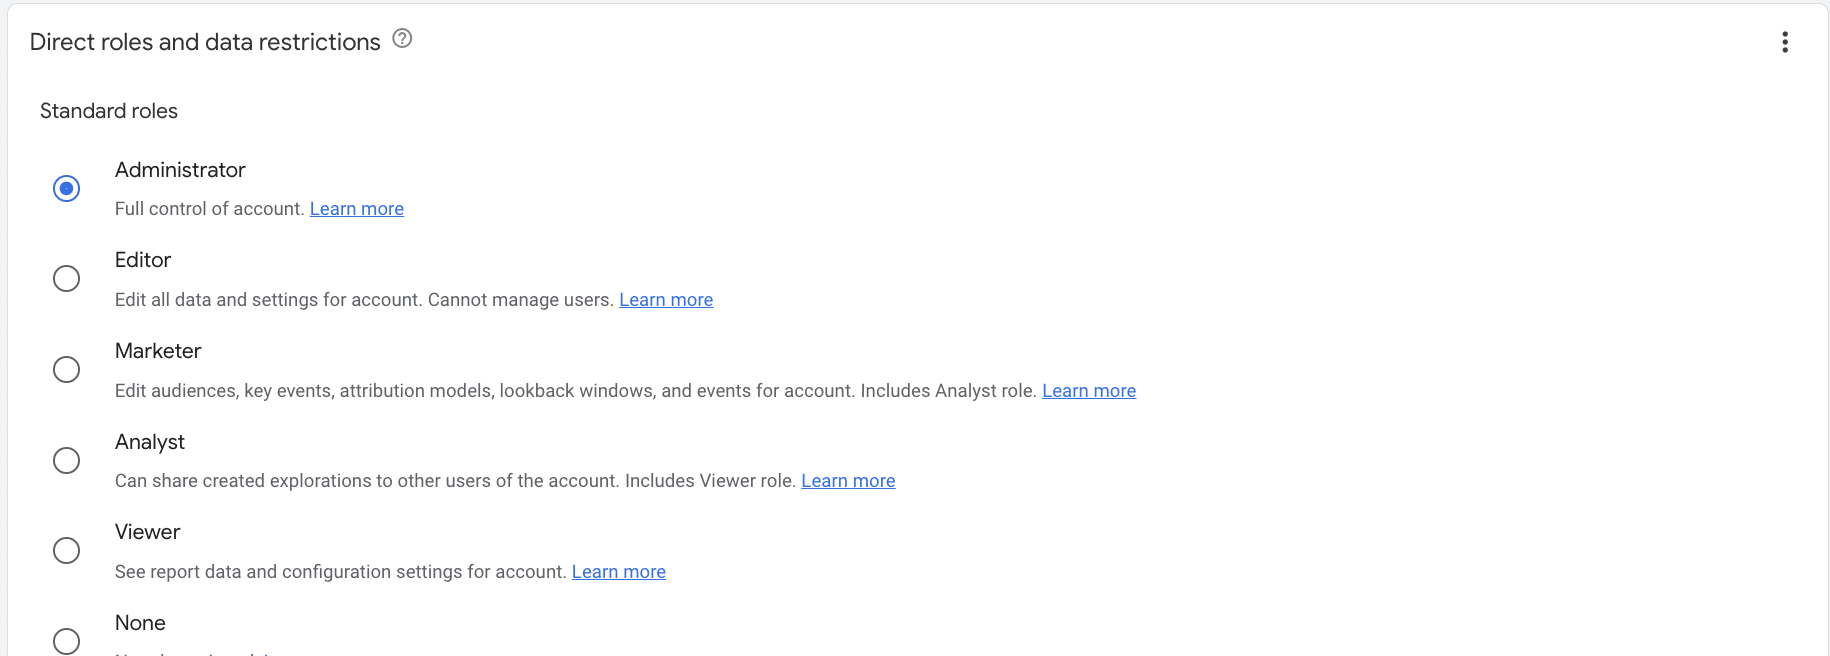
Permissions found in GA4
The table below lists the different permissions found within GA4:
| Role | Description |
|---|---|
| Administrator | Gives a user complete control over their analytics. They can manage users (add/delete users, assign any role or data restriction). They can also grant full permissions to any user, including themselves, for any account or property for which they have this role. The administrator role includes all the permissions of the editor role. |
| Editor | Gives users complete control over property-level settings. They cannot manage other users. The editor role includes all the permissions of the analyst role. |
| Marketer | Allows a user to create, edit, and delete audiences, events, and key events. They can also edit attribution-model settings. The marketer role has all the permissions of the analyst role. |
| Analyst | Enables users to share their explorations with other users of a property. Users of Google Analytics 360 can also request unsampled explorations. The analyst role contains all the permissions of the viewer role. |
| Viewer | A user can view settings and data and alter the data displayed in reports. They can also view shared assets via the user interface or the APIs. The viewer can also create, edit, and delete explorations. |
| None | A user has no access to the property. |
As mentioned, with so many active data privacy laws globally, cookie compliance should be a top priority. Here are some steps you can take during your web analytics audit to ensure compliance.
Make sure Consent Mode is active
Data privacy legislation is built around the concept of consent. You need to obtain a user’s permission before any data enters your web analytics tool. Gathering consent requires the use of external tools, such as a consent management platform.
Alongside these, you’ll need to activate a function within Google Tag Manager called Consent Mode. This gathers users’ consent choices from your CMP. It then adjusts tag behavior inline with these preferences before sending data to GA4.
To check if Consent Mode is implemented correctly, head to Admin>Property details>Data collection and modification> Consent Settings. If Consent Mode is working correctly, you’ll see a message that reads ‘All consent signals are active on this property.’
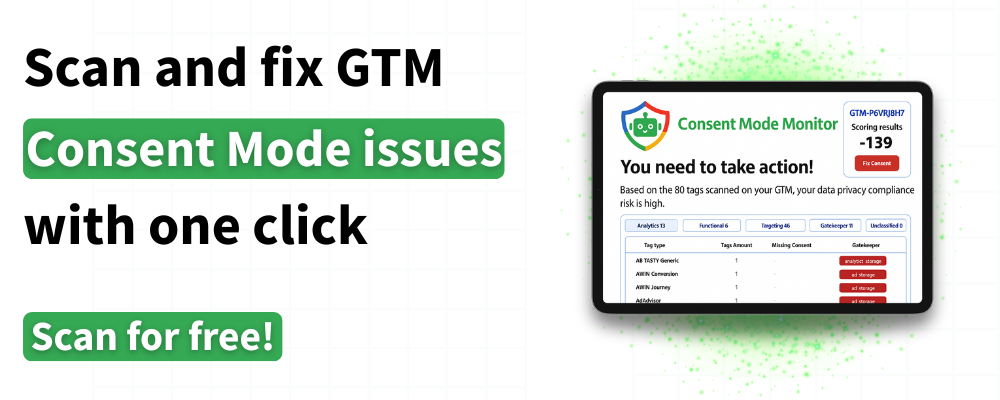
For extra security, you can also use our Consent Mode Monitor. This scans tags on your site to look for missing or incorrect consent. Once issues are identified, you can fix them in a single click. Best of all, it’s free to access.
Check for PII
Under legislation such as GDPR, it’s illegal for businesses to collect any personally identifiable information (PII). It’s also against Google’s terms of service. You might lose your account if you’re found to be collecting any PII.
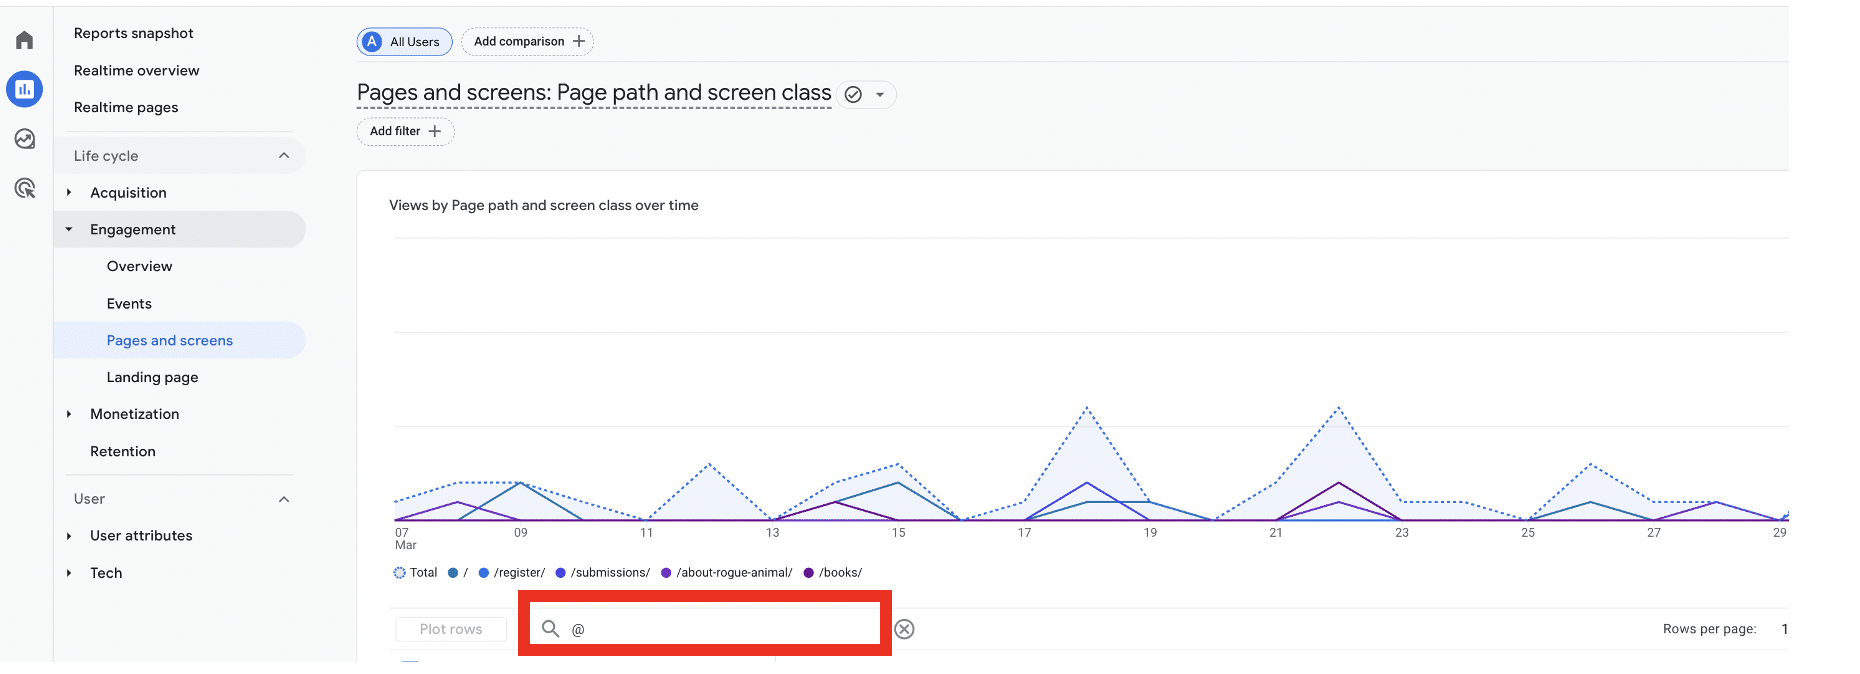
That’s why part of your data analytics audit should be making sure that no PII is sent to GA4. Head to your ‘Pages and screens’ report by choosing Reports>Engagement>Pages and screens.
Enter the ‘@’ symbol in the search bar above the table. This will reveal whether any email addresses have been accidentally collected in your GA reports.
You can also use regular expressions to identify PII. Copy and paste any of the regex from below and see if any PII is present.
.*?@.*
or
^\S+@\S+\.\S+$
If you do detect any PII in your Google Analytics reports, you’ll need to remove it as soon as possible. Here’s our guide on how to easily remove PII from GA.
Review your data retention settings
By default, GA4 retains data for 14 months. You can alter these settings, however, to suit your needs. It’s always helpful to have access to historical data for benchmarking. Consider extending this period to enable a richer data analysis.
Remember, under legislation such as GDPR, you can only retain data for as long as necessary. Make sure you consider the relevance of the data you hold and avoid setting overly lengthy retention settings.
Specify UTM tagging
Within Google Analytics, you have the option of setting up manual or automated tagging for your Google Ads campaigns. UTM parameters aren’t configured in GA4 but are appended to your marketing campaign URLs.
With manual tagging, manual campaigns are given priority when data enters your campaign. If you don’t specify a UTM tag, the value will be drawn from the automatic markup.
To view your UTM tagging data, head to your Traffic Acquisition reports in GA4. From here, you can break down website traffic by source, medium, and a variety of other options.
There’s no correct option here. Manual tagging provides more overall control over tracking specific content. Automatic tagging offers a broader overview of your overall campaigns. Consider your business’s unique needs before making a decision.
Check session timeouts
In GA4, each user journey is classed as a session. But if a user is inactive for more than 30 minutes during a session, it will time out. If they return and continue interacting after this time, customer journey analytics will classify this as a new session.
But this setting isn’t ideal for everyone. Let’s say your website contains long videos or podcasts. A user may appear inactive to Google while they’re actually watching/listening to content.
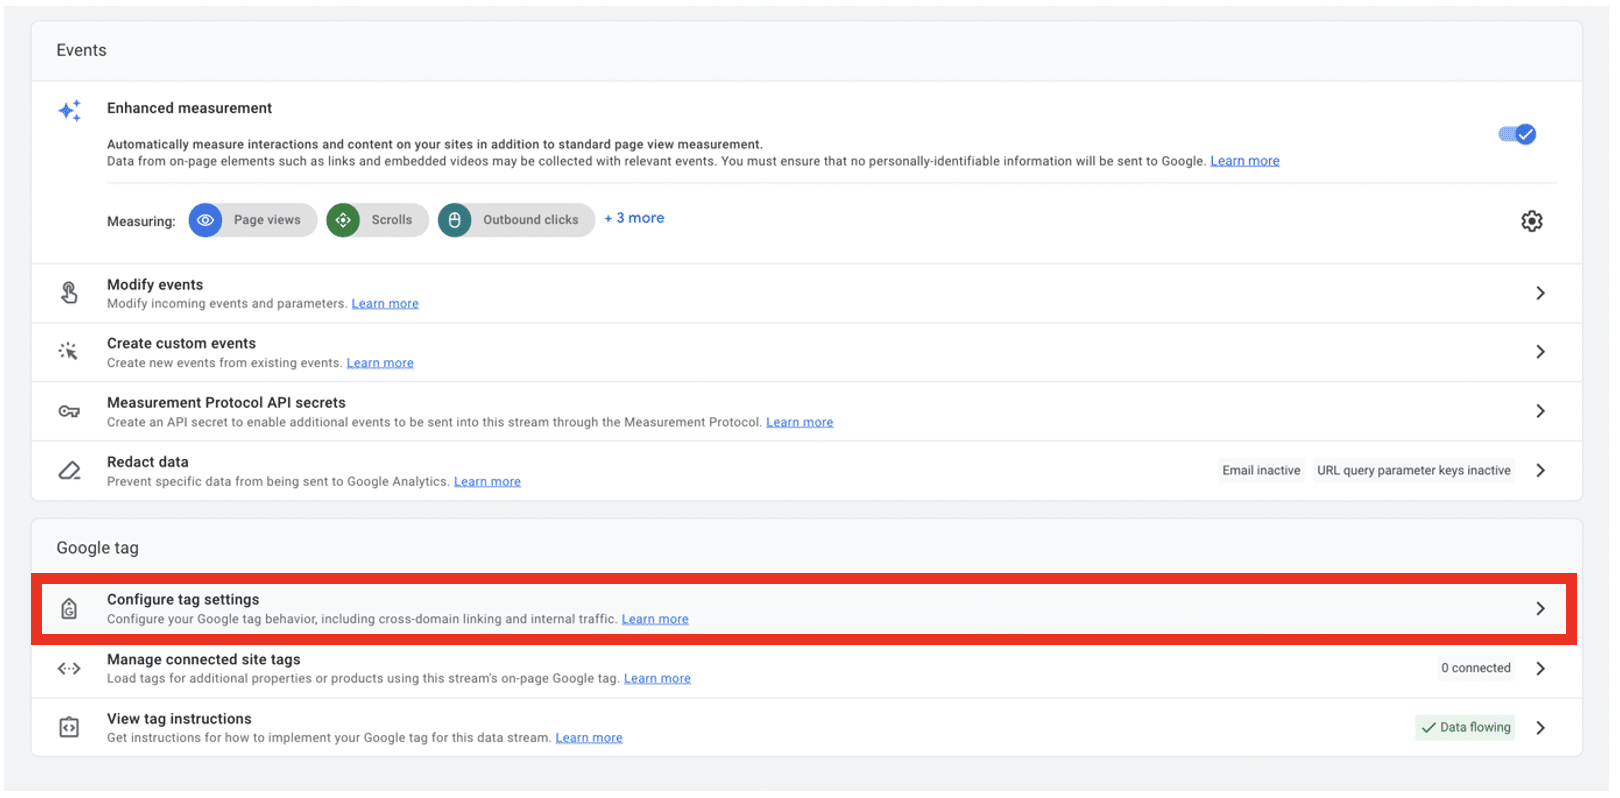
If the default session timeout doesn’t work for you, you have the option of changing it. From within GA4, head to Admin>Data Streams (found within the property column).
Now choose the relevant data stream, then select Configure tag settings from the next screen.
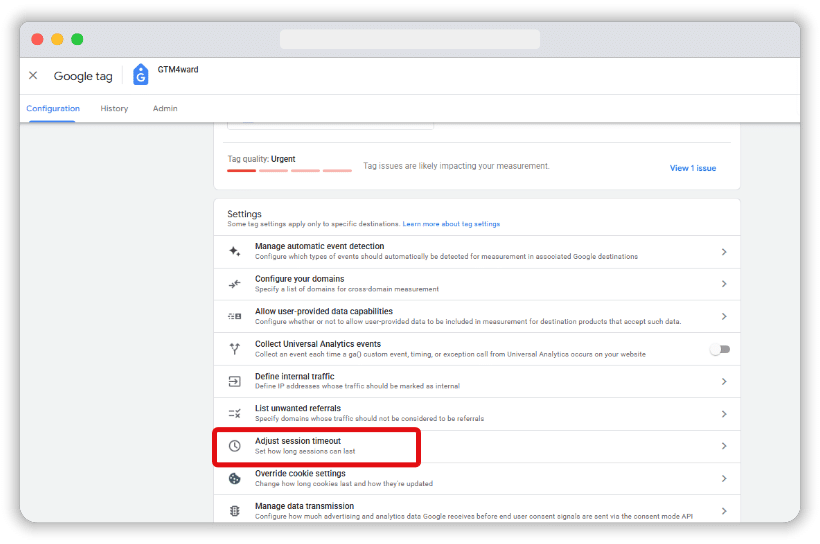
From the next window, click the Adjust session timeout option from the list of settings.
Then, in the next screen, adjust the session timeout from the default 30 minutes. The maximum timeout you can set is 7 hours and 55 minutes.
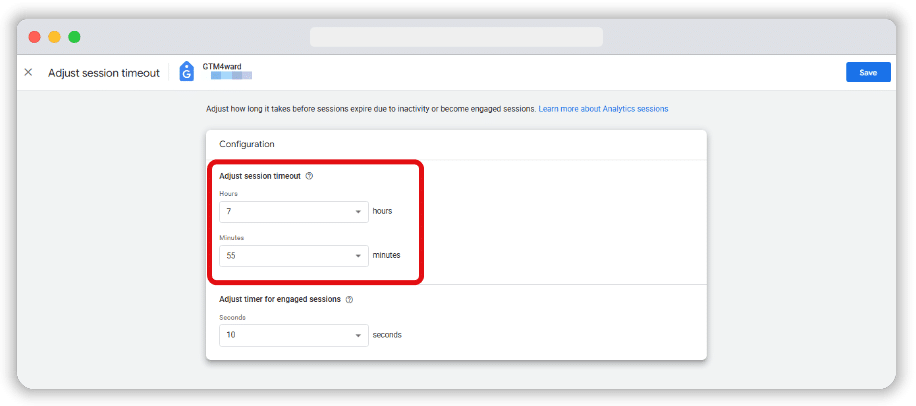
You can specify a timeout that better aligns with your needs. Again, consider your unique needs and set a limit that aligns with them.
Cut out employee traffic
The GA4 reporting view provides an overview of all your data sources. You can add filters to data from individual properties, enabling you to include and exclude certain traffic. It’s worth applying filters to traffic attributed to staff members to gain more accurate audience insights.
Two filters can help to achieve this. These are:
- Developer traffic – Excludes data from developers who utilising the debug mode.
- Internal traffic – Excludes data originating from specific IP addresses.
Note: Filters permanently alter data (although they don’t impact historical data). It’s important to test your filters before applying them to avoid making any mistakes.
Ensure that pages are tagged correctly
When pages aren’t tagged correctly, you’ll get missing or incomplete data. That’s why every web analytics audit should involve verifying your tagging setup.
Once again, we need to go to the Configure tag settings page. Choose Admin > Data collection and modification, then select your data stream. Then, choose Web Stream Details>Configure tag settings.
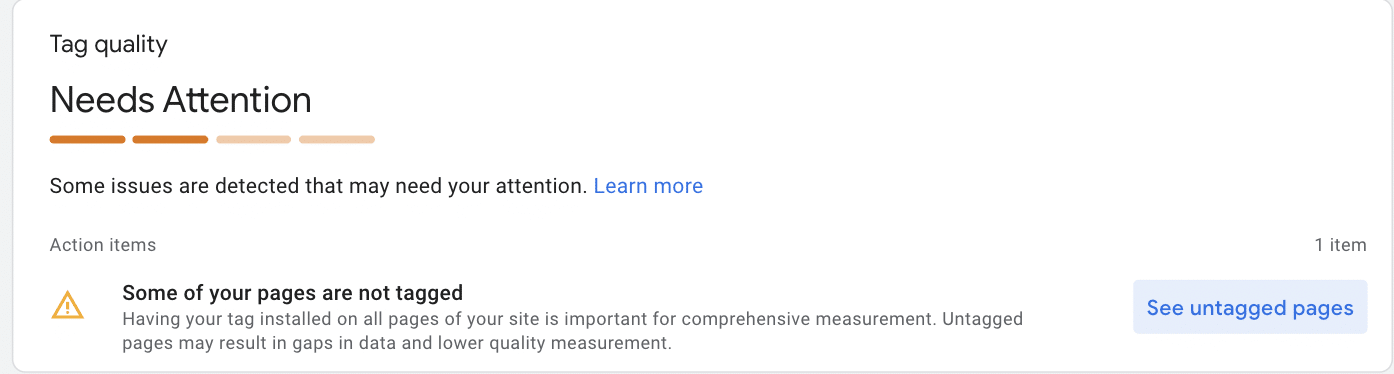
If there is a tagging issue, you will receive the error message listed below. By clicking ‘See untagged pages,’ you can get a list of all the pages that require your attention. Go through each entry on the list and review its tracking code. Head back to this page when you’re done to make sure that errors are corrected.
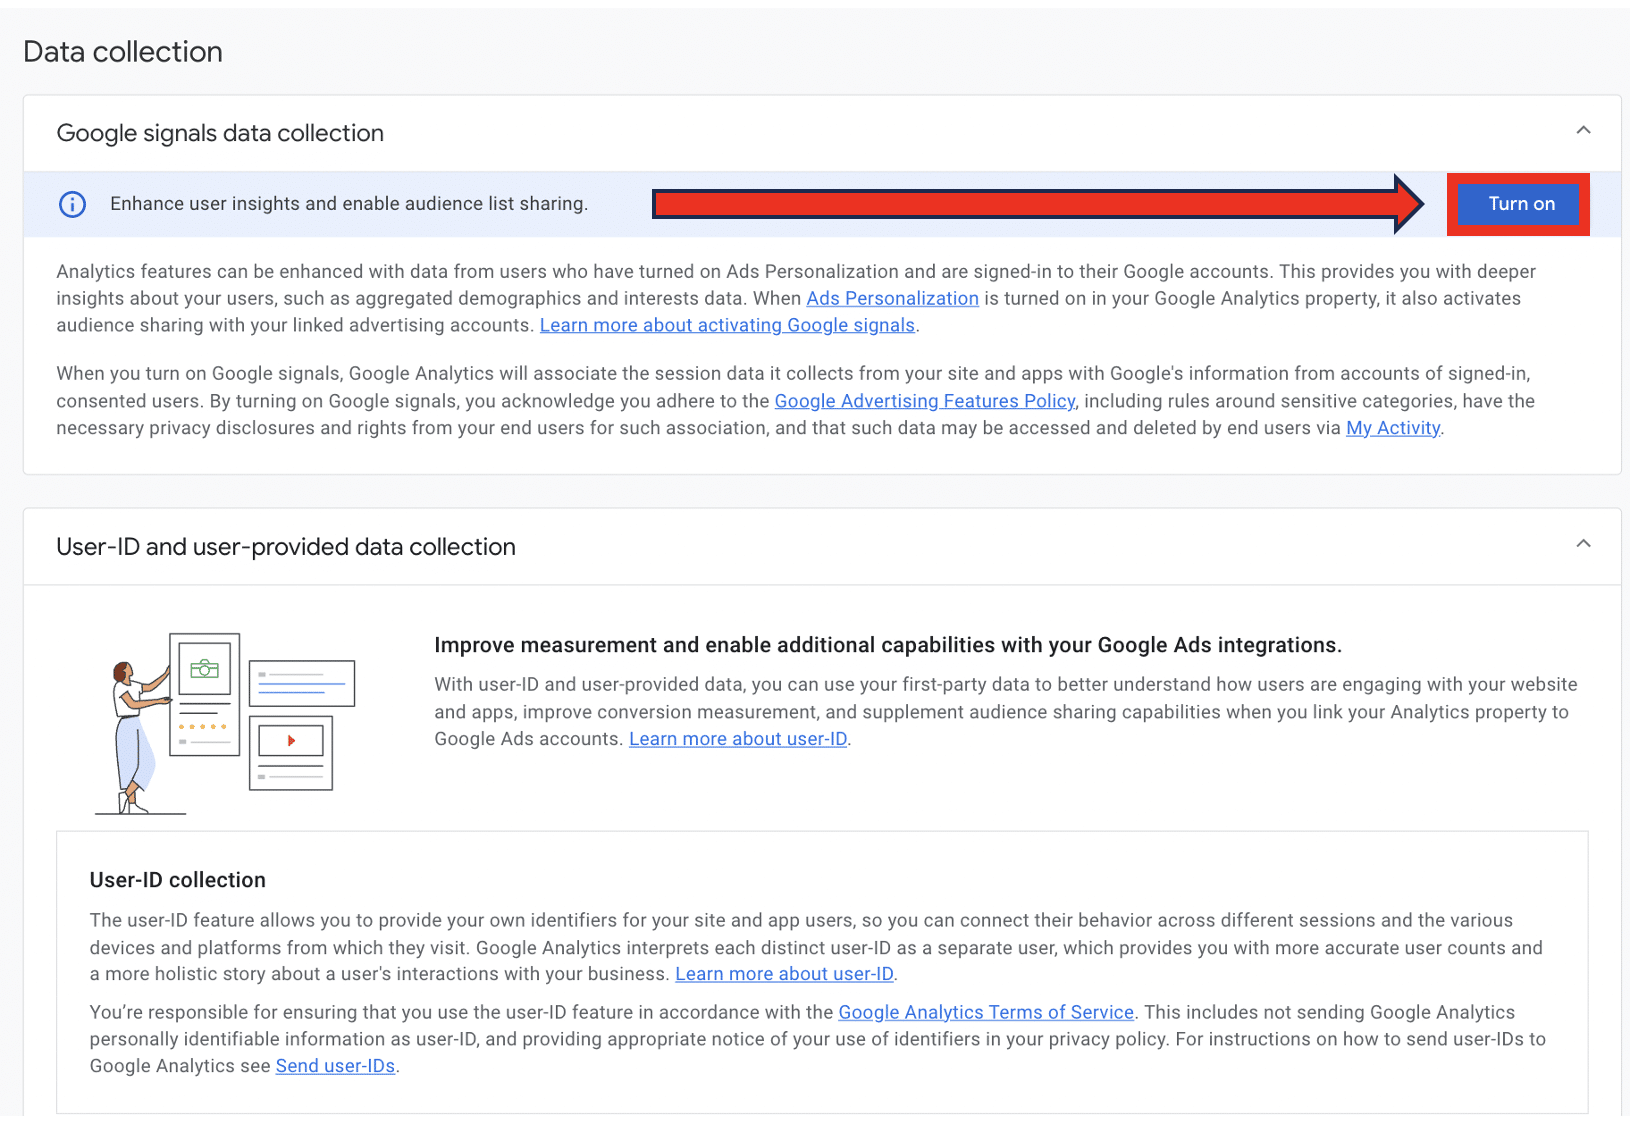
Activate/deactivate Google Signals
Google Signals is a handy feature that can enhance your web analytics data. It enables you to track users across devices who are signed in to their Google accounts. If a user visits your site using one device and returns using another, GA4 will recognise them. This provides a better picture of the different sorts of user journeys that take place on your site.
There’s a caveat, though. Despite anonymizing all user data, Google Signals is not compliant with legislation such as GDPR by default. You’ll need to take additional steps, such as gathering consent and explaining your Google Signals usage in your privacy and cookie policies. If you haven’t yet taken those steps, you’ll need to disable Google Signals.
To activate or deactivate Google Signals, go to Admin>Data collection and modification>Data collection and choose ‘Turn on/off’ under ‘Google signals data collection.’
Why is a Web Analytics audit important?
Analytics data provides lots of benefits. It can help you get to know your website users inside out. You can understand their pain points, preferences, and general behaviors. This enables you to deliver the personalized experiences your audience expects.
With stronger audience knowledge, you can make smarter business decisions. You’ll carry out more targeted marketing and create better products and services.
But to make these data-driven decisions, you first need to make sure that your data is accurate. Errors can lead to costly mistakes. That’s why it’s crucial to verify the accuracy of your data.
An audit helps you to gain complete visibility over your web analytics setup. You can spot errors, inefficiencies, and make sure you’re getting the most out of your data.
What types of analytics tools are available?
There are many different tools designed to record and measure user behavior on your site. Here are some different types of popular analytics tools you might use in your audit.
- Web analytics tools – These tools provide detailed reports about user activity on your website. The most popular analytics option is to use Google Analytics, but alternatives include Adobe Analytics or Clicky.
- Subscription analytics – Designed to track subscription key performance indicators, such as Monthly Recurring Revenue (MRR), Churn Rate.
- Ecommerce tracking – Platforms such as Spotify and WooCommerce come with built-in analytics capabilities to track the success of your store.
- Behavior analytics – Focus on monitoring user journeys on your site. They utilise heat maps and session recording to provide qualitative data.
Start your audit today
Don’t leave it chance – low data quality can damage your business. Regular web analytics audits can help provide a health check. You start tracking issues before they leave a mark. So, why not get started? Go through our list one by one to ensure a comprehensive audit.
Want expert help? MeasureMinds has assisted world-renowned clients in getting the most out of their data. Book a free audit today!