How to Setup Google Consent Mode in WordPress
As a business owner, you should be aware of just how important data privacy is. Across the world, new data regulations are cropping up, such as the EU user consent policy, forcing organisations to re-evaluate how they collect, manage, and use data.
If your business uses WordPress, Google Consent Mode helps to make achieving compliance a breeze. But it’s important to understand how to set up and configure Consent Mode WordPress properly.
What is Consent Mode WordPress?
Google Consent Mode is Google’s solution to keeping businesses within global privacy laws. Legislation such as GDPR requires businesses to gather user consent before collecting personal data. Consent Mode ensures that tags on your website honour users’ consent choices.
Consent Mode works by interacting with your website’s Consent Management Platform (CMP). Your CMP collects consent responses and sends signals to Consent Mode.
Consent mode alone isn’t enough to be compliant, it’s important to make sure you have a CMP set up first.
What’s new in Google Consent Mode V2?
Recently, Google introduced Consent Mode V2 in response to the EU’s Digital Market Act (DMA). While V2 is similar to the original version, it does include two new fields:
- ad_personlization= allow downstream remarketing usage.
- ad_user_data= allows email or mobile numbers in downstream usage.
Google Consent Mode WordPress must be implemented properly, so it’s always best to double-check.. If you’re unsure about your implementation, you can use our Consent Mode Monitor to scan your GTM setup and list tags that are missing or set up incorrectly.
Why WordPress users should use Consent Mode
Consent Mode is an important tool for WordPress users. But why should you utilise this tool? Here are some of the top advantages of using Consent Mode WordPress:
- Ensuring compliance – The biggest reason that WordPress websites should use Consent Mode is to make sure their website is compliant. When used alongside other tools such as a CMP, Consent Mode can help you avoid costly fines.
- Maintain data flow – Without a consent solution, you’d be unable to legally collect user data. Consent Mode helps make sure you can continue collecting high-quality data in a compliant way.
- Consent Mode Modelling – Users who reject consent on your website can lead to data gaps. Consent Mode Modelling bridges the gap, using data from consenting users to upscale and maintain the data flow.
- Strong user experiences – Website owners want to create the best user experiences for their users. To do that, it helps to be able to visualise user journeys and understand what’s impacting your site’s user experience.
Setting up Google Consent Mode in WordPress
With data privacy becoming increasingly important, there’s never been a better time to set up Google Consent Mode in WordPress. Doing so can be quick and painless, saving you from the legal headaches of failing to be compliant.
Find a consent management platform
To use Consent Mode, you need to set up a consent management platform. It’s recommended that you use a Google CMP partner for this process. For this example, weuse Cookiebot, but there are many other options available.
If you’re looking for a Google CMP, follow this link for an exclusive 20% discount on your subscription.
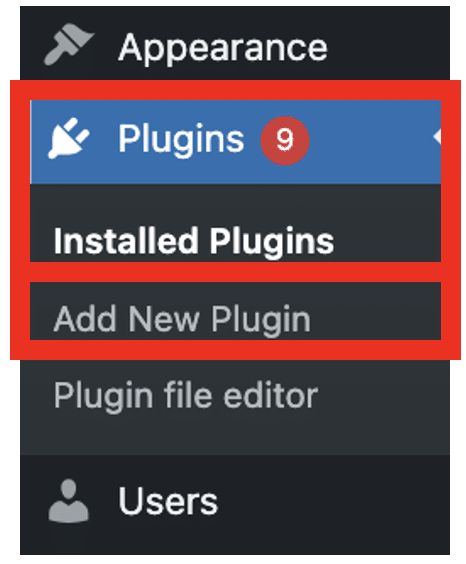
Step 1
To implement Consent Mode with Cookiebot CMP, you’ll need to set up the Cookiebot plugin on your WordPress site. To do so, go to the toolbar on the left of your dashboard and select ‘Plugins’. From the dropdown menu, choose ‘Add New Plugin’.
Step 2
Search ‘Cookiebot’ within the search bar. The plugin should be the first result that shows up. Select ‘Install Now’. Once installed choose ‘Activate’.

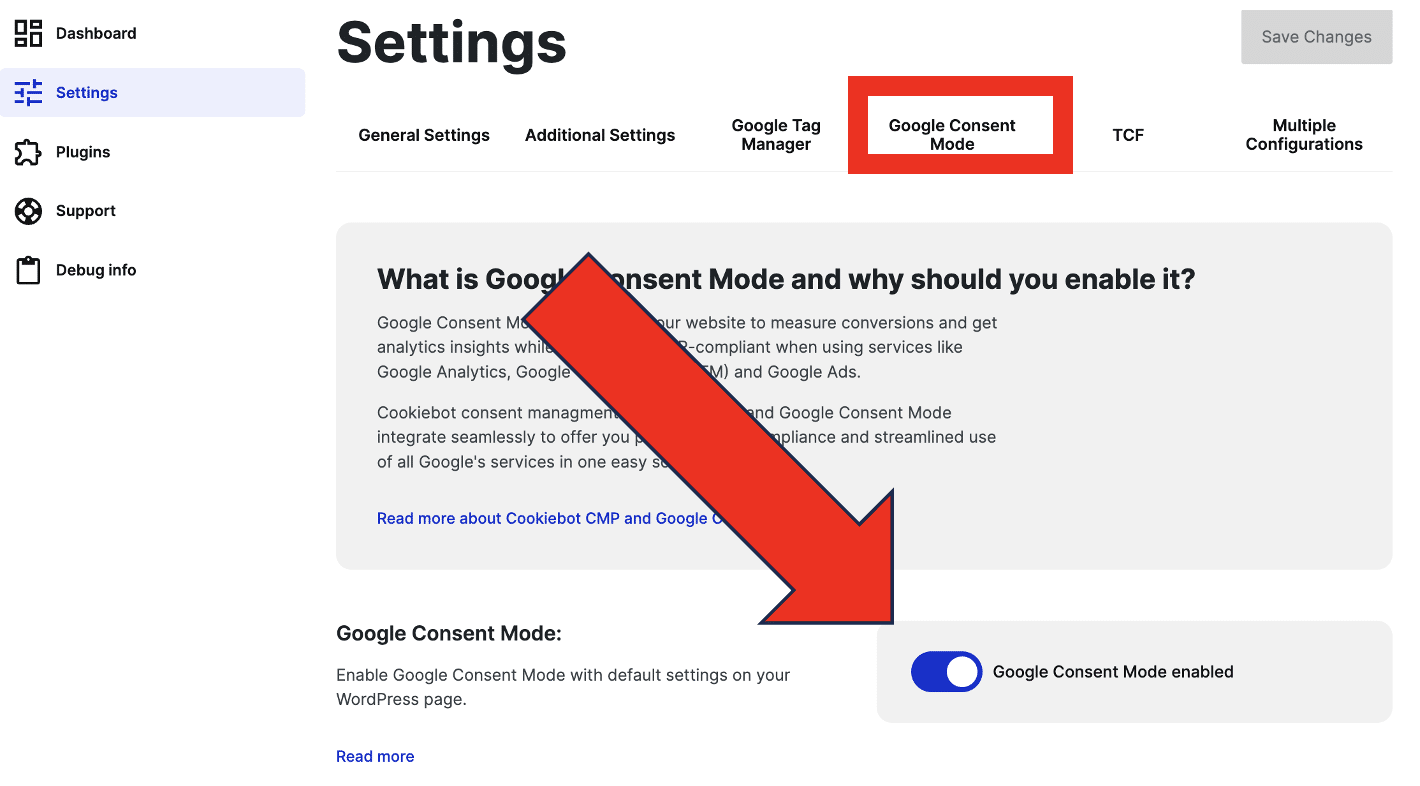
Step 3
Locate the plugin from your toolbar. Then choose Settings>Google Consent Mode. Make sure that Google Consent Mode is enabled.
Now that Cookiebot is installed on your site, you’ll need to configure your cookie banner. To begin, you’ll need to create a Cookiebot account. You can speed up this process by signing up with your Google account.
Step 1
When you access Cookiebot for the first time, you’ll be guided through the configuration. Here, you’ll input your domain. Cookiebot will then scan your site and produce a list of cookies utilised on it.
Step 2
Once scanning is complete, you will want to review your report. There may be some cookies that have been marked as ‘unclassified’. If so, you’ll need to describe them. From your account choose ‘Cookies’. For each declassified cookie, add a classification and a brief explanation of what they do.
Step 3
Next, you check all ‘marketing’, ‘preferences’, and ‘statistics’ cookies. These cookies should only fire once a user has consented to them. Make sure that only ‘strictly necessary’ cookies (those that are needed for your website to function), kick in straight away.
The Cookiebot report will reveal the location of all cookie setting scripts. You’ll need to apply the attribute “data-cookieconsent” to enable prior consent. For each type of cookie, assign the value of “preferences”, “statistics” or “marketing”. You should also alter the attribute type from ‘type’ to either “text/plain” or “text/javascript.
Here’s an example of how this will look for a Google Analytics Universal script tag.
<script type="text/plain" data-cookieconsent="statistics">
    (function(i,s,o,g,r,a,m){
    i['GoogleAnalyticsObject']=r;
    i[r]=i[r]||function(){(i[r].q=i[r].q||[]).push(arguments)},i[r].l=1*new Date();
    a=s.createElement(o),m=s.getElementsByTagName(o)[0];
    a.async=1;
    a.src=g;
    m.parentNode.insertBefore(a,m)})(window,document,'script','//www.google-analytics.com/analytics.js','ga');
    ga('create', 'UA-00000000-0', 'auto');
    ga('send', 'pageview');
Step 4
Choose Settings>Dialogue. From here, you’ll be given a list of options for your cookie consent banner. By default, Cookiebot is set to comply with the most stringent data laws.
Step 5
Next, you’ll need to choose the text that will be displayed within your cookie banner. To do so select Settings>Content.
It’s important to make sure this clearly explains your data collection policies, as well as the user’s consent options.
Step 5
You’ll need to inject the Cookiebot script to ensure your banner appears correctly. The code below should appear at the header of your website template.
<html>
<head>
<script id="Cookiebot" src="https://consent.cookiebot.com/uc.js" data-cbid="00000000-0000-0000-0000-000000000000" type="text/javascript" async></script>
</head>
<body>
  ...
</body>
</html>
Step 6
You’ll also need to input the code containing your cookie declaration (seen below) alongside your cookie consent banner. This could be included within your existing privacy policy or given its own place on your website.
The declaration allows users to change their consent at any time, ensuring GDPR compliance.
<html>
  ...
<body>
  <h1>Cookie Declaration</h1>
  <script id="CookieDeclaration" src="https://consent.cookiebot.com/00000000-0000-0000-0000-000000000000/cd.js" type="text/javascript" async></script>
</body>
</html>
Implementing inline script
To ensure tags, triggers, and variables work correctly, Cookiebot must communicate user preferences to the Consent Mode API. This involves injecting some code into your site.
Adding default consent states
With Cookiebot active on your site, you’ll need to set up default consent states. These control how consent mode behaves before a user has chosen a consent option. Remember, to be compliant with legislations such as GDPR, a user must provide consent before you collect data.
To do so, make sure that the following code is placed as high in the head as possible.
<script data-cookieconsent="ignore">
    window.dataLayer = window.dataLayer || [];
    function gtag() {
        dataLayer.push(arguments);
    }
    gtag('consent', 'default', {
        'ad_personalization': 'denied',
        'ad_storage': 'denied',
        'ad_user_data': 'denied',
        'analytics_storage': 'denied',
        'functionality_storage': 'denied',
        'personalization_storage': 'denied',
        'security_storage': 'granted',
        'wait_for_update': 500,
    });
    gtag("set", "ads_data_redaction", true);
    gtag("set", "url_passthrough", false);
</script>
Implementing regional requirements
If you have users from across the globe, it’s important to make sure you alter the behavior of Google Tags based on these locations. It’s important to remember that consent requirements depend on your visitor’s location.
For example, you might set ad_storage as ‘granted’ for users in Australia but as ‘denied’ for users based in the European Economic Area (EEA).
The code below can be altered based on your regional needs. Remember, code is listed in order of priority, so always begin within the most specific regions. For instance, if you have different default settings for users in particular states, you’d list these states before the US as a whole.
<script data-cookieconsent="ignore">
    window.dataLayer = window.dataLayer || [];
    function gtag() {
        dataLayer.push(arguments);
    }
    // EU-specific settings
   gtag('consent', 'default', {
       'ad_personalization': 'denied',
       'ad_storage': 'denied',
       'ad_user_data': 'denied',
       'analytics_storage': 'denied',
       'functionality_storage': 'denied',
       'personalization_storage': 'denied',
       'region': [
         'GB','AT','BE','BG','CH','CY','DE','DK','EE','ES','FI',
         'FR','GG','GR','HR','HU','IE','IM','IT','JE','LT','LU',
         'LV','MT','NL','PL','PT','RO','SE','SI','SK'
       ],
       'wait_for_update': 500,
   });
    // Default settings
   gtag('consent', 'default', {
        'ad_personalization': 'granted',
        'ad_storage': 'granted',
        'ad_user_data': 'granted',
        'analytics_storage': 'granted',
        'functionality_storage': 'granted',
        'personalization_storage': 'granted',
        'security_storage': 'granted',
        'wait_for_update': 500,
    });
    gtag('set', 'ads_data_redaction', true);
    gtag('set', 'url_passthrough', false);
</script>
Advanced Consent Mode vs Basic Consent Mode
When setting up Google Consent Mode WordPress you have two options. You can enable Basic Consent mode or Advanced Consent Mode.
With Basic Consent mode, tags configured with consent checks (i.e. l ‘marketing’, ‘preferences’, and ‘statistics’) will not fire without prior consent. With advanced mode, users have more freedom. You can configure the default consent preferences to control the behavior of individual tags.
Which version of Consent Mode should you use?
The ‘best’ version of consent mode depends on your unique needs. There are advantages and disadvantages of each approach based on your unique needs.
Basic Consent Mode
The most obvious advantage of this version is that it is extremely simple to set up. This might be the better option if you’re inexperienced with tools such as Google Tag Manager. There’s less customization involved and you ensure compliance quickly and easily.
This simplicity is also the biggest disadvantage of the Basic Mode. There’s no way of tailoring consent options for different groups of users. Any user that arrives on your site must provide consent before you can collect any data.
Data provided by Basic Mode is also less detailed. While this version is capable of modelling data for non-consenting users, it relies on industry benchmarks, often leading to less accurate data.
Advanced Consent Mode
Advanced Consent Mode offers a lot more customization options. This is ideal for organizations that operate in multiple regions with different data laws.
For instance, the EU user policy requires consent for data collection. For users in Australia, however, there is no such requirement. With Advanced Mode, you can alter default settings to account for both groups of users. With more granular control, you get easier access to the data you need.
Advanced mode also unlocks a more detailed form of modelling. This uses cookieless pings from non-consenting users to upscale data. This offers greater accuracy within your reports and stronger insights into site visitors and helps boost personalization for advertisers, such as Google Ads.
Unfortunately, Advanced Mode also comes with some flaws. Cookieless pings track data from non-consenting users. This puts you at risk of non-compliance with data privacy legislation.
Activate Consent Mode today
The consent issue isn’t going away. More and more users are becoming clued up about their data privacy rights. To keep users happy and avoid painful fines, it’s important to make consent a priority. Luckily, Google Consent Mode WordPress makes the process of collecting user consent a breeze.
We’ve explored some simple steps for getting Consent Mode up and running on your site. A Consent Management Platform is a central part of this process. Remember to take advantage of our Cookiebot discount if you’ve yet to set up a CMP WordPress Plugin.
With Consent Mode active you can put your compliance worries to one side. So, why not get started?

- How to Run a Google Tag Manager (GTM) Audit - 26/11/2025
- How to Run a Web Analytics Audit: Examples & Tools - 30/10/2025
- How to Run a Cookie Audit: Examples and Tools - 23/10/2025