How to Implement Consent Mode V2 for Magento 2

Compliance is a top concern for Magento store owners. With more and more data privacy laws constantly appearing, staying in line with the law increasingly becomes more difficult. Luckily, Magento 2 Consent Mode is a tool that makes your life easier.
Here, we’ll give a deep dive into Consent Mode, how it can help you, and how you can implement it on your site.
What is Magneto 2 Consent Mode?
Magento 2 Consent Mode is a powerful tool that enables tags on your Magento website to adjust alongside user privacy choices. It was designed by Google to collect data in a way that was compliant with legislation such as GDPR.
Consent mode collects different categories of user consent. You’ll need to document all data collection methods in each category so that users can make informed decisions. The categories are:
- ads_storage – enables the storage of cookies for advertising purposes.
- analytics_storage allows the storage of cookies that can be used for analytics.
Consent Mode V2 was a response to the Digital Markets Act (DMA). In reality, it’s only a slight change from the original Consent Mode. To align with the DMA, Google introduced two new fields on top of the abovementioned two. These were:
- ad_personalization, which manages whether user data can be used for personalised ads like remarketing.
- ad_user_data, which determines whether personal data like email or mobile numbers can be sent to advertising services.
Remember, Google Cookie Consent Mode must be used alongside a Consent Management Platform to work correctly.
Checking if Consent Mode V2 is implemented correctly
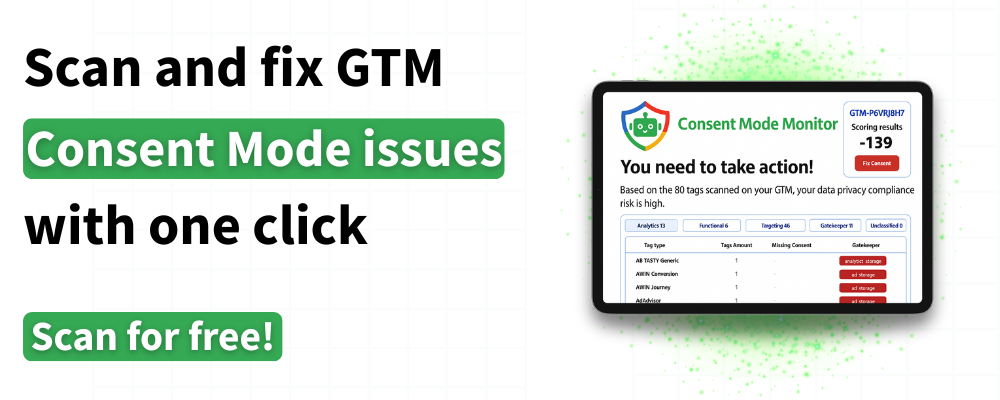
MeasureMinds offers a free solution if you’re unsure whether Magento 2 Consent Mode is implemented correctly. Our Consent Mode Monitoring tool will analyse your Google Tag Manager setup and provide you with a list of tags with missing or incorrect consent. What’s more, the tool is completely free. Why not give it a try?
Implementing Consent Mode V2 for Magento 2
Hopefully, by now, the many benefits of Magento 2 Consent Mode are clear. But where should you begin implementing this tool?
There are multiple approaches that you can take. For the most control, you might opt for a manual implementation. This process involves some coding knowledge. If you don’t have any experience in this area, it’s worth hiring a professional to assist you.
For this guide, we’ll focus on the simplest approach, using Meetanshi’s extension. We’ll break this process into several steps.
Step 1: Installing Magento 2 Google consent mode v2 extension
To begin, you’ll need to download the extension Zip file. Once downloaded, head to your SSH and input the following commands. This will install the Consent Mode extension within Magento.
- php bin/magento setup:upgrade
- php bin/magento setup:static-content:deploy –f
- php bin/magento cache:flush
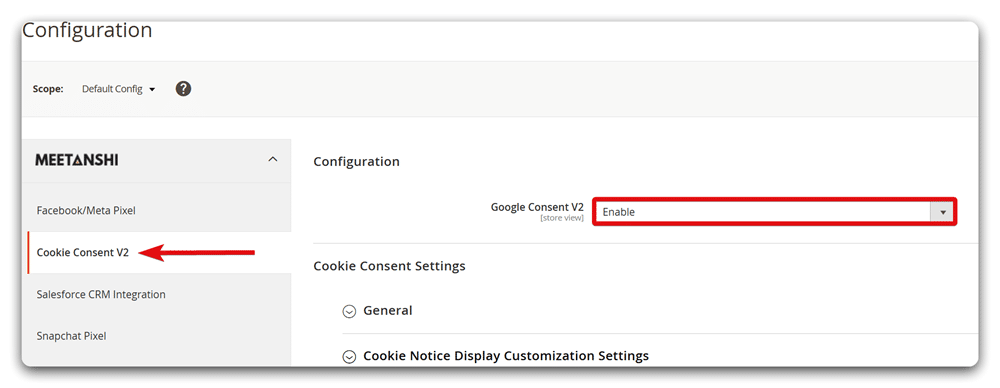
Step 2: Enabling the extension
The next step is to enable the extension. This can be accomplished by going to Stores > Configuration > Meetanshi > Cookie Consent v2.
Once enabled, you can now customise your cookie bar to your liking. Let’s explore the different ways you can tailor your banner.
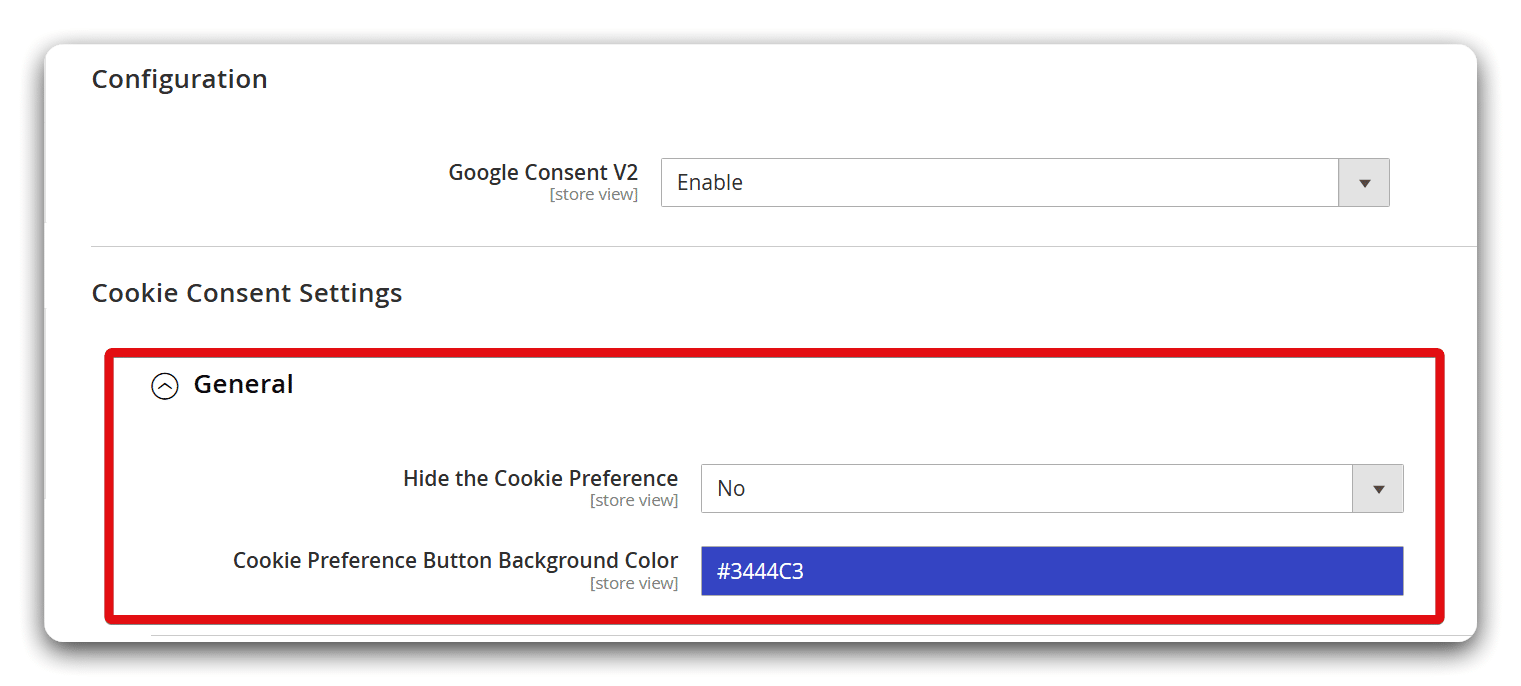
User preferences
The tool contains a ‘General’ section, which enables you to control how users can alter their cookie preferences on your site. You can choose to either display or hide the cookie preferences button and modify the background color.
Cookie notice
You can change how the cookie notice, which appears when new users arrive on your site, is displayed. For instance, you can compose a message that will inform users that cookies are used on your site, and include a link to your documentation. You can also set the date on which the user’s cookie preferences will expire.
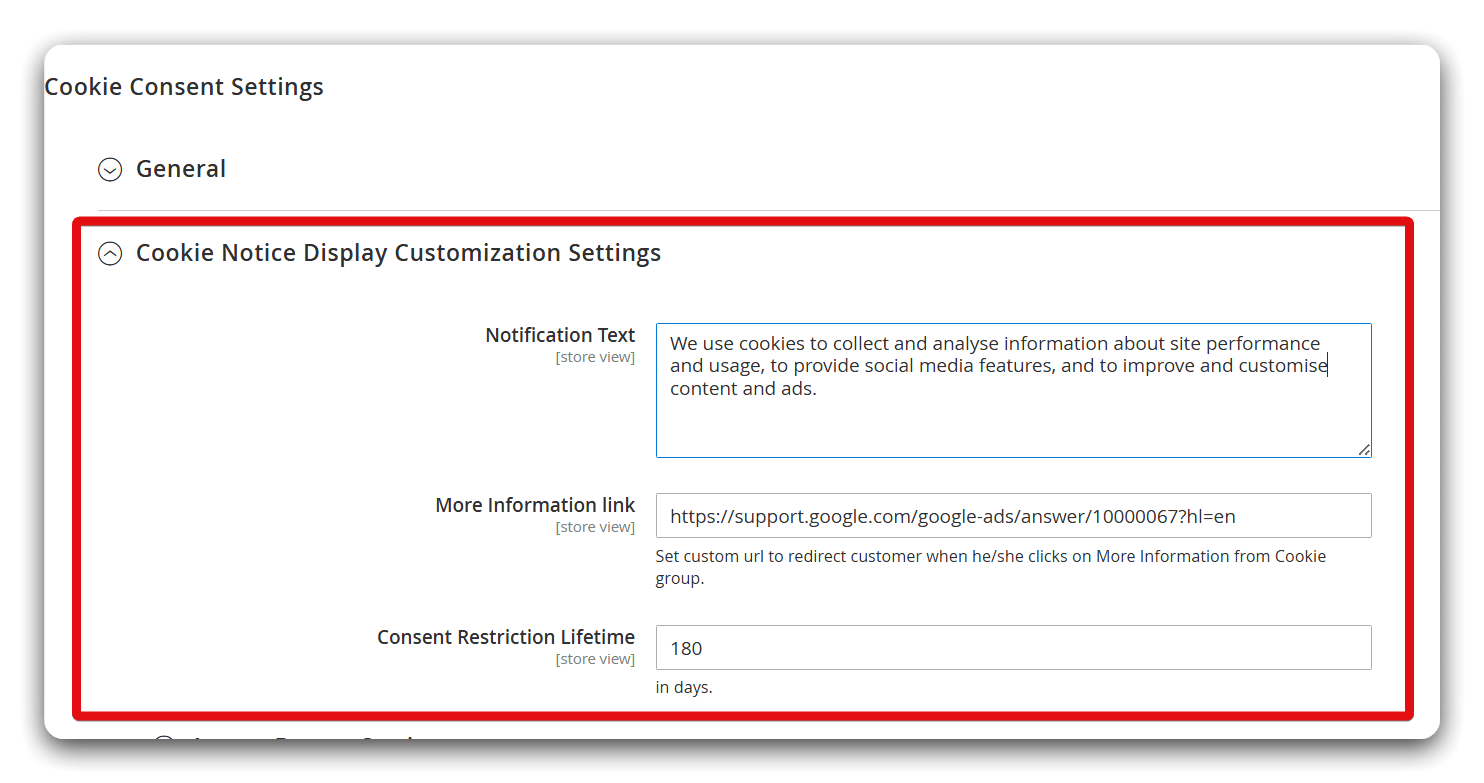
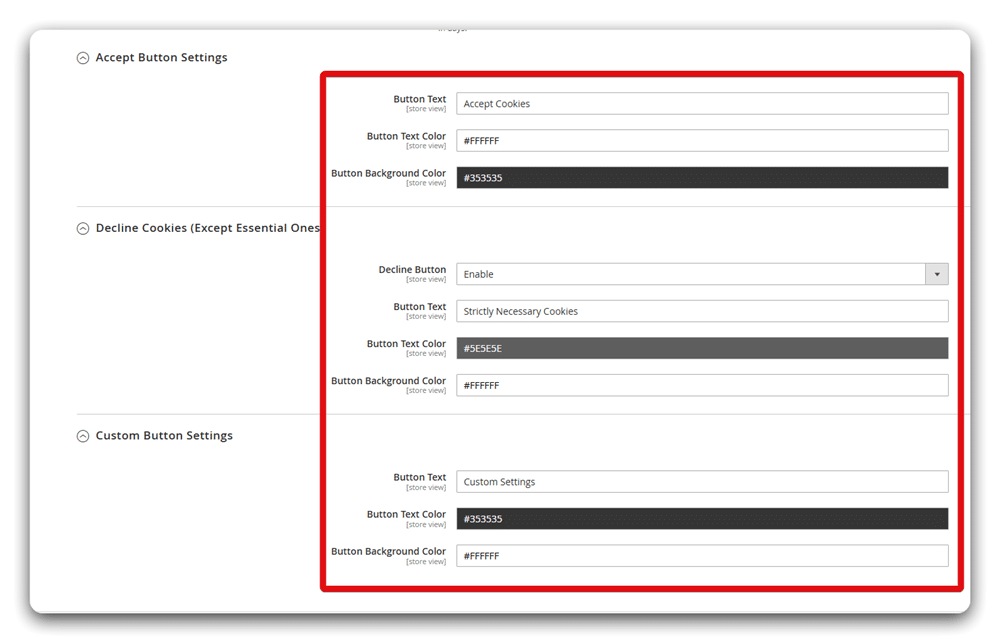
Alongside this, you can change the ‘accept’, ‘reject’, and ‘custom preferences’ buttons by changing the text and colours.
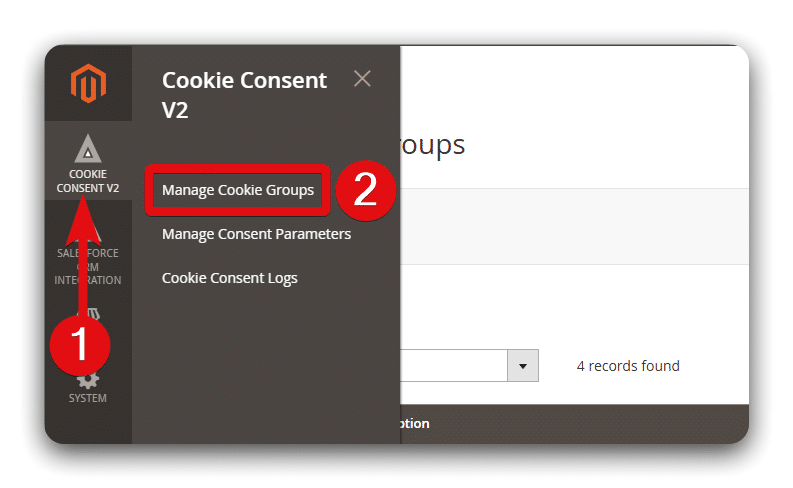
The Meetanshi extension includes ready-made consent types for Google services like Ads and Analytics. These are organised into cookie groups that visitors can accept or reject.
You can edit these consent types and groups or create new ones to match your tracking setup. Navigate to Cookie Consent v2 → Manage Cookie Groups to add or modify a group. Only enabled groups are shown in the preference panel on your site.
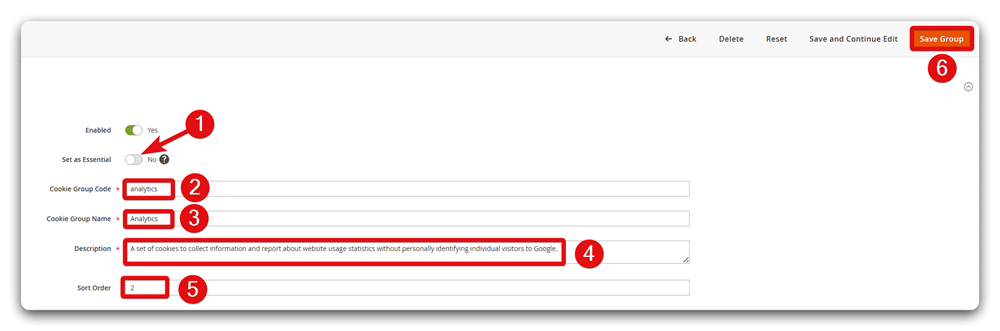
When creating or editing a group, keep the following in mind:
- Set as Essential: Enable this if the group is required. Visitors will not be able to turn it off.
- Cookie Group Code: Provide a short reference code, usually the group name in lowercase.
- Cookie Group Name: This is the label shown in the cookie preferences pop-up.
- Description: Explain what this group covers and why it is used.
Use Sort order to control where the group appears in the preferences list. When finished, click Save Group.
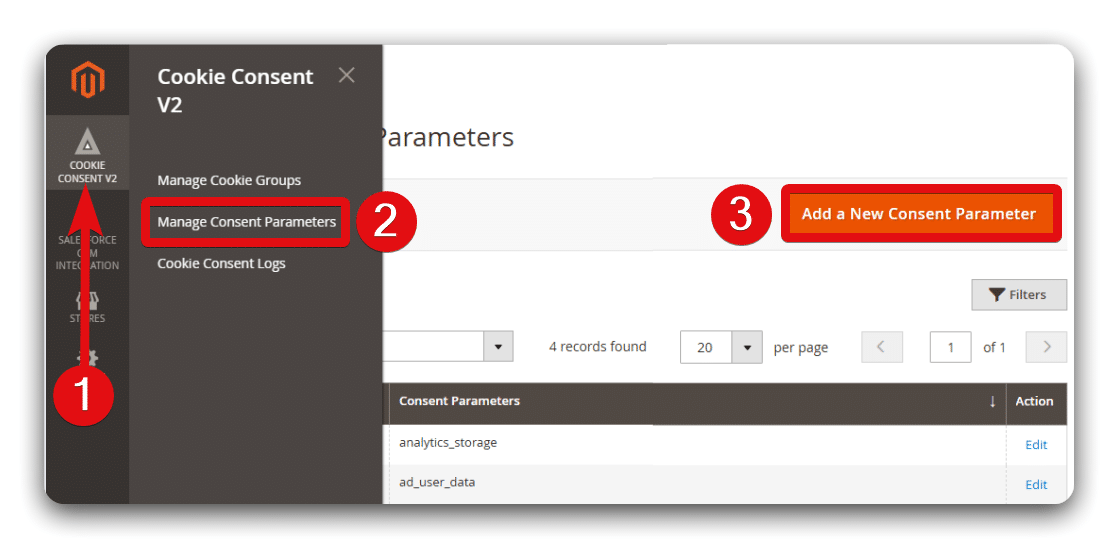
Step 5: Managing consent parameters
You also have the option of creating new consent types. These can be added by going to Cookie Consent v2 > Manage Consent Parameters. From here, click ‘Add a New Consent Parameter’ to create a new parameter.
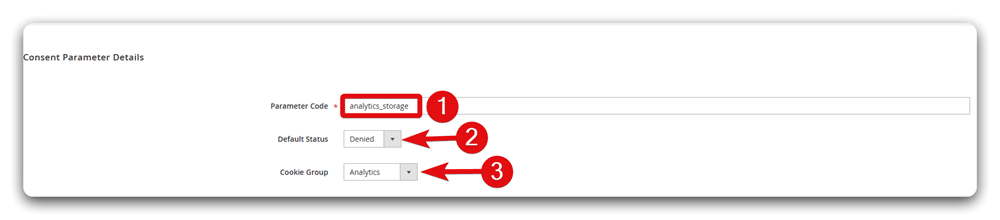
You have the following configuration options:
- Parameter Code: You can edit the consent code that is forwarded to the Google Tag.
- Default Status: Consider whether a consent type is active when a user arrives on your site.
- Cookie Group: Assign the consent parameter to an appropriate cookie group.
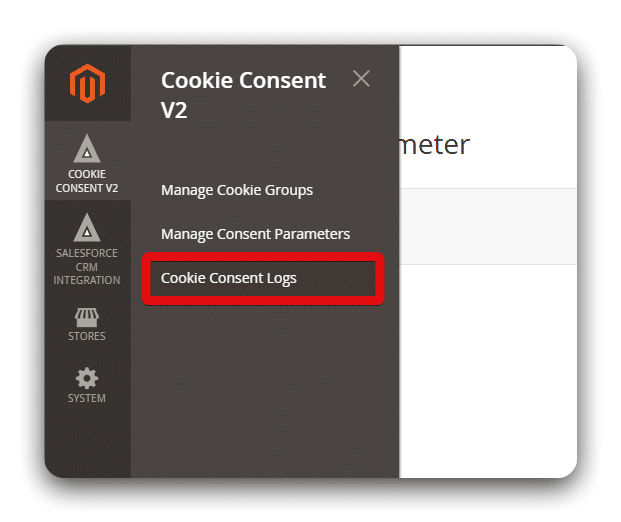
Once these steps are completed, Magento 2 Consent Mode should be set up successfully on your site. You should now be able to view user consent records by heading to Cookie Consent v2 > Cookie Consent Logs option.
Advanced Consent Mode Vs Basic Consent Mode
Magento 2 Consent Mode introduces two methods for dealing with user consent. These are Basic Consent Mode and Advanced Consent Mode. After setting up the tool, you’ll want to choose one of these options.
When using basic consent mode, no tags are loaded before a user chooses a consent option. Tracking only begins when a user agrees to ‘accept’ cookies. Advanced Consent Mode grants a user more control. Here, you can collect cookieless pings before a user grants consent.
This makes Advanced Mode a strong option for businesses that run Magento sites in multiple markets. It enables you to alter your default compliance settings based on the legislation local to a specific market.
Advanced Consent Mode also introduces a new form of modeling. With basic mode, data is upscaled using industry benchmarks. Advanced Mode, however, looks at your website data and uses deny pings for upscaling. This provides a more accurate picture of users who deny consent.
Which version should you use?
Advanced Consent Mode brings greater accuracy and functionality. So, why wouldn’t you use this version of the tool?
There are several reasons why Advanced Mode might not be the smartest option. Remember, this version allows you to collect data before users consent. If you have visitors from the EU or UK, this is a barrier to GDPR compliance.
Similarly, if you have visitors from California, you’ll need to consider the California Consumer Privacy Act (CCPA). CCPA makes it illegal to collect IP addresses for remarketing. While Advanced Mode doesn’t do this, it’s unclear whether collecting IP addresses at all could cause a compliance issue.
Ultimately, unless you are sure that Advanced Mode won’t result in a compliance issue, it’s generally safer to stick with Basic Mode.
Why should you use Consent Mode for Magento 2?
Consent Mode V2 can be a valuable tool. Listed below are some of the top advantages of using the tool on your Magento site.
Legal compliance
The most obvious benefit of Consent Mode is that it keeps your business in line with data protection laws. Any breaches of legislation can result in costly consequences. For example, a breach of GDPR can lead to a fine of up to 4 % of your total global turnover.
Maintain data flow
To remain compliant with data privacy regulations, you must gain consent before collecting personal data. This means that without Consent Mode, you’d have to cut off all data to remain compliant. The tool ensures you can continue to collect high-quality data without compliance worries.
Grow customer loyalty
Monetary fines aren’t the only impact of non-compliance. It can also damage customer trust and harm your brand reputation. Consent Mode helps ensure that user preferences are always respected.
Alongside a cookie banner, Consent Mode allows you to provide clear documentation of your data collection practices. This reassures customers that your data protection practices are ‘above board’. They’ll be more likely to place their trust in you and recommend your business to others.
Best practices for Consent Mode V2
How can you make sure you’re making the most of Consent Mode once it’s running on your Magento site? Here are some best practices to help get you on the right track.
Choose the right Consent Management Platform (CMP)
Remember, Magento 2 Consent Mode won’t work without a cookie banner. If you’ve implemented Consent Mode via the Meetanshi extension, you’ll have access to an in-built cookie banner. If you choose a manual implementation, however, you’ll need to choose the right consent management solutions. When doing so, there are several factors to consider.
Firstly, you’ll need to choose a CMP that is compatible with Magento. There are several popular examples that fall into this category, such as CookieBot, OneTrust, and UserCentrics. Additionally, make sure your solution supports Consent Mode V2 and consent categories within it.
User experience is an equally important factor to consider. According to legislation, users must be properly informed about how they collect, manage, and maintain data. A CMP that is slow or crashes frequently won’t provide users with the time to make an informed decision. Look for platforms that have a strong and contented following.
Once you’ve chosen a CMP, you’ll need to integrate it with Magento 2 Consent Mode. This involves carefully setting up data mapping between the two tools. Remember to test your setup once complete. Make sure that the user’s preferences are accurately reflected and match Google’s consent states.
Ensure an accessible user interface
Magento 2 Consent Mode interfaces with your cookie banner and carries out the consent preferences of users. As mentioned, a user must make an informed decision. They should receive and understand clear information about how data is collected.
We’ve talked about how poor performance can impact user experience. Similarly, the user interface (UI) of your banner could also be a barrier for users. When creating your UI, consider how you best present consent options to a user.
When doing so, bear the following points in mind:
- Magento fonts – Not all fonts will appear clearly on your cookie banner. Choose an option that isn’t overly elaborate. The size and colour are equally important – always prioritise clarity.
- Call to action (CTA) – Your CTA should enable users to register or withhold consent easily. Vague or unclear CTAs such as ‘proceed’ or ‘ok’, can leave users unsure about what they have agreed to.
- Accessibility – All website users must be able to provide consent. This includes those with disabilities. Make sure that your banner follows WCAG 2 guidelines to ensure accessibility.
Set up Server-side tagging
Having a Google Tag Manager account (GTM) is an essential part of running Consent Mode. Your GTM container will contain all the tags, triggers, and variables used on your site.
When using GTM Consent Mode, it’s far better to set up Server-side tagging, rather than using Client-side. Server-side moves all data processing to the server. This means you avoid browser-related issues that might impede data collection, such as ad blockers or other restrictions.
As user data is stored on the server, this approach is also more secure. It helps you stay in line with the security requirements of legislation such as GDPR.
To use Server-side GTM, you’ll need to create a GTM server container that will run on the Google Cloud Platform. Within this, you’ll create data streams that can receive data from your Magento store. Be careful to build these in line with data privacy legislation.
Begin your implementation
The topic of user privacy is here to stay. While this may bring some additional pressure, it doesn’t need to be a negative. Magento 2 Consent Mode makes your life easier. You can focus on gathering high-quality data and building user trust.
So, why not begin your implementation today?