How to Use Consent Mode with Server-Side Tagging
Server-side tagging can be a powerful solution for businesses looking to improve data accuracy. However, to avoid costly ramifications, information must also be collected in a legally compliant way. This is where Consent Mode server-side comes in handy.
Here, we’ll explore how to activate this tool and stay in line with data privacy legislation.
What is Consent Mode?
Google Consent Mode is a tool that ensures tag behavior corresponds with a user’s consent preferences. It guarantees that tags don’t fire until a user has provided consent.
It should be noted that Consent Mode isn’t a tool for collecting consent preferences. For that, you’ll need to choose a consent management platform (CMP).
Basic Consent Mode vs Advanced Consent Mode
Google Consent Mode offers two settings: basic Consent Mode and advanced Consent Mode. Both options provide different levels of flexibility to users.
With basic Consent Mode, all tags are disabled when a user arrives on a website. You’ll only collect data once website visitors provide consent.
Advanced Consent Mode affords users more control. With this option, you can choose which tags fire by default when a user lands on your site. Advanced mode will also send a cookieless ping for users who don’t provide consent. This can be used to upscale and fill the data gap left by users who withhold consent.
There is no ‘correct’ option between these two versions. If you only serve users in a region governed by data privacy regulations, such as the UK or EU, opt for the basic mode. Collecting any data without consent puts you at odds with legislation.
If you operate in a market with no data privacy legislation or in multiple markets, advanced mode might be a stronger option. You can tailor Consent Mode around the legislative needs of users based in different regions.
Ultimately, your choice should be based on your audience and their respective laws. If you’re ever unsure, opt for basic mode. It’s always better to be safe than sorry.
What is server-side tracking?
Businesses have two options for collecting user data. They can gather information from the client side or the server side.
Traditionally, businesses have opted for the former. With client-side tracking, information is transferred from a user’s browser to the ‘endpoint’ – a vendor that you have granted permission to carry out data processing. A typical example would be sending information to Google Analytics.
With Server-side tracking, data passes through a server before it reaches the endpoint. This means you have more data control over the information that is transferred to vendors. If there is some information you’d rather a certain vendor didn’t see, you can choose to exclude it.
How to Set Up Consent Mode with Server-Side Tagging
In this guide, we’ll cover the three main areas of setting up Consent Mode with server-side tracking. These are:
- Creating a web and server Google Tag Manager container.
- A Consent Management Platform*
- Implementation of Server-side Google Analytics 4
*For this guide, we’ll be using Cookiebot. If you’ve yet to set up a CMP, you can use our exclusive Cookiebot 20% Cookiebot discount.
Setting up Cookiebot in GTM
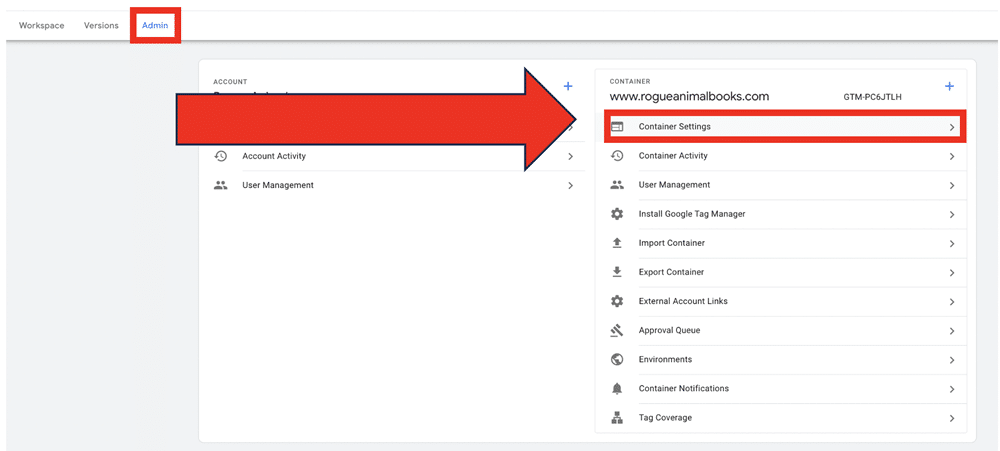
To begin, head to the ‘Admin’ section in GTM. This will present a series of options separated into two columns. Choose ‘Container Settings’ from the second column.
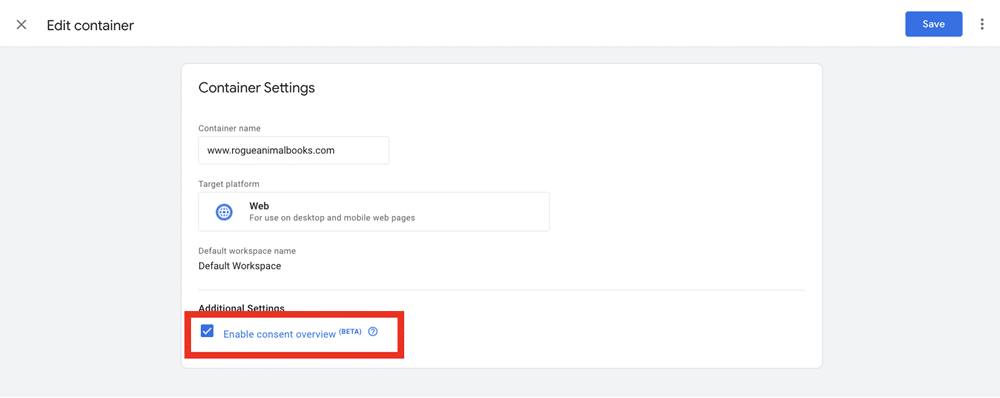
You will be presented with the Container Settings window. Tick the box next to ‘Enable consent overview’ at the bottom of your screen.
Now, you’ll need to find the Cookiebot template from the tag gallery. To do so, choose Workspace>Templates. Next, choose ‘Search Gallery’ from the box labeled ‘Tag Templates.’
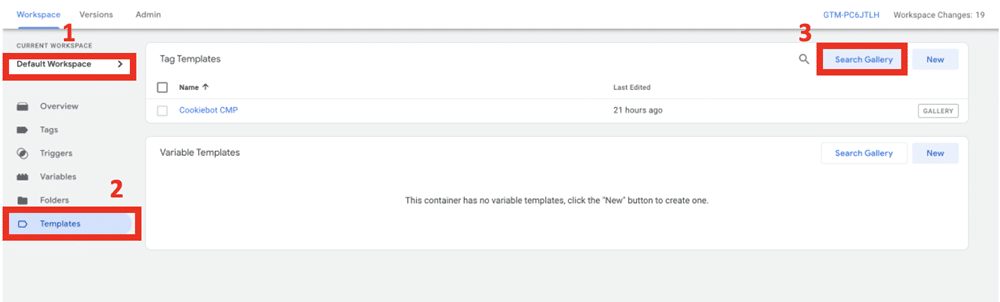
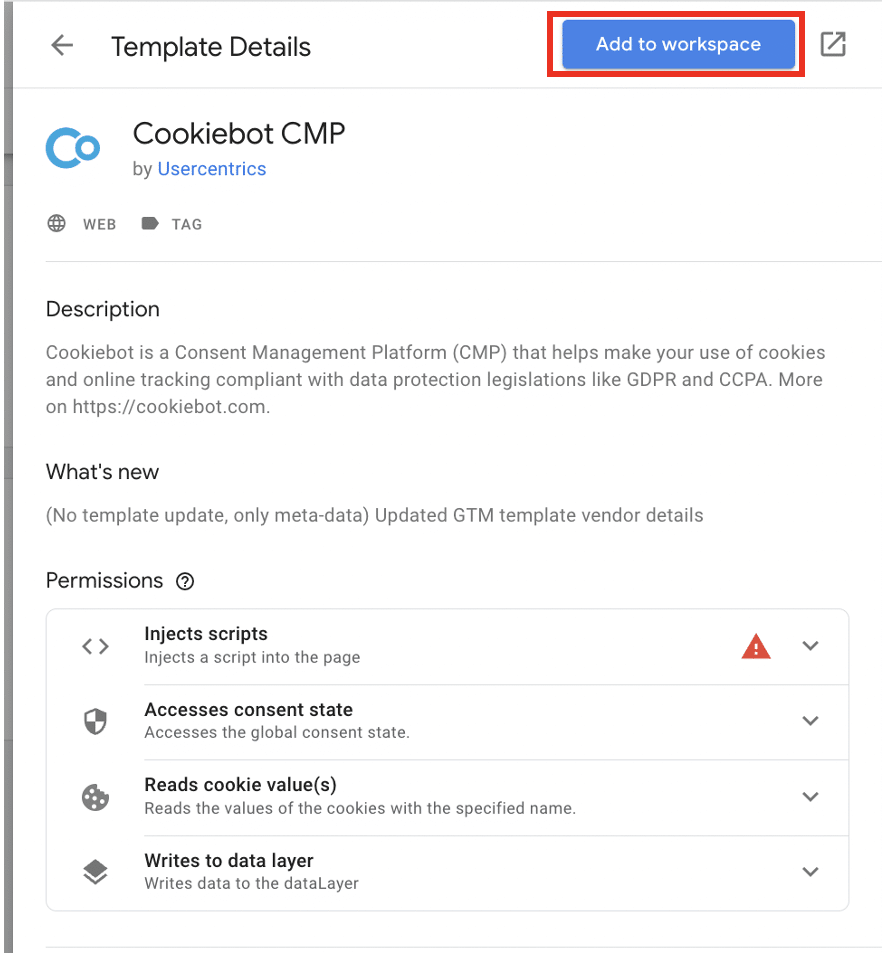
Search for Cookiebot in the search bar and then select ‘Cookiebot CMP’ from the menu. Then choose ‘Add to workspace.’
The tag will now be located in the ‘Tag Templates’ section. Select it.

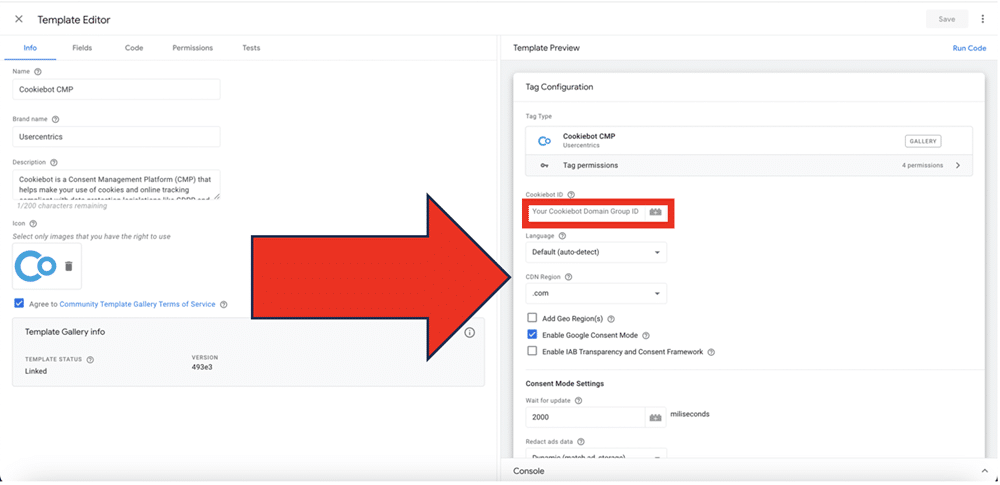
You’ll be brought to the ‘Template Editor’ screen. Choose ‘Tag Configuration’ from the right of your screen and look for a field marked ‘Cookiebot ID. ’ You’ll need to paste your ID into the corresponding box (your ID can be found within your Cookiebot account).
Configuring a GTM server for your container
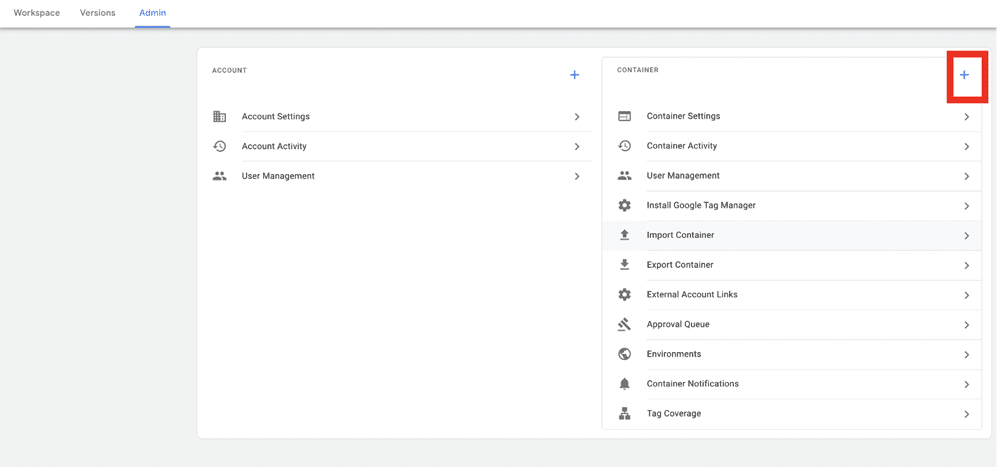
Choose Admin. From the top of the Container column on the right of your screen, you’ll see a ‘+’ symbol. Select this.
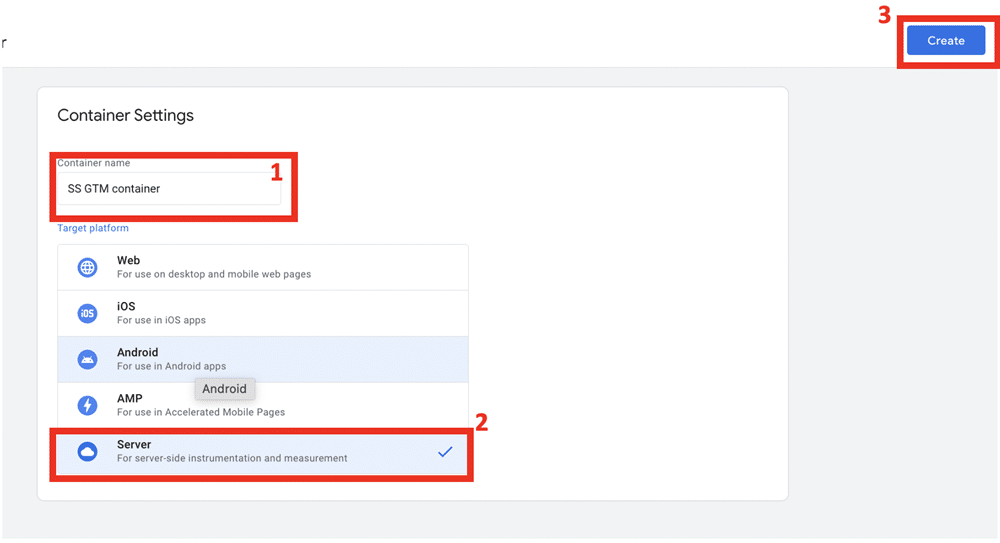
You’ll need to add a container name and choose ‘Server. ’ Then click ‘Create.’
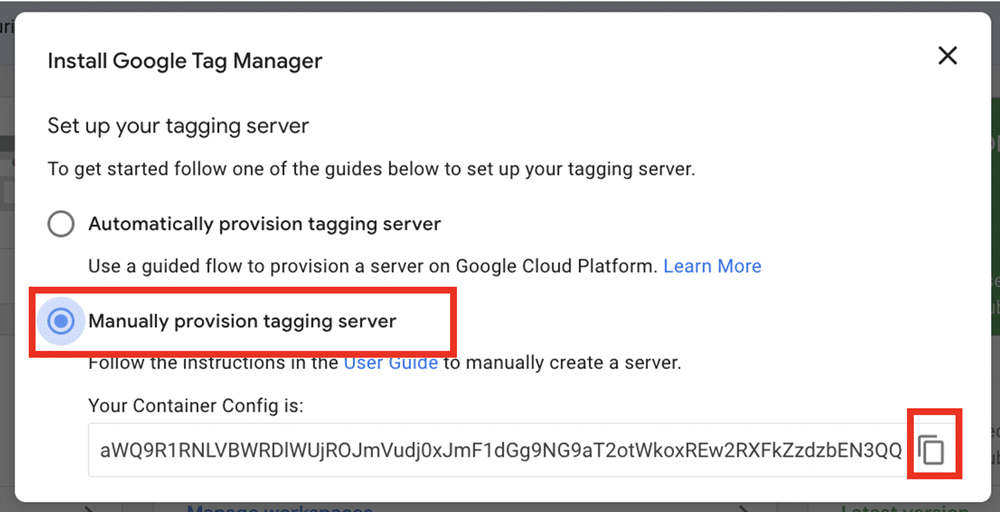
Now, set up your tagging server as a ‘Manually provision tagging server. ’ When you select this option, you should also see your container config. You can copy this by choosing the square symbol on the right of your screen.
For the next stage, you’ll need to use a server-side tracking tool such as Stape, DataTrue, or Scale8. From within your chosen tool, enter your container name and paste the configuration. You can then create a custom domain for your server container.
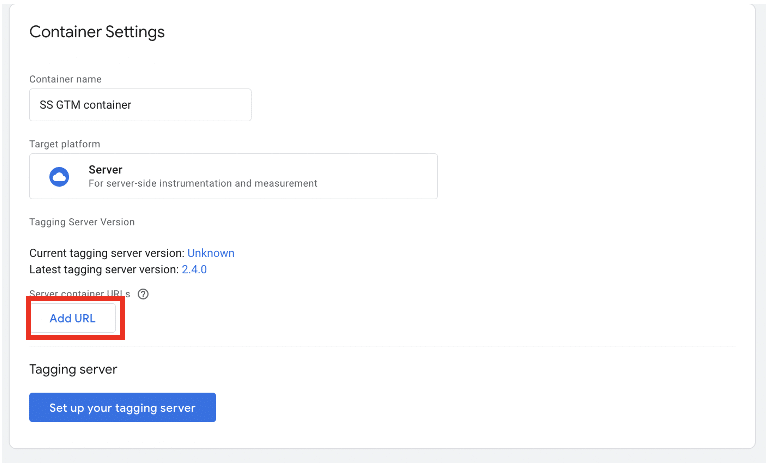
You’ll now need to wait for domain verification. This could take up to 72 hours. Once verified, head back into your GTM container and paste the container into the box labeled ‘Server container URLs,’ then choose ‘Add URL. ’
Lastly, you’ll be required to update the GTM script on your website with the new custom domain.
Setting up server-side GA4
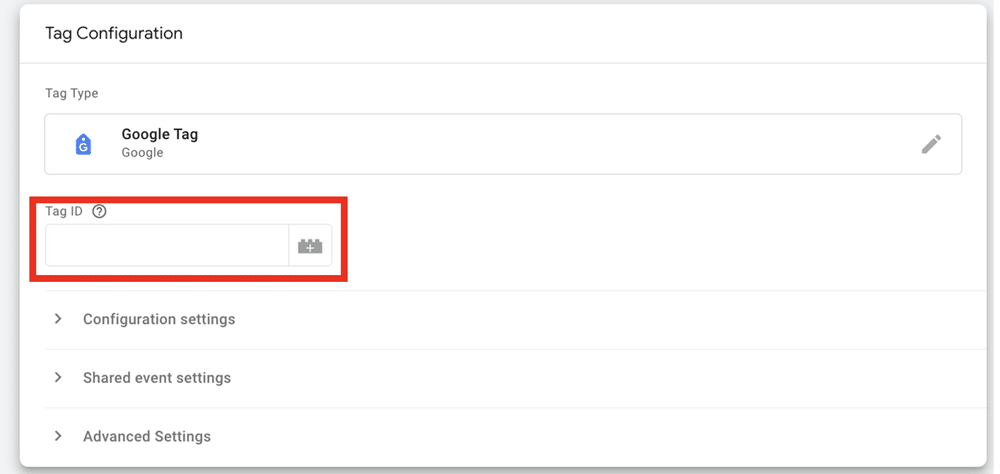
To begin setting up server-side Google Analytics 4, you’ll need to create a new tag within GTM. Choose Tag Configuration>Google Analytics> Google Tag. Next, you’ll need to input your Tag ID into the relevant field.
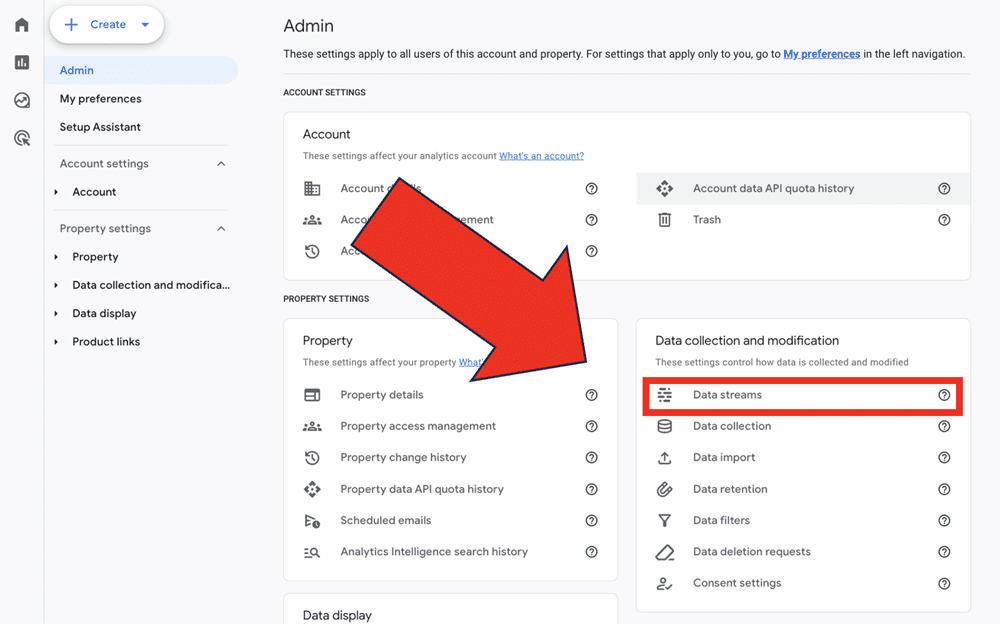
To find your Tag ID, open Google Analytics in a separate tab while leaving GTM open. Choose ‘Admin’ from the bottom left of your screen and then choose ‘Data Streams’ from within the ‘Data collection and modification’ table.
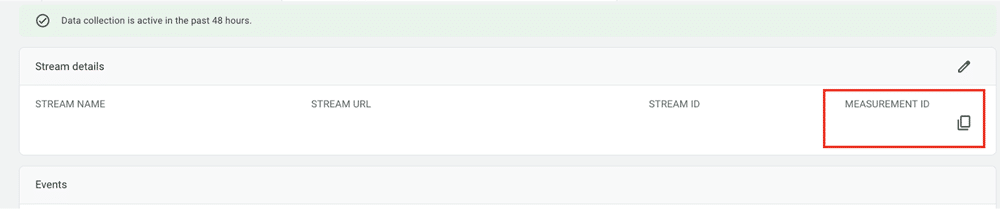
Select the data stream related to the website you want to track. Then, from the following screen, copy your GTM ID. Now reopen your GTM tag and paste the ID into the correct field.
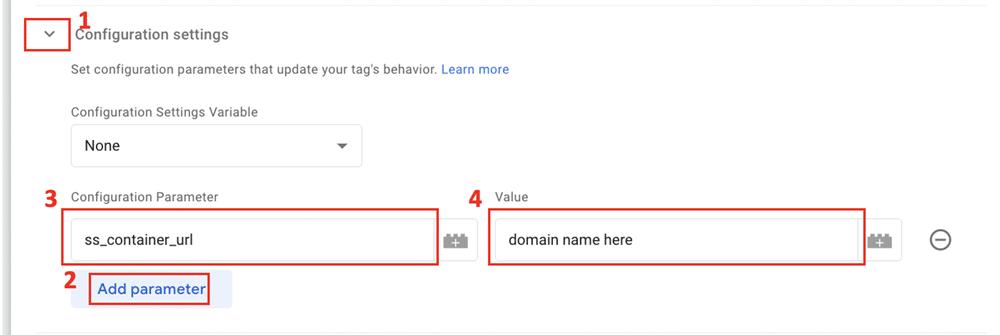
Once this is complete, you can select the drop-down menu labeled ‘Configuration Settings. ’ Select ‘Add Parameter. ’ Then enter the name ‘ss_container_url’. In the value section, input the URL of the domain we created earlier.
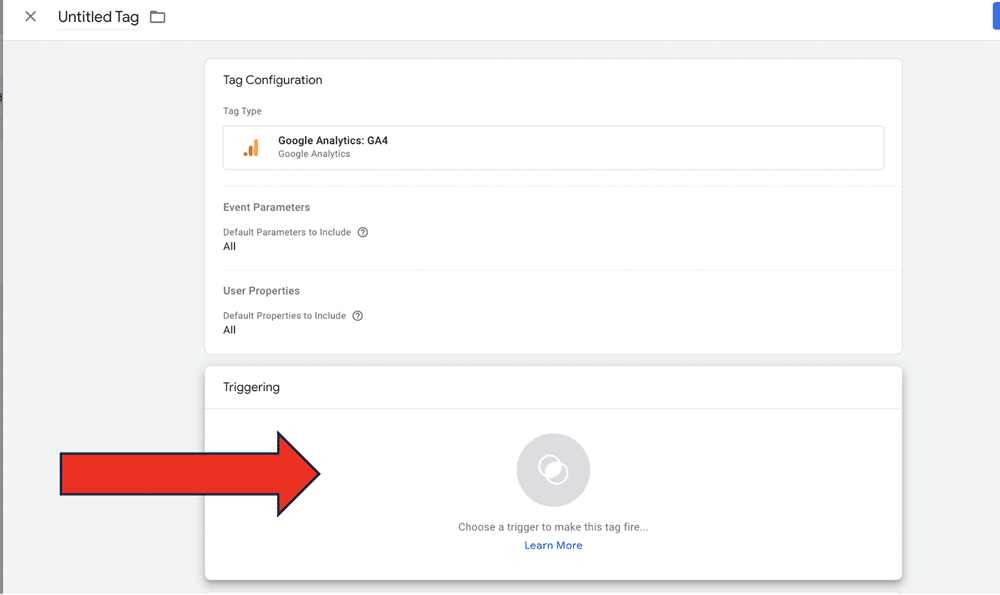
In the Triggering section, add a trigger to ensure the tag fires on ‘All Pages. ’

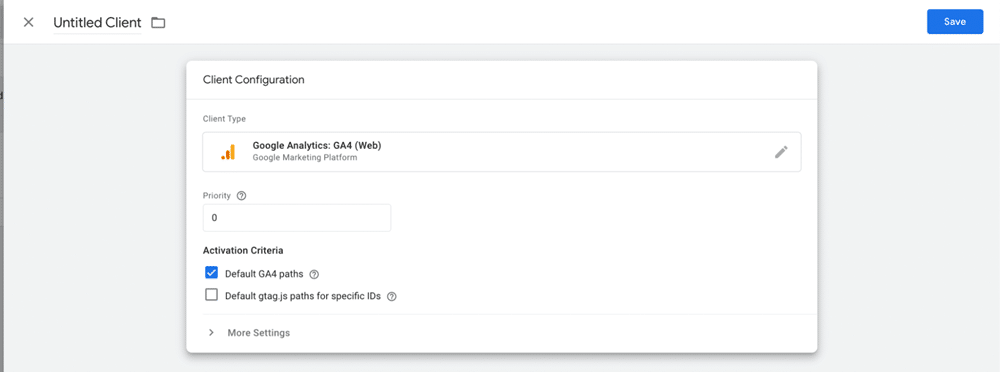
Now, go back to your server container and create a GA4 client. Alongside this, create a GA4 tag each time a GA4 client is claimed. To do so, choose Clients > New > Google Analytics: GA4 (Web).
Finally, create a GA4 tag within your GTM server container. Set this tag to fire each time a client is claimed.
Choosing consent settings for server side GA4
Within GTM, you can alter the behavior of tags to align with a user’s consent choices. Google Tags will already have built-in consent checks.’ These tags will only modify their behavior if a user grants consent. Many third-party tags don’t have consent checks – you’ll need to configure these yourself.
As we’ve mentioned, Consent Mode has two options for altering the default behavior of tags: basic Consent Mode and advanced Consent Mode. Let’s look at how you can enable both options.
Basic consent mode
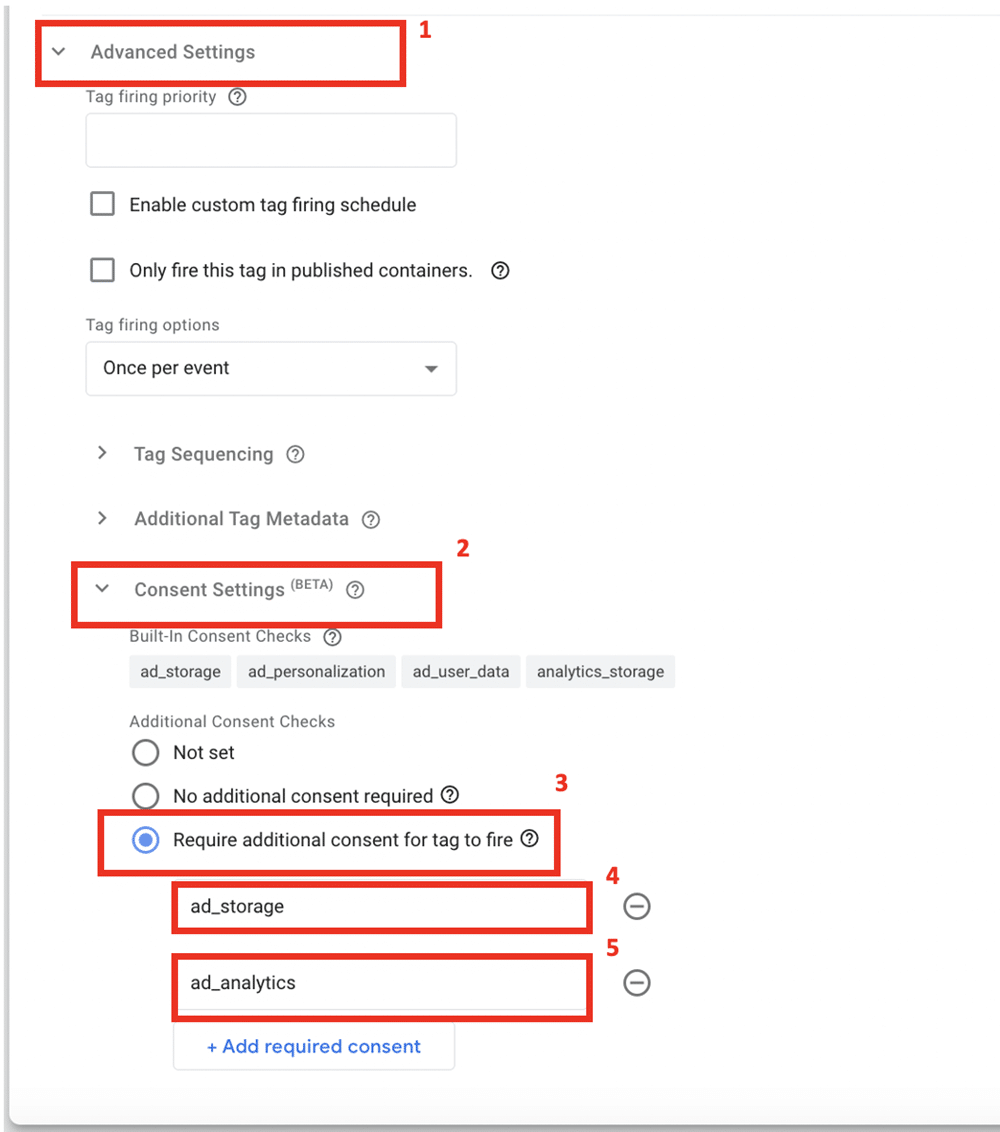
To ensure that no information is sent to GA4 without user consent, head to your Google tag. Select ‘Advanced Settings, ’ choose the option labeled ‘Additional Consent Checks’, and select ‘Additional Consent Checks.’
Now add two additional checks for ‘ad_storage’ and ‘ad_analytics.’
Advanced consent mode
You can activate advanced mode if you’d like more flexibility with your Consent Mode setup. To do so, choose ‘Consent Settings’ and ‘No additional consent required.’

Note: With this setup, Google will send anonymized pings to Consent Mode. This may put you at odds with legislation such as GDPR.
Why is Consent Mode important?
To understand the tool’s importance, consider Consent Mode in a broader context. In 2018, the European Union introduced GDPR, a law that governed how businesses collect, manage, and maintain personal data.
One of the key pillars of this legislation is ensuring that businesses collect consent before gathering any user data. Since then, many other countries have followed the EU’s lead in introducing data privacy legislation.
Consent Mode is Google’s response to these laws, ensuring businesses can continue with data collection in a legally compliant manner.
Of course, compliance isn’t the only reason to use Consent Mode. Customers care about how their data is collected and used – as many as 86% of US adults say user privacy is a growing concern for them.
Respecting user consent preferences won’t go unnoticed. When customers trust your business, they’ll feel stronger loyalty and invest more in your business.
If you’re unsure about your consent mode setup, you can use our Consent Mode Monitor. This will scan your GTM container and look for instances of missing or incorrect consent.
Server-side tagging: the pros and cons
Server-side tracking can be more reliable than client-side tracking. By using this method, you can avoid browser restrictions and ad blockers, meaning you’ll experience less data loss. There are also, however, some drawbacks to this approach.
Let’s compare the pros and cons of server-side tracking.
Pros of server-side tagging
Higher quality data
As mentioned, server-side provides greater control over the data that is sent to servers. You can, for instance, enrich your data to create more targeted campaigns on platforms such as Google Ads.
The server-side container acts as an HTTP API endpoint. This means it can receive many different forms of data that can then be sent to GTM. You can complement your container with information from additional sources, such as your CRM, for example.
Data privacy advantages
With server-side tagging, you can choose whether data is sent to vendors and can exclude sensitive information. JavaScript libraries loaded on your site might carry out more tracking than you intend. They might, for example, collect information relating to a user’s device and other personally identifiable information (PII).
Remember, under legislation such as GDPR, it’s illegal to collect any PII. With client-side tagging, there is no way to prevent this information from being shared with third parties. By using server-side tagging, however, you have complete control over which data is parsed from the server. You can spot and remove PII before it reaches a vendor.
Quicker page load times
On the client side, all website resources are downloaded and processed simultaneously. When a page loads analytics and marketing snippets alongside other elements, it can significantly impact loading times. And, of course, the more tracking you carry out on a page, the more it impacts website performance.
Luckily, with server-side tagging, snippets of code are loaded within the web server. With fewer page elements to load on the client side, loading times should speed up, resulting in a better user experience.
Cons of server-side tracking
More complex
Server-side tagging is more complex than client-side tagging. Even a user knowledgeable in client-side development will need to broaden their technical skills to make the most of this solution. If you lack the time to become well-versed in server-side, you may need to introduce new expertise to your team.
High costs
Hosting your server-side container can be expensive. Google recommends running a minimum of three production servers to minimize the risk of data loss. Each Google Cloud Platform server costs $40 per month, so you’ll be paying a minimum of $120 monthly.
Which should you choose?
There is no correct answer about which option to choose; both approaches have their positives and negatives.
For server-side tracking to be effective, you need the right setup. If you’re unsure where to start, here’s our guide for setting up GTM server-side.
Put data privacy at the heart of your approach
Now more than ever, customers are conscious of their data and how it’s being used. Consent Mode helps you to respect users’ wishes while continuing to collect valuable data. The good news is that by using server side tagging, you have complete control over your business’s data collection.
We’ve shown you the steps to get started with Consent Mode. So, why not begin your implementation? Remember, if you’d like to learn more about the tool, you can check out our blog about consent mode fines.
FAQ
Is Consent Mode enough to ensure compliance?
No, Consent Mode is a tool to assist with compliance. You’ll need a custom cookie banner or consent management platform to collect a user’s consent preferences.
Part of remaining compliant is also keeping up to date with relevant legislation. Be sure to employ external help if necessary.
I need help with my Google Tag Manager implementation
Measureminds is a Google Tag Manager agency on hand to assist. We’ve a track record of success, delivering even the most complex GTM implementations. We’ll even conduct an audit to ensure your setup is compliant with data privacy regulations.

- How to Run a Google Tag Manager (GTM) Audit - 26/11/2025
- How to Run a Web Analytics Audit: Examples & Tools - 30/10/2025
- How to Run a Cookie Audit: Examples and Tools - 23/10/2025