Autoblock vs Google Consent Mode Categories: Pros & Cons

Autoblock can reduce the risk of accidental non-consented script firing, especially when third-party scripts appear outside your tag manager. It can help you avoid costly Consent Mode fines. But is the feature really as valuable as it sounds?
Here, we’ll weigh up the pros and cons of autoblock vs an approach using Google Consent Mode (GCM) categories. First things first, though…
What is autoblock?
Autoblock is a feature found in Consent Management Platforms (CMPs) such as Usercentrics, Cookiebot, and OneTrust. When enabled, it prevents certain non-essential scripts from running until a user gives consent.
But it doesn’t remove the need for a cookie banner or a consent UI, because you still need to inform users and collect their choices in most regions (for example, under GDPR/ePrivacy).
Autoblock is best seen as a safety net that helps stop non-consented scripts, not a replacement for proper consent collection.
What other options do users have?
The second approach to tag management is to collect a user’s consent via a cookie banner. You can provide granular consent choices to your website users through your CMP. This ensures a regular flow of compliant data.
With this approach, your tag management system provides the mechanisms to honour a user’s consent and interfaces with the CMP to ensure the correct conditions are applied. In the case of GTM, you can implement Consent Mode V2 to register a user’s consent.
Which approach should you use?
It’s generally recommended that users stick with the GCM categories approach. As we’ll explore later, while auto-block might seem like an easy solution, it can actually prove more hassle than it’s worth.
Of course, every organisation is different. Let’s weigh up the pros and cons of autoblock to help you make a more informed decision.
Pros of autoblock
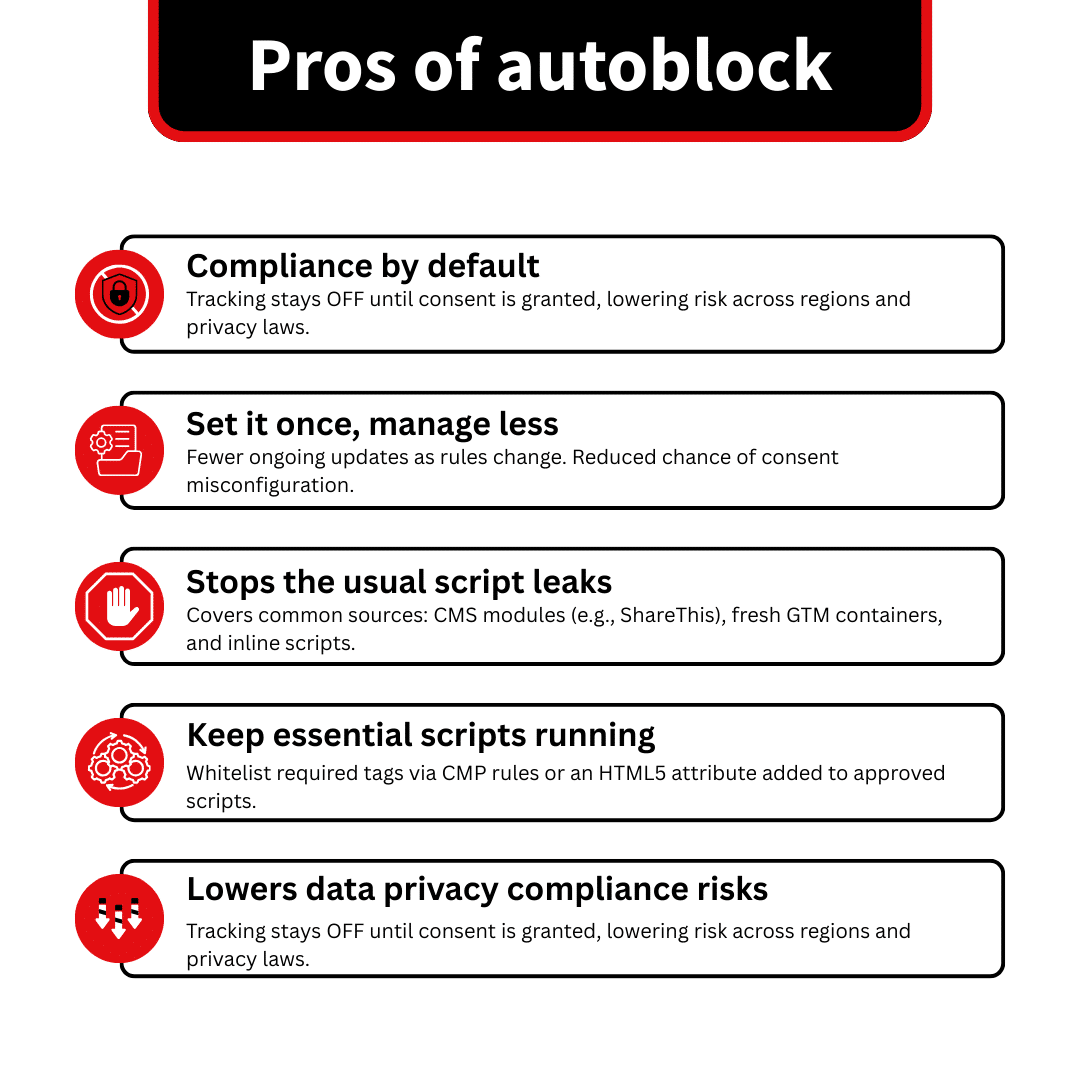
Makes Compliance bullet-proof
Ensuring compliance with data privacy laws is critical for businesses. But with a minefield of worldwide legislation, compliance becomes challenging, especially for organisations that operate in multiple regions and markets.
With autoblock, there’s no need to worry about navigating the nuances of different legislation. By default, data collection is disabled, so there’s no risk of breaching legislation.
However, it does not make compliance ‘bullet-proof’ on its own. Compliance still depends on correct banner behaviour, regional rules, accurate script classification, and the enforcement of consent across all tracking methods (including server-side).
Low maintenance once set up
Managing compliance manually takes time. New legislation is regularly introduced, with restrictions related to data collection. Updates may require changes to Consent Mode categories, which can be a time-consuming process. There’s also a risk of human error leading to Consent Mode mistakes and the collection of non-compliant data.
Using autoblock, on the other hand, is much more straightforward. Once enabled, there’s no need to apply extra conditions to your CMP. Minor edits to your CMS may be needed so that it knows which scripts can fire.
Autoblock uses a script that blocks other code on your site. This provides full-proof protection on your site from the following common sources dropping non-compliant scripts:
- CMS modules – A CMS deploys JavaScript containing tracking code through modules such as ShareThis. The autoblock script activates before this code, ensuring tracking doesn’t take place.
- New GTM accounts – GTM default settings aren’t compliant with data privacy legislation such as GDPR. Autoblock stops GTM from loading tags on your site, preventing non-compliant user tracking.
- Inline scripts – Inline scripts cause compliance issues when they set non-essential cookies. Autoblock can detect these scripts and stop them from executing.
That said, autoblock is not guaranteed to block every tracking method perfectly in all cases (for example bundled scripts, pixels loaded in unusual ways, or scripts misclassified as essential).
Required Tags can be whitelisted using either the HTML5 attribute CMP interface
Of course, you don’t want all tags on your website to be blocked. Some are essential for your site to function as it should.
Luckily, there are simple methods for ensuring that autoblock does not prevent these tags from firing. Most CMPs enable users to enter whitelisting rules that exclude certain scripts from autoblock. Another option is to add an HTML attribute to the end of your code to inform the block that certain tags are whitelisted.
Autoblock availability depends on the CMP plan
In many platforms, autoblocking is only available on paid tiers or specific packages. Always confirm pricing and feature access in your CMP subscription before building your consent strategy around it.
Cons of autoblock
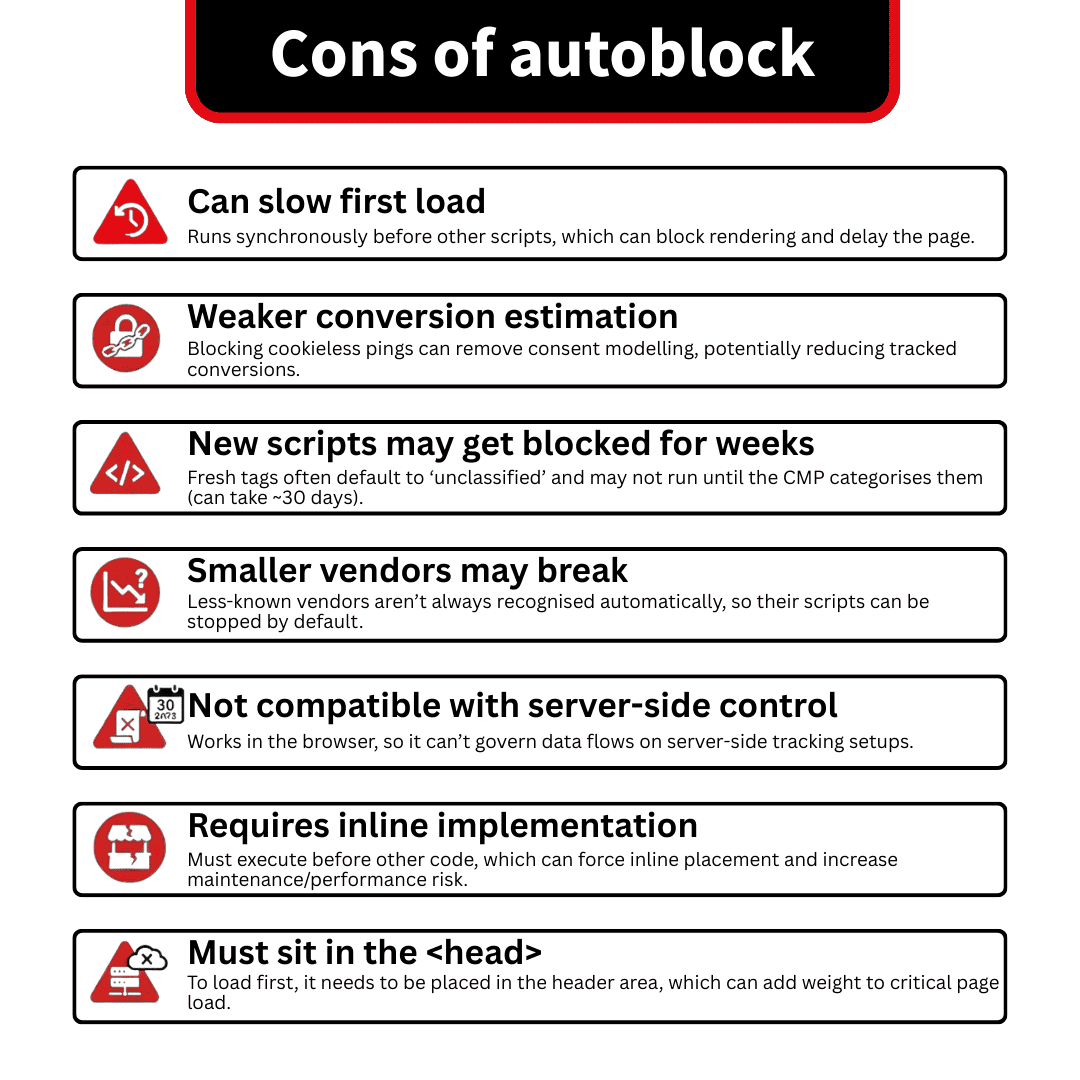
Bad for site speed
Autoblock uses synchronous JavaScript. This means that each line of code executes sequentially in a predefined order. As autoblock loads before all other scripts, this causes a gridlock; rendering and other tasks cannot execute until autoblock scripts are loaded.
For users, this means a poorer user experience. They may be met with a blank screen and be forced to wait before they can access your site.
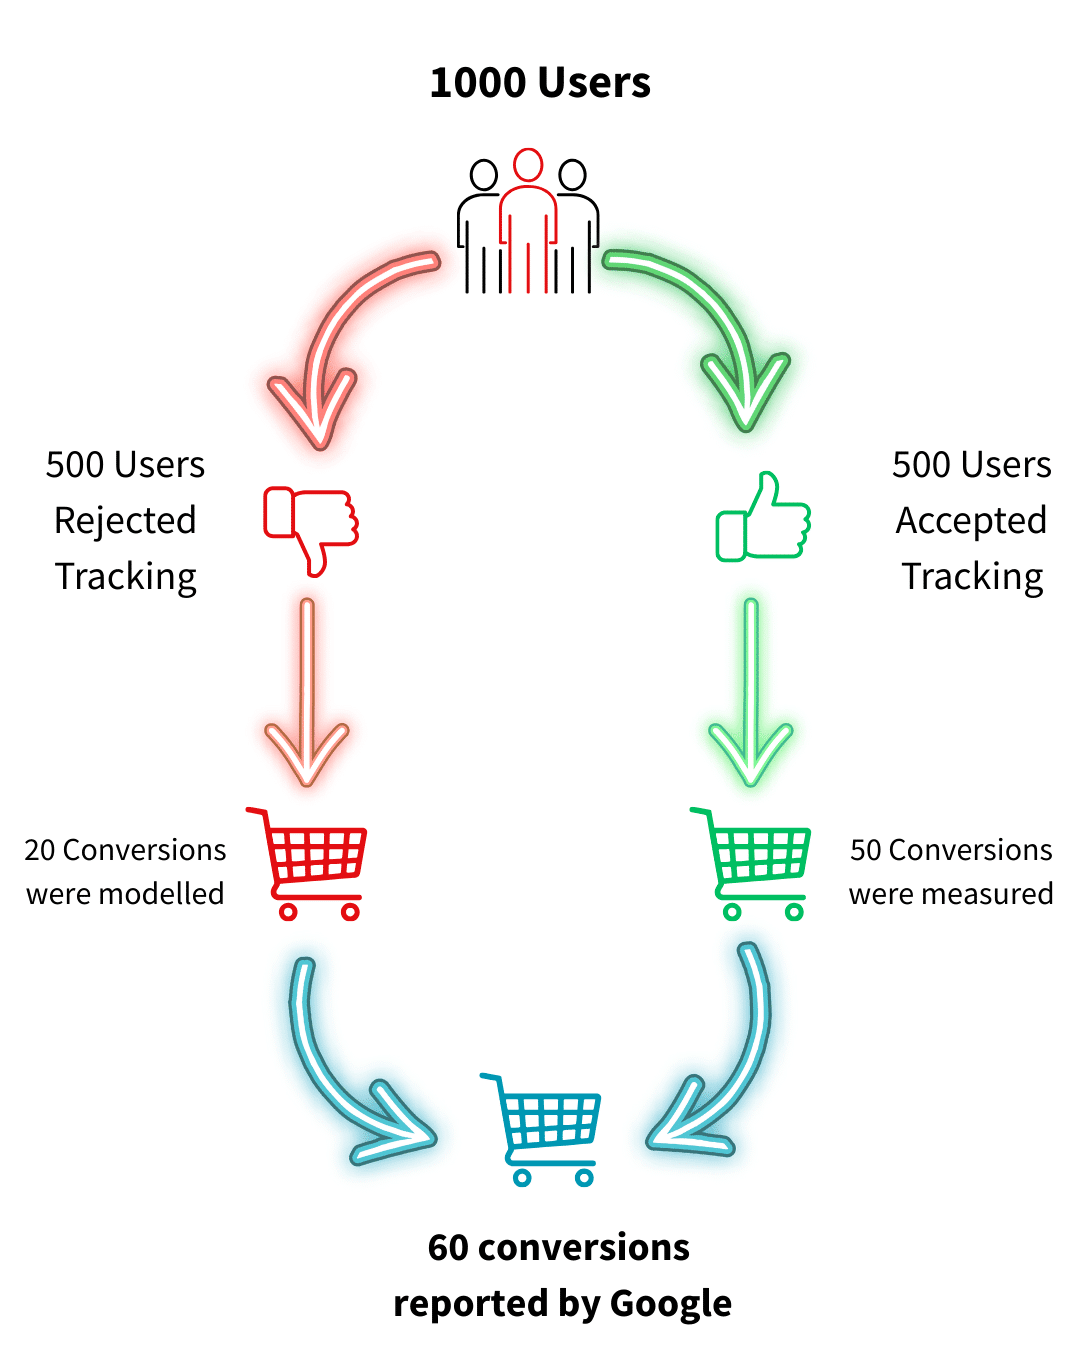
Disables ~10% modelling/upscalling pings
When following a manual approach, you gain access to consent modelling. Here, GCM will use data from consenting users to estimate the behaviour of users who decline cookies. When activated, this feature can boost your conversion count by 10%.
By default, Autoblock forces you into Basic Consent Mode, which kills the “cookieless pings” required for Advanced Consent Mode modelling. However, expert setups now involve whitelisting Google Tags from Autoblock.
This allows the tags to load, read the GCM “denied” state, and send modelled pings to Google to help recover ~10% of your lost conversion data. Using “Pure” Autoblock without this whitelist effectively blinds your marketing AI.
New Tags can take ~30days to get classified/blocked
When you add content to your site, your CMP must analyse and categorise new tags and scripts. This process can take around 30 days to complete. During this time, new scripts will be automatically viewed as non-compliant by autoblock and prevented from triggering.
This is potentially bad news for any new additions to your site. Content might not function without the relevant scripts. Once again, this means a poorer overall experience for your website visitors.
Small vendors are not automatically classified
CMPs come with a large database of vendors. Autoblock can ensure that scripts and cookies that enable vendors to function can trigger. Small vendors, however, are less likely to receive classification. You may find that autoblock prevents these vendors from operating on your site.
You may need to classify smaller vendors manually using HTML5 or your CMP’s interface. Until you do so, certain aspects of your site may not function as they should.
Does not work with server-side
Autoblock runs on the client-side (a user’s browser). This means that it cannot control data that is sent over the server-side (your back-end servers). If you’re using server-side GTM tracking, autoblock can’t control the flow of non-compliant data.
If you’re using server-side tracking, you’ll need to explore alternative methods for managing consent.
Needs to be added inline
As mentioned, Autoblock must be added synchronously and executed before all other code. This means that tag management tools such as GTM, which load tags asynchronously, cannot be used to enable the feature.
The use of inline code is often discouraged, as it can lead to issues such as code bloat and other performance-related problems.
Needs to be added in the header
Autoblock must be loaded before all other code to function. This means that the code can only be added in the head section and won’t function in the footer. Too much code in the head can slow loading times, potentially damaging your site’s visitor count.
Consent Mode best practices
For the reasons we’ve mentioned, consent management via Consent Mode is likely a stronger option than autoblock. Of course, GCM is only useful when used correctly. Here are some Consent Mode best practices to help you get the most out of the tool.
- Do not delay GTM until after consent – In 2026, the gold standard is to load GTM immediately, but with Default Consent States set to ‘denied’. If you wait for the banner, you lose the ability to track “Page Views” for users who do eventually consent, as the initial load event will have already passed.
- Missing default consent settings – Some websites only send a single consent signal (eg, analytics_storage but not ad_storage). Both consent signals are needed for compliance; make sure to include both.
- Tags missing consent – Simple errors when setting up tags can lead to compliance issues. You can use our Consent Mode Monitor to scan for tags with missing or invalid consent.
GCM categories are (usually) the smart way forward
While autoblock may seem like a quick fix, it’s likely to cause more problems than it solves. The best way to ensure a steady and compliant flow of data is usually to use GCM categories.
So don’t delay, check if Consent Mode is enabled and begin mapping your categories.
- Autoblock vs Google Consent Mode Categories: Pros & Cons - 22/04/2026
- Privacy Attack Vectors: What are They & How to Defend Against Them - 10/04/2026
- What are the Different Types of Consent? - 11/02/2026