What Happened to Automatic Enhanced Conversions Setup in Google Tag Manager?

Automatic Enhanced Conversions enable you to send hashed customer data, such as email addresses or phone numbers, from your site to Google Ads. This data is used to connect conversions back to actual users and give you clearer insights.
By sharing this information, you can see which ads lead to real sales. This process can improve your ad performance and give you a more accurate view of your return on investment.
What has changed?
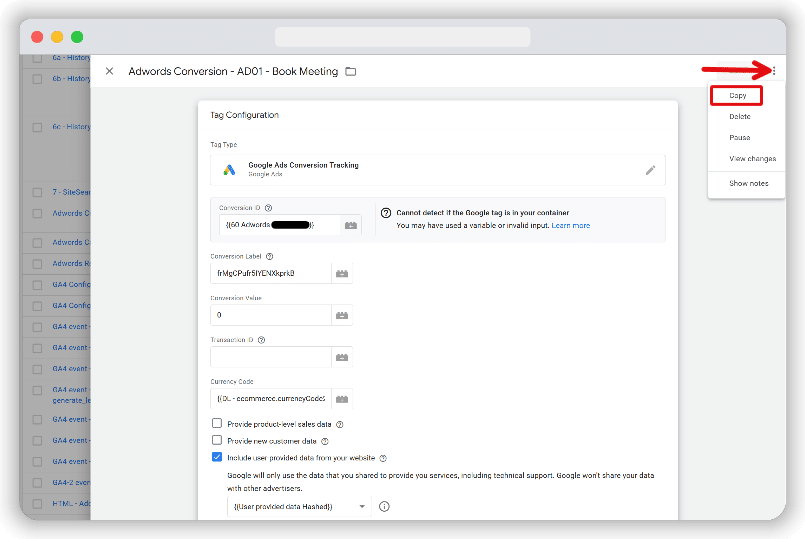
Previously, we used to check the “Include user‑provided data from your website” box in the Google Ads Conversion Tracking tag to enable automatic enhanced conversions.
![]()
![]()
That checkbox is no longer visible.
![]()
![]()
Now, you must set up user data by adding a user_data parameter at the tag level or by using a separate user‑provided data event tag.
How to solve the enhanced conversions in GTM checkbox issue
There are two main ways to restore automatic enhanced conversions when the checkbox is no longer visible:
- Copy an old tag or import an older container that had the setting enabled.
- Use a separate user-provided data event tag.
Let’s look at each option in detail.
Copy an old tag or import a previous container
You can still send user-provided data (UPD) in the Google Ads Conversion Tracking tag by cloning or importing an older tag that had this setting turned on. The option is hidden, not removed.
If your site already had a conversion tag set up when the “Include user-provided data from your website” checkbox was visible, you can copy that tag directly:
1. In your GTM workspace, find the old tag. Click the three-dot icon in the top-right corner of that tag to clone it.
2. Rename the cloned tag and update any conversion ID, label, or other details for your current setup.
If you need to add this setting to a container that never had it before, follow these steps:
In the old container where the checkbox was visible, go to Admin and choose Export Container.
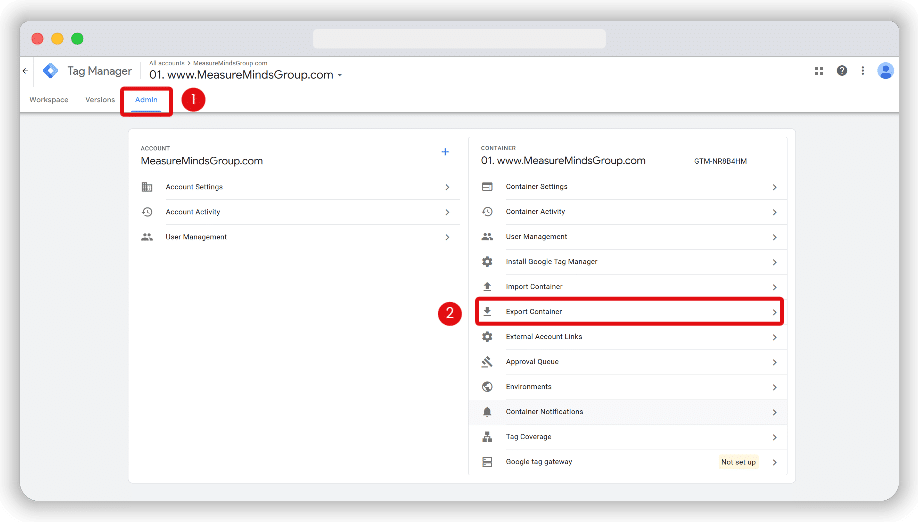
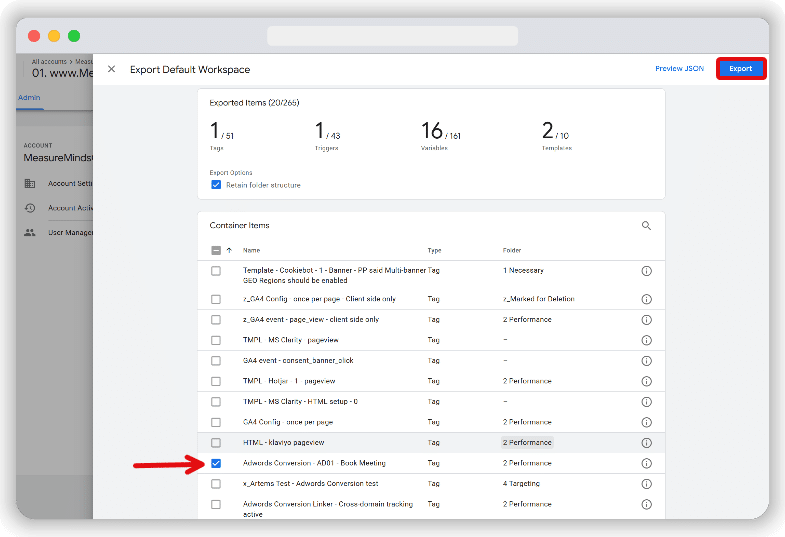
In the export window, select the default workspace.

From the list, choose the Google Ads conversion tag that had the checkbox enabled. Make sure to include its triggers, variables, and templates used. Click Export to download the JSON file.
Open the GTM container where you want to get the Google ads tag with the checkbox. Go to Admin and select Import Container.
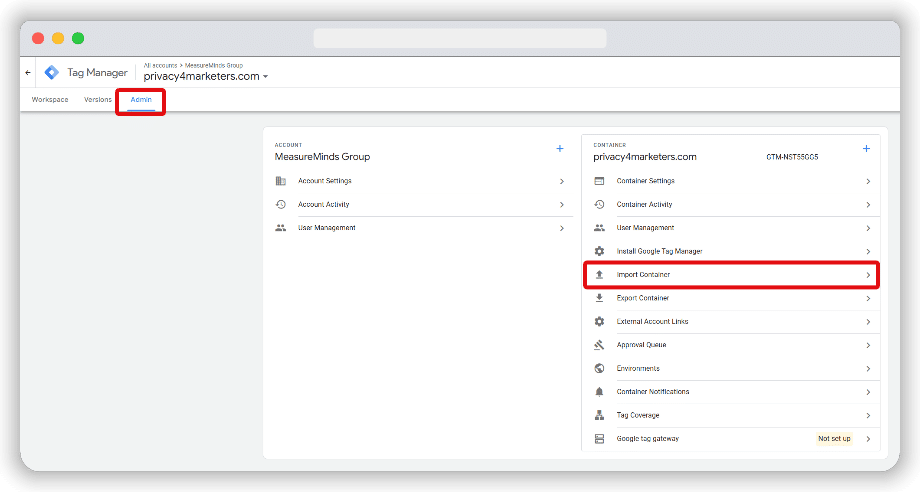
In the import window, upload the JSON file you just saved. Choose the workspace where you want to add the tag and select Merge to keep existing items.
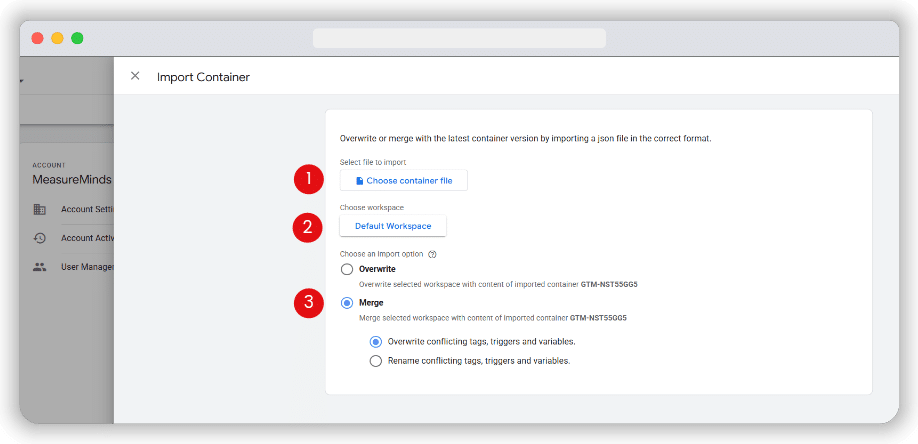
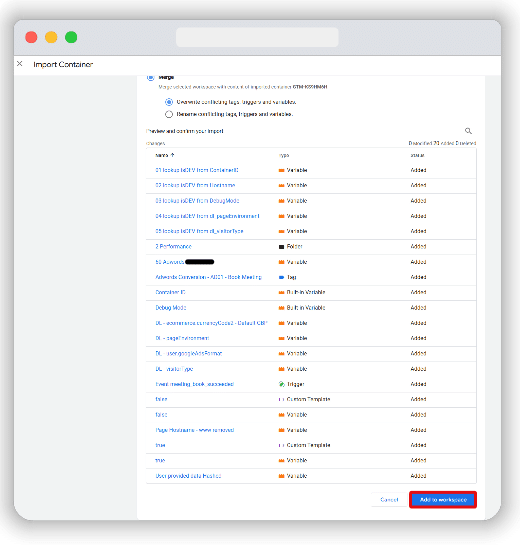
Review the list of changes shown in the preview. If everything looks correct, click Add to workspace at the bottom-right.
Now go to Tags section of that GTM account. You should see the imported Google Ads conversion tag in the list.
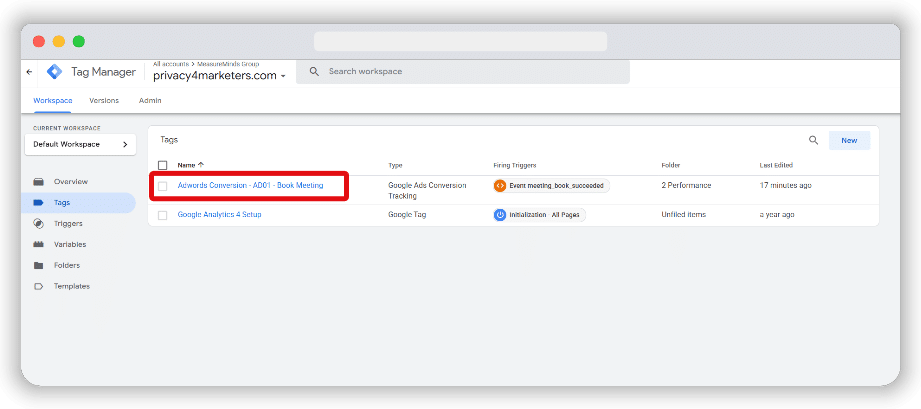
Open the tag to verify that the “Include user-provided data from your website” checkbox is visible. Ensure that you update any other fields, such as the conversion ID or label, to match your current campaign.
![]()
![]()
After these steps, you can adjust any remaining settings, variables, or triggers to match your current tracking needs. This method restores the old checkbox so that GTM can automatically collect user data on the conversion page.
Use the User-Provided Data Event Tag
If you prefer not to clone an old tag or import a container, you can capture user data with a dedicated event tag. To do this, make sure you have Admin rights in both Google Ads and Google Tag Manager. You also need a working GTM setup and a configured GA4 account.
Set up a Google tag
You must first allow Google Ads to send data into Tag Manager by installing a Google tag. If you already have one in your GTM container, you can skip these steps.
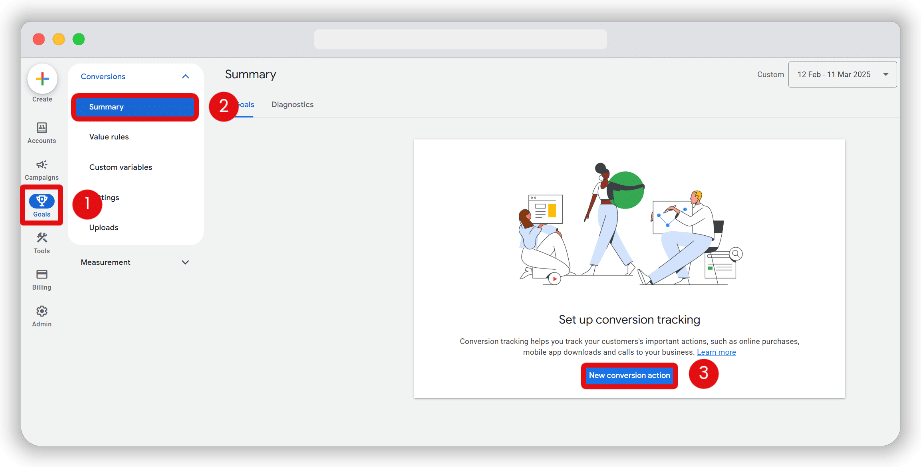
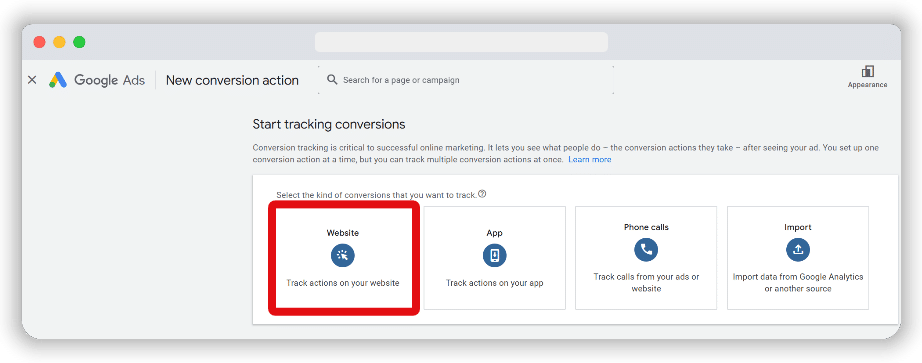
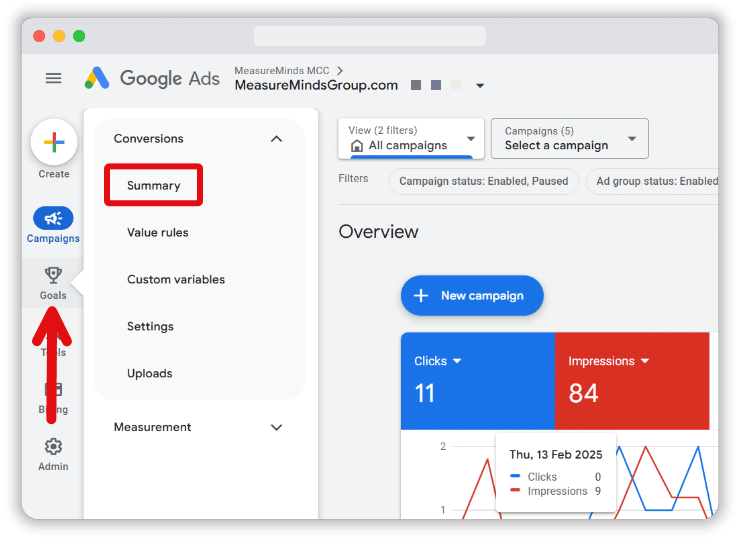
If you have not set up any conversions yet, start by creating one in Google Ads. Log in to your account at ads.google.com. From the left sidebar, go to Goals > Conversions > Summary. Click the “New conversion action” button.
Next, choose Website as the conversion type you want to track.
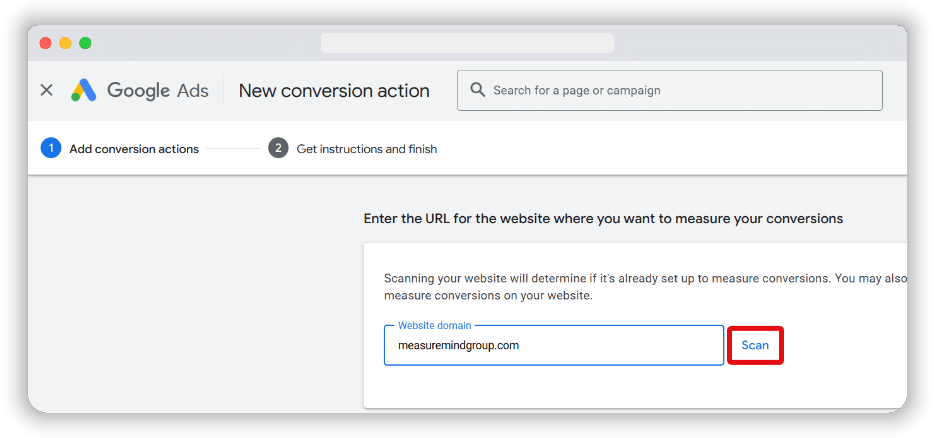
Enter the URL of the site where you will measure conversions, then click Scan. Scanning checks if your site is already set up for conversion tracking and may offer suggestions for new conversion actions.
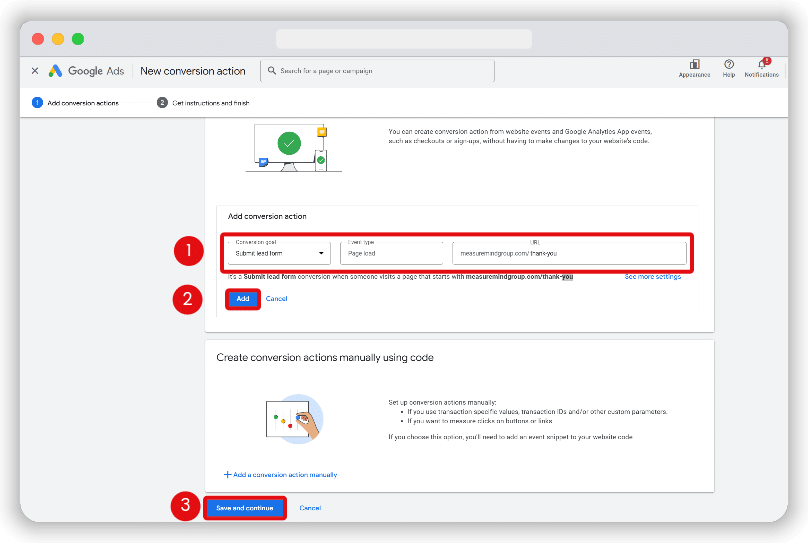
In the following window, create conversion actions based on your Web and App events. For this example, we’re setting up a lead form submission conversion when someone lands on a page that begins with measuremindsgroup.com/thank-you.
Click Add to save your conversion, and then click “Save and continue.”
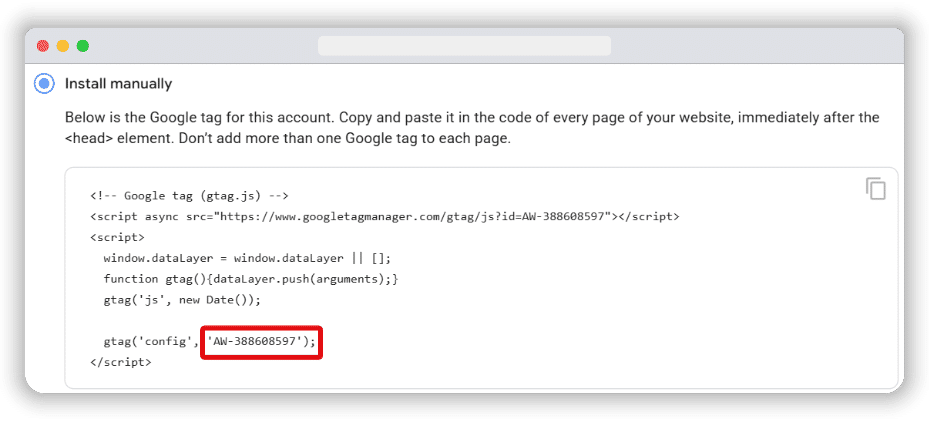
Since this is your first time using Google Ads, you will see a prompt to set up a Google Tag.
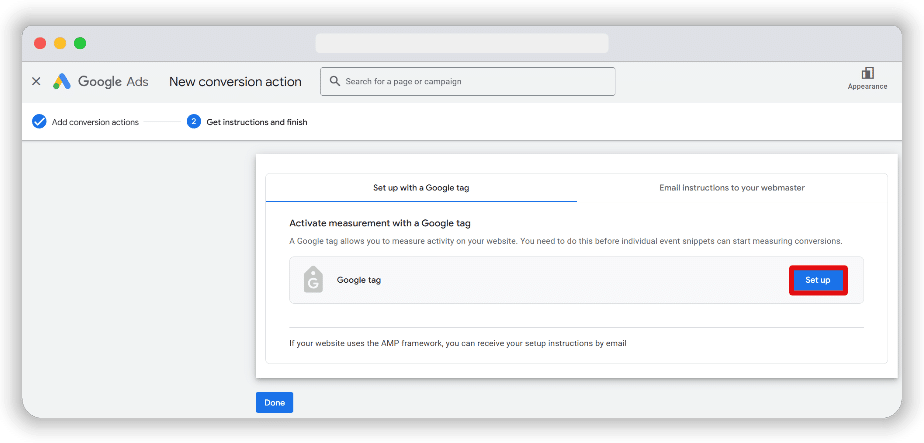
Because we are using GTM, all you need from the Google Tag setup is the ID that starts with “AW” found in the code snippet. Copy that ID.
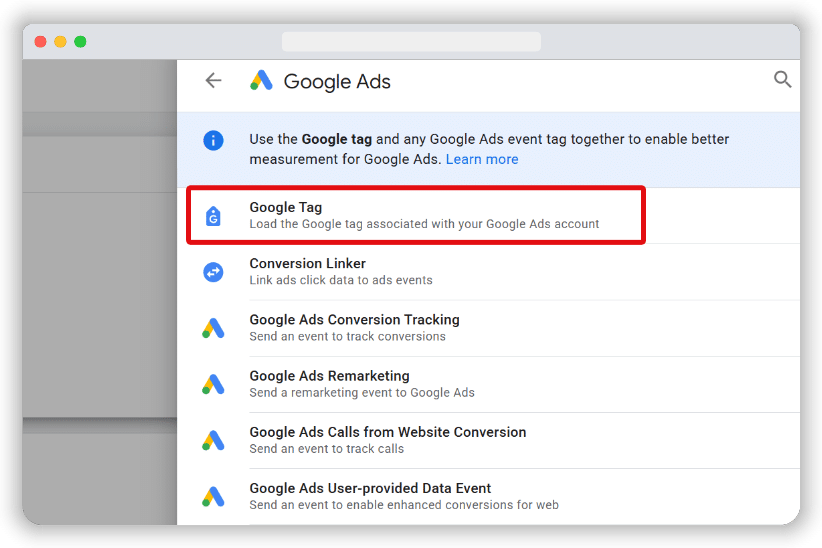
Log in to your GTM account and create a new tag. Under Tag Configuration, choose Google Tag.
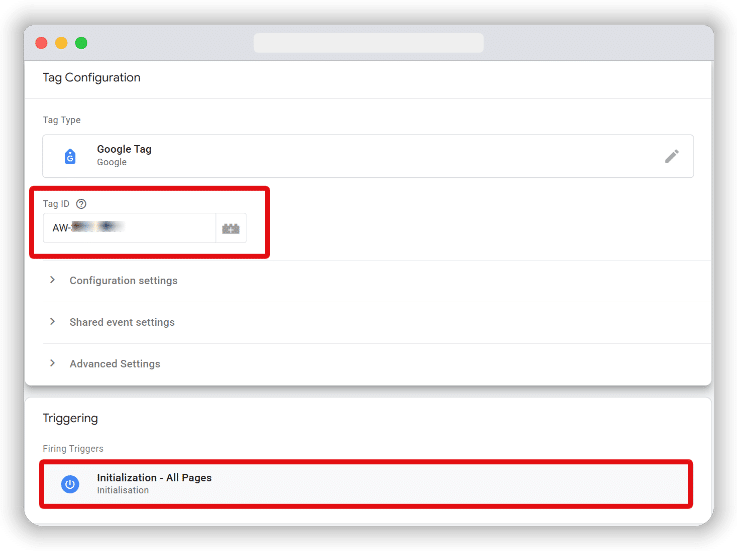
Paste the “AW” ID into the Tag ID field. Use the built-in trigger “Initialization – All Pages” so the tag loads on every page.
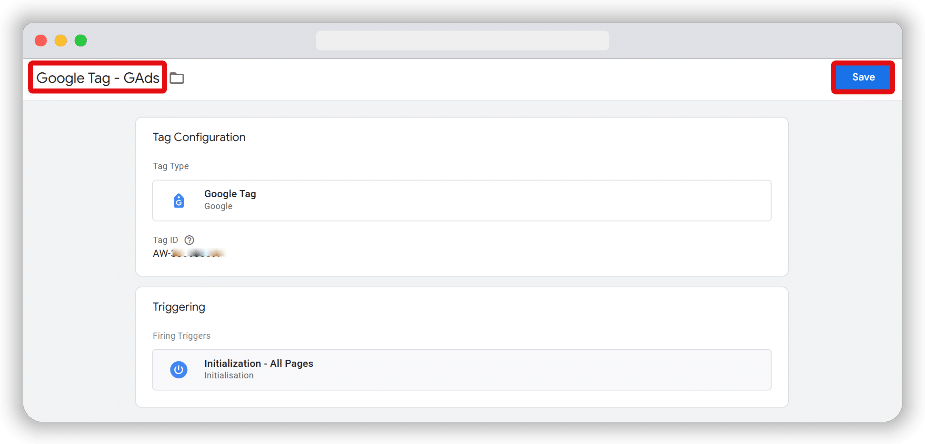
Name this tag “Google Tag – GAds” and click Save to finish.
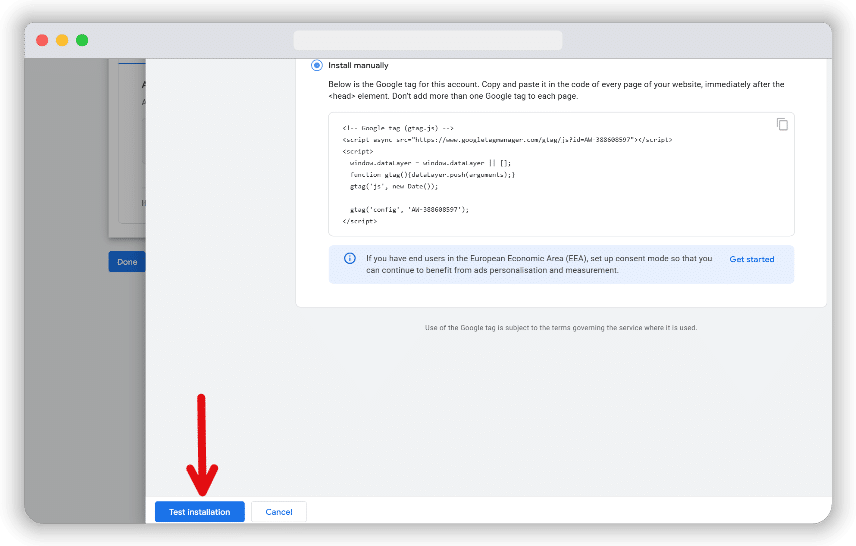
Publish your GTM container to send changes live. After a few minutes, return to the Google Ads interface where you copied the AW ID and click “Test installation.”
Note: You no longer need a separate Conversion Linker tag in GTM if the Google tag has already been set up.
Configure the Google Ads User-provided Data Event tag
You can add the Google Ads User-provided Data Event tag by following the steps below:
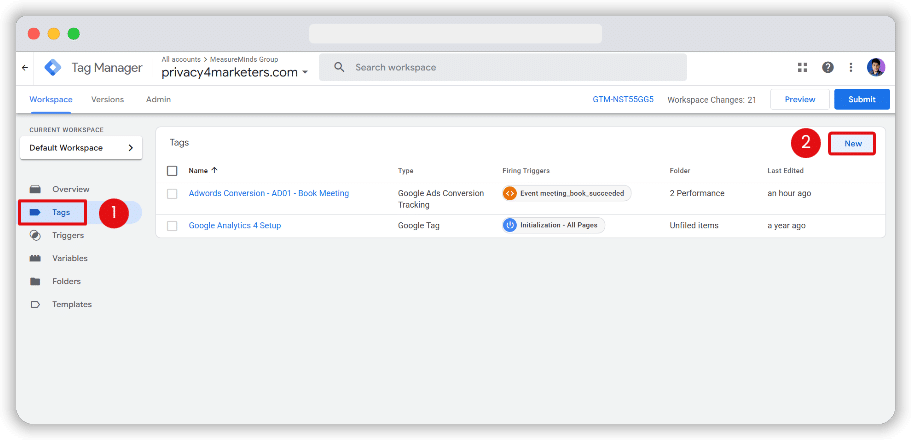
In your GTM container workspace, open the Tags menu on the left. Click New to create a new tag.
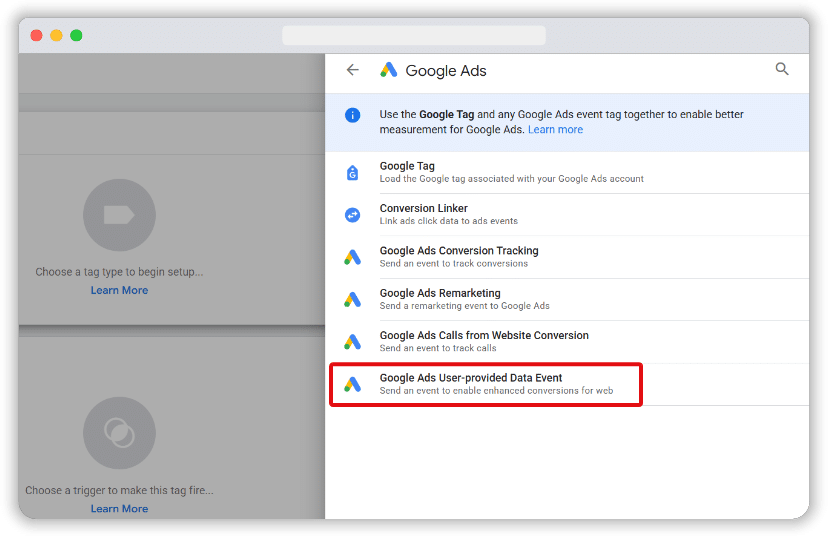
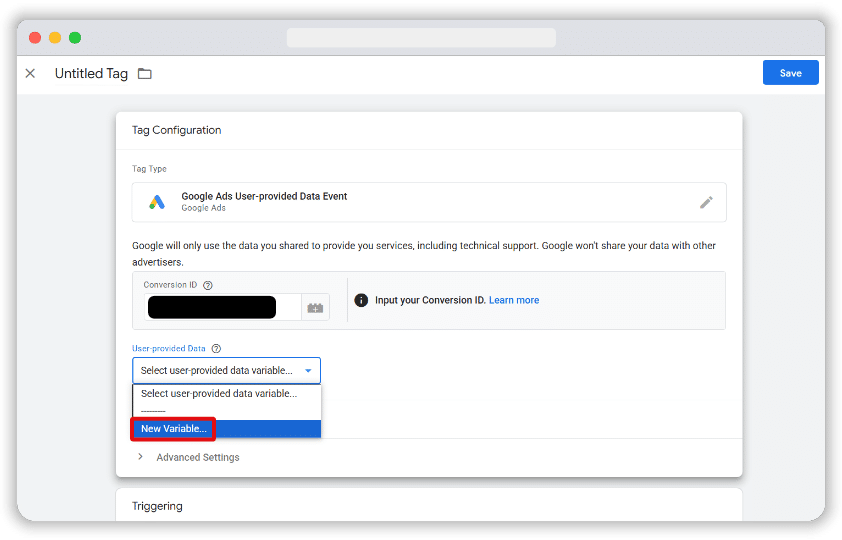
Select the Google Ads User-provided Data Event as the tag type.
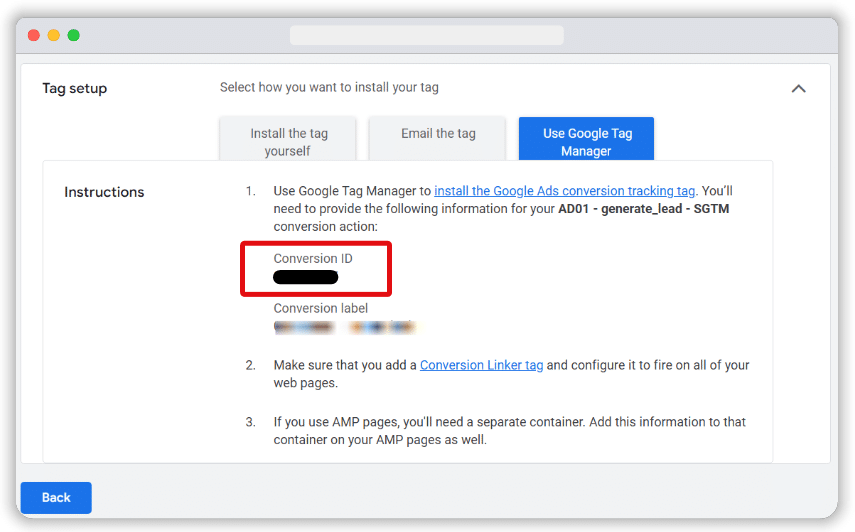
Enter the required Conversion ID. You can find this value in your Google Ads account:
1. In Google Ads, click the Goals icon and go to Conversions.
2. Under Summary, choose the conversion action you want to track.
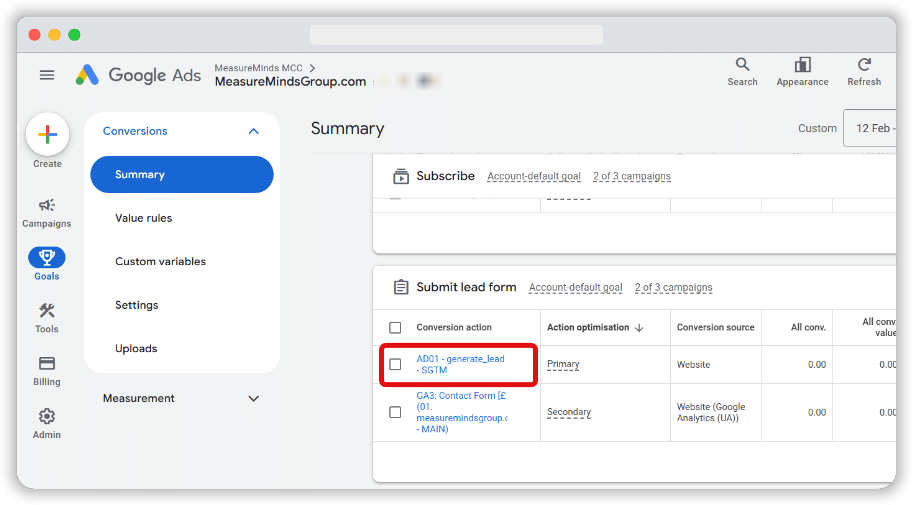
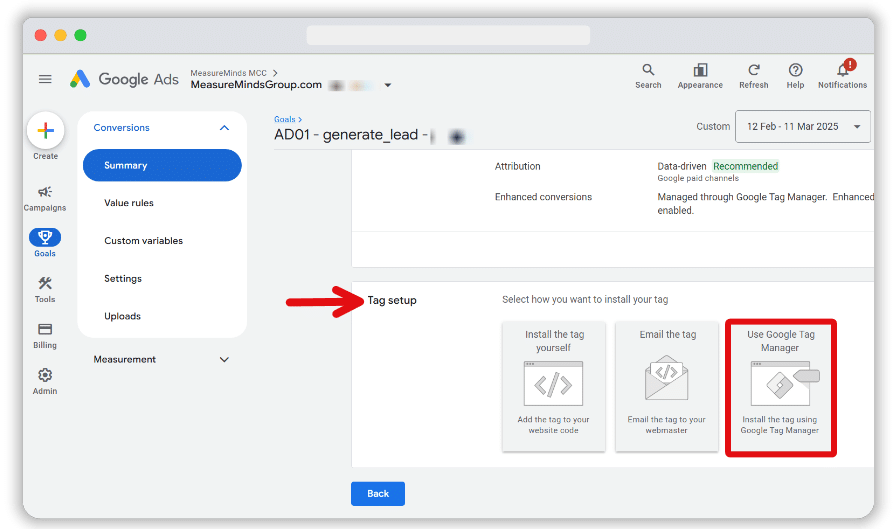
3. In the Tag setup section, click Use Google Tag Manager.
4. Copy the Conversion ID (this is unique for your account) and paste it on the Google Ads tag you’re configuring.
Set up a User-Provided Data variable
You have three options to collect user-provided data in Tag Manager. Pick one to use:
- Automatic collection: The system gathers data based on your site code.
- Manual configuration: You pick CSS selectors or JavaScript variables to grab user data.
- Code configuration: Add a script on your site that sends hashed data for better accuracy.
We will use automatic collection for its simplicity. If you need more control, you can explore manual or code methods.
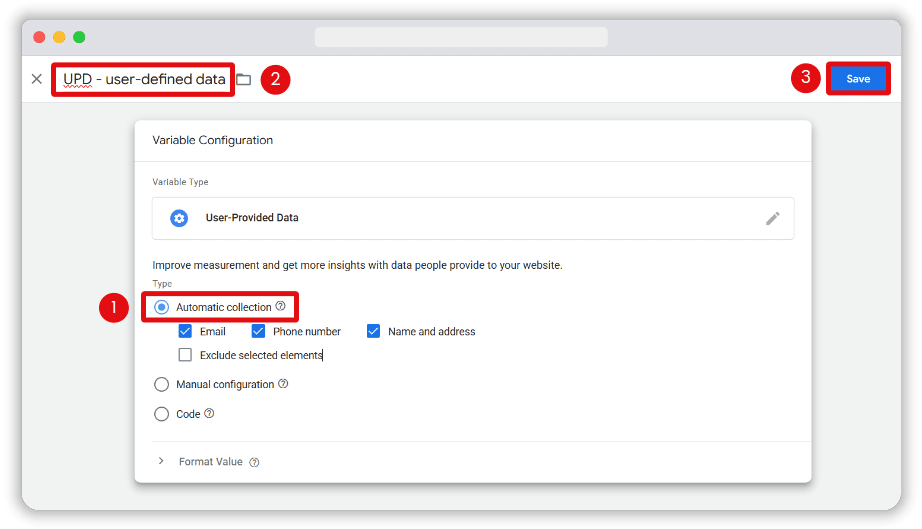
1. In the data event tag you created, go to the User-provided data section and click New Variable.
2. In the new variable window, select Automatic collection. Give the variable a clear name and click Save.
Configure the Trigger for the User-Provided Data Event tag
In the Triggering section, pick an existing trigger if it fits your needs. If not, create a new custom trigger by clicking the blue plus icon.
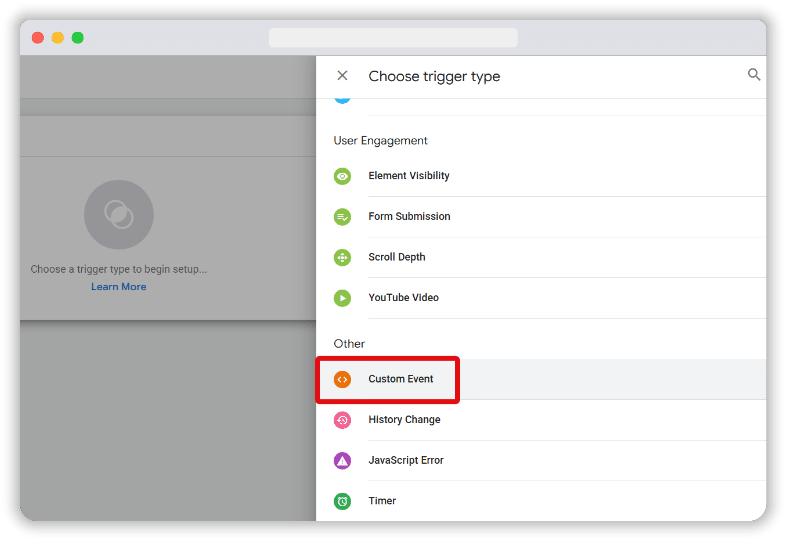
To fire the tag on a custom event:
1. Choose the Custom Event trigger type.
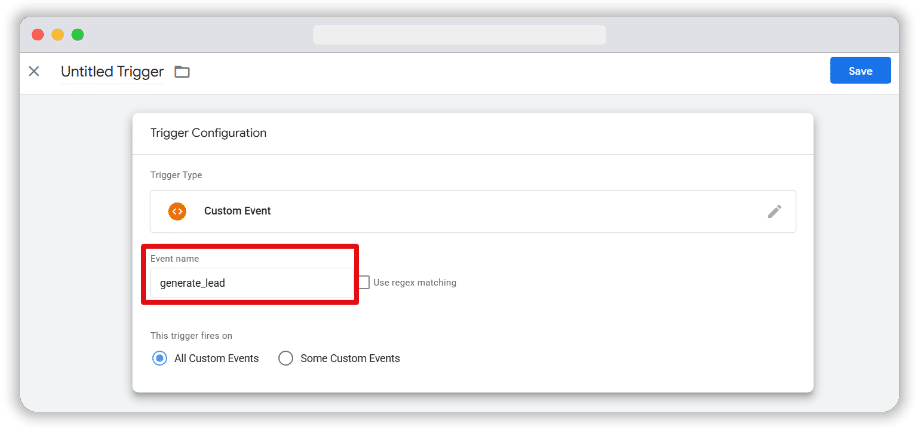
2. Enter the event name that matches the one used in your Google Analytics 4 Event tag. In our example, we use generate_lead as the event name.
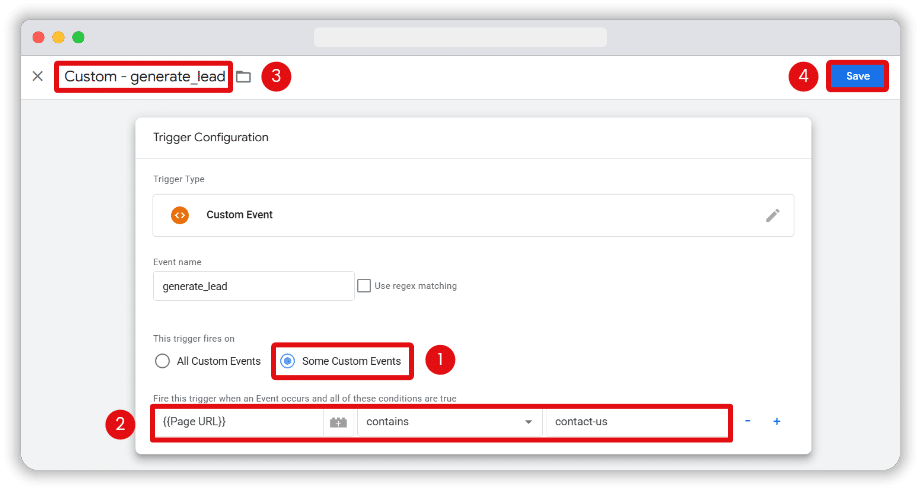
To fire the tag on specific pages:
- Choose the option to trigger on Some Custom Events.
- Add a condition where the Page URL variable equals the exact URL where you want the tag to run.
- Once your trigger is set, give the tag a descriptive name and click Save.
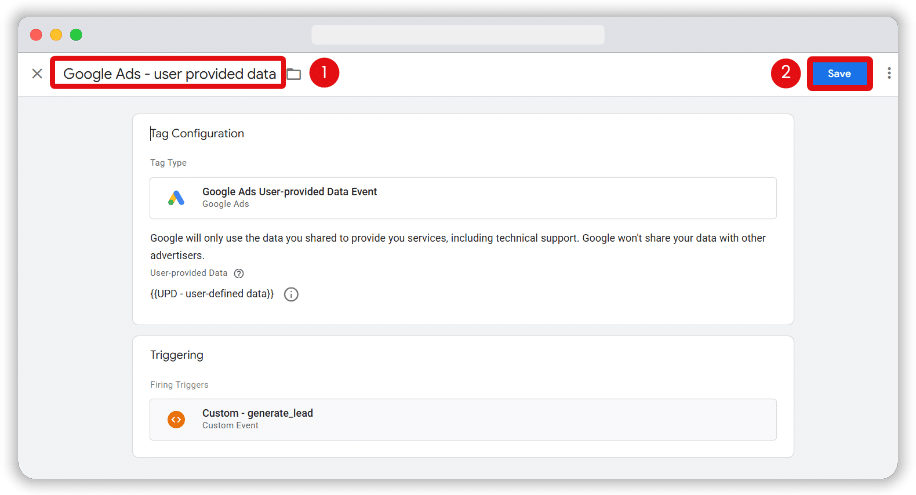
Now that we are done setting up our tag, let’s name it & click Save.
Final steps and testing
After you finish these setups, make sure to verify everything works as expected. Use GTM Preview mode to confirm the user data event tag fires at the right moment. Check the Network tab to see if the hashed data is sent to Google Ads. Once everything seems fine, publish your container. Also, you must check whether you have implemented consent mode correctly with your enhanced conversion setup.
In your Google Ads account, navigate to the Conversions option under the Goals menu. Under Summary, select the Diagnostics tab. Any issues will be listed here, and you can click See details to learn more. Once all problems are resolved, your setup is complete and ready to deliver accurate conversion data.
- Autoblock vs Google Consent Mode Categories: Pros & Cons - 22/04/2026
- Privacy Attack Vectors: What are They & How to Defend Against Them - 10/04/2026
- What are the Different Types of Consent? - 11/02/2026