Mastering GTM Templates: Privacy, Performance, and Scalability in Action

GTM templates are powerful tools. To explain why we’ll look at three real-life use cases relating to privacy, performance, and scalability. So, let’s jump in!
This is a webinar write-up of Mayra Valdes’s talk at GTM4ward V2. Find her slides here and a YouTube recording of her session below:
Privacy
Clean and redact PII from page URLs
PII (Personally Identifiable Information) refers to any data that can identify an individual, such as names, emails, or phone numbers. It’s important to remove PII to protect privacy, ensure compliance (e.g., GDPR, CCPA), and reduce the risk for users in data breaches.
One of the most common ways for PII to enter analytics data is through a website form. After a user has inputted their details, there’s a risk information will go into the URL, and from there, enter your analytics platform.
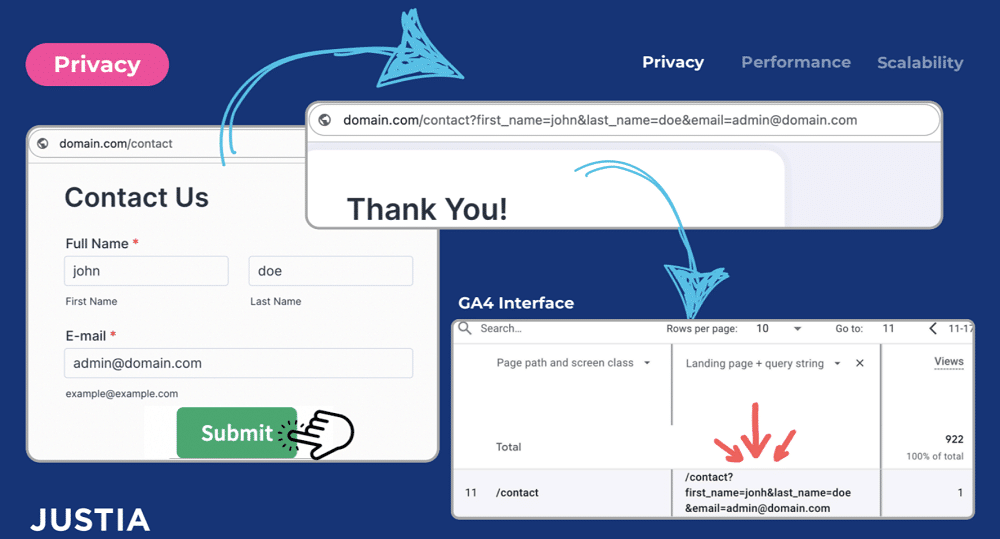
To understand this process, you first need to understand query parameters. This is all the text that appears after the question mark in the URL.

Before Google Tag Manager templates, users had to remove PII using a custom JavaScript variable.
Using templates to remove PII
Let’s look at two examples of templates for removing PII.
The first example uses whitelisting. This means that it only keeps a user’s predefined whitelisted parameters (eg. utm_source, utm_medium, etc). ]
The second method uses blacklisting. This removes a user’s predefined parameters and keeps everything else.

Whitelisting example
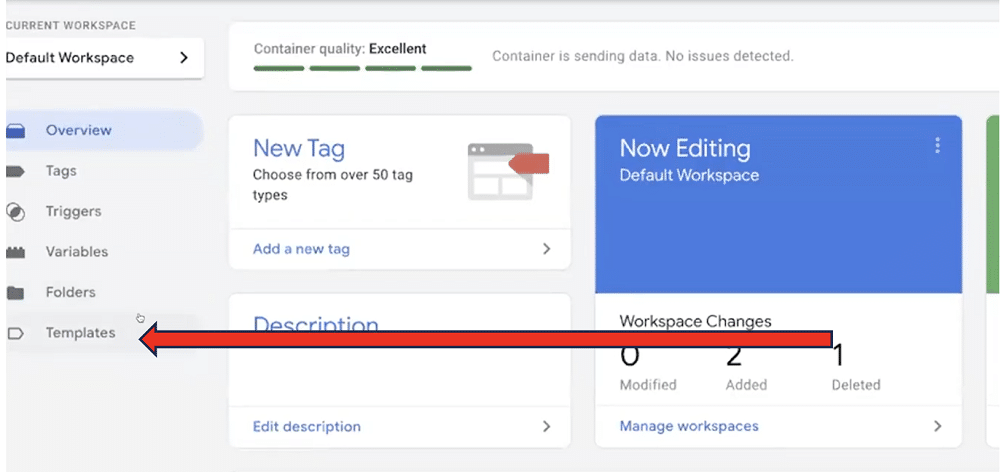
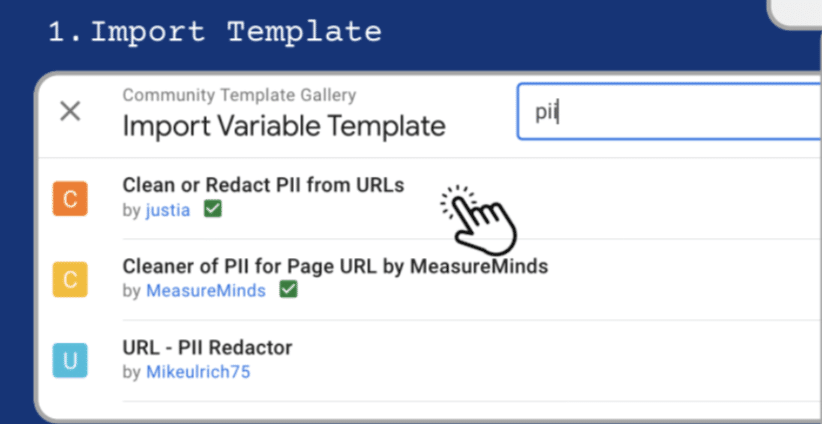
To import our whitelisting template, you first need to head to the ‘templates’ section on GTM.
Next, select ‘search gallery’ to find your downloaded template.
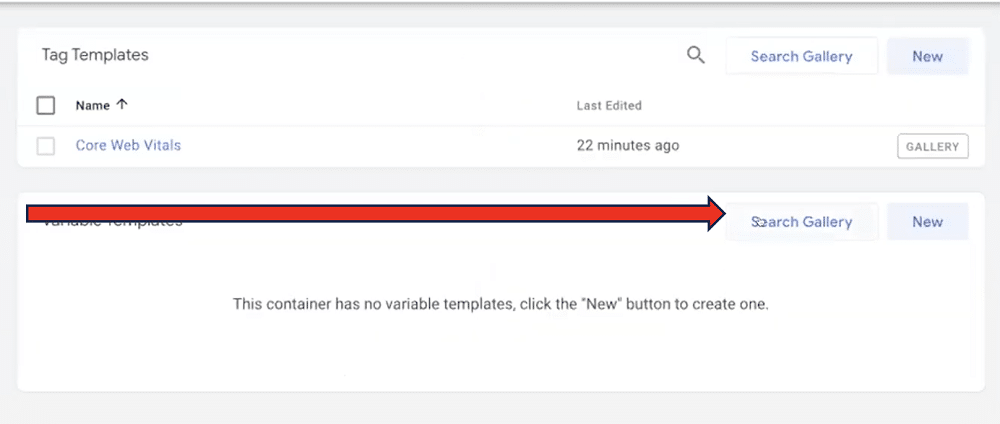
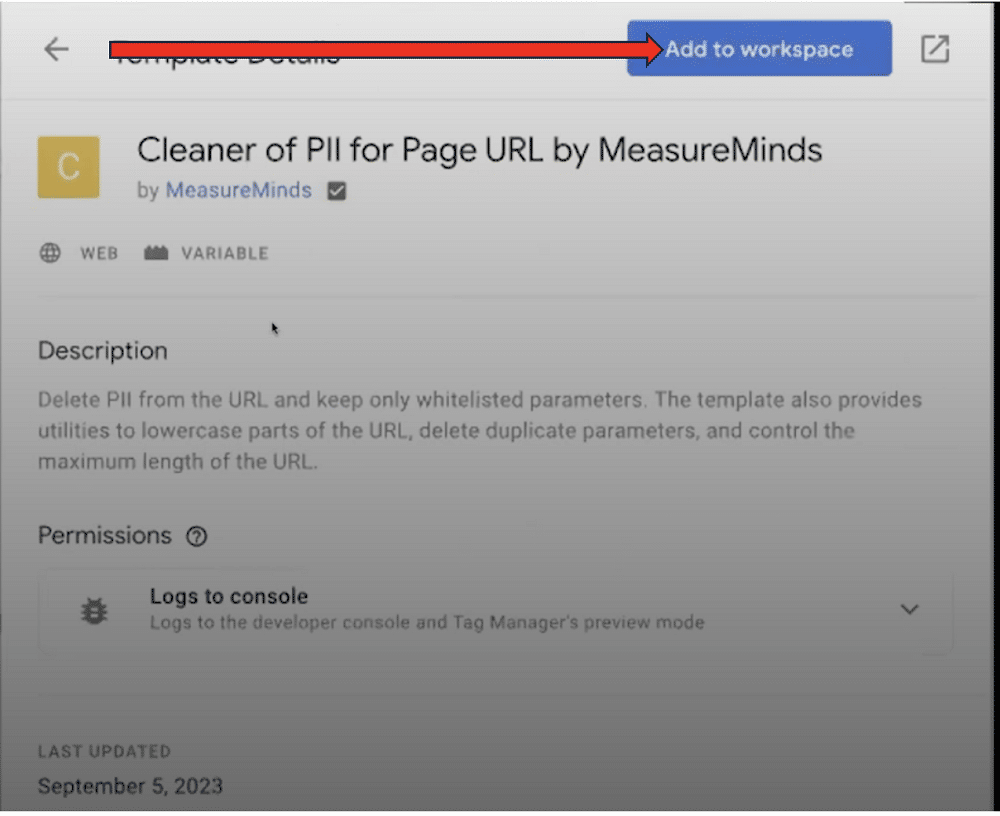
From here, enter the name of your template within the search field. Next, select your template from the list and choose ‘Add to workspace’.
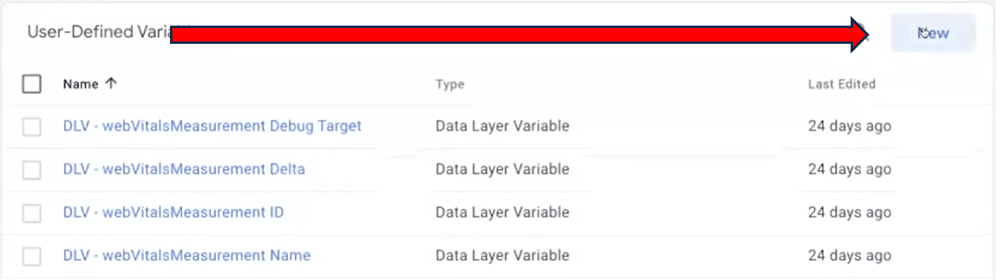
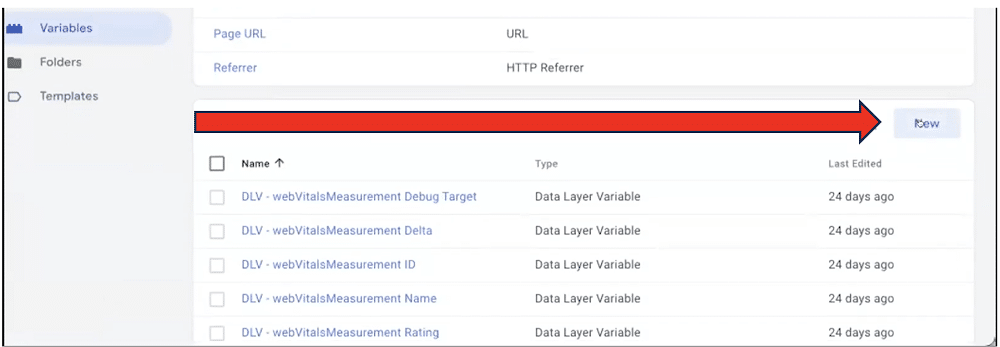
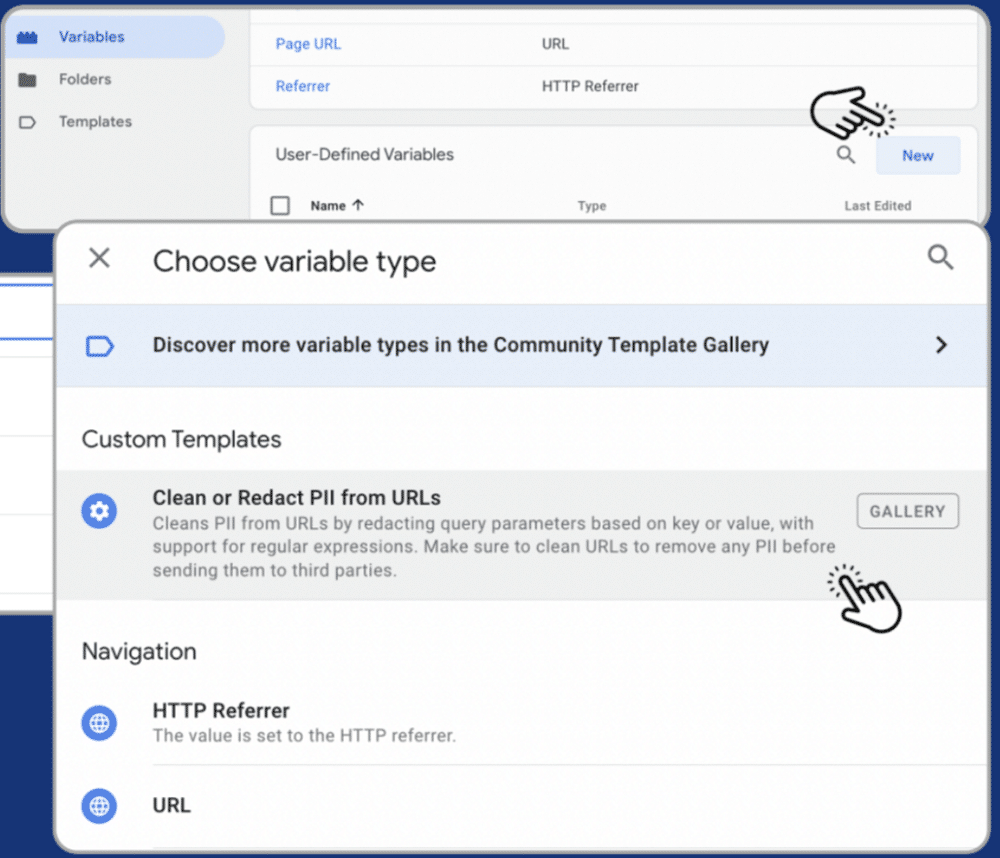
Now, let’s create a variable based on our downloaded template. To do so, go to the ‘Variables’ heading. Then, choose ‘New’ from the ‘user-defined’ variables section.
Select your new custom variable from the ‘Choose variable type’ screen.
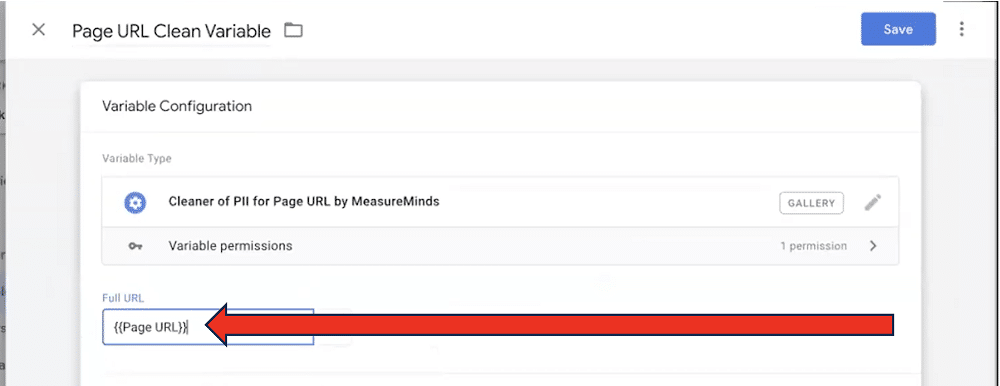
Next, name your variable and head to the ‘Full URL’ section. It’s here that we’ll be able to add to our whitelist. To do so, choose ‘Page URL’.
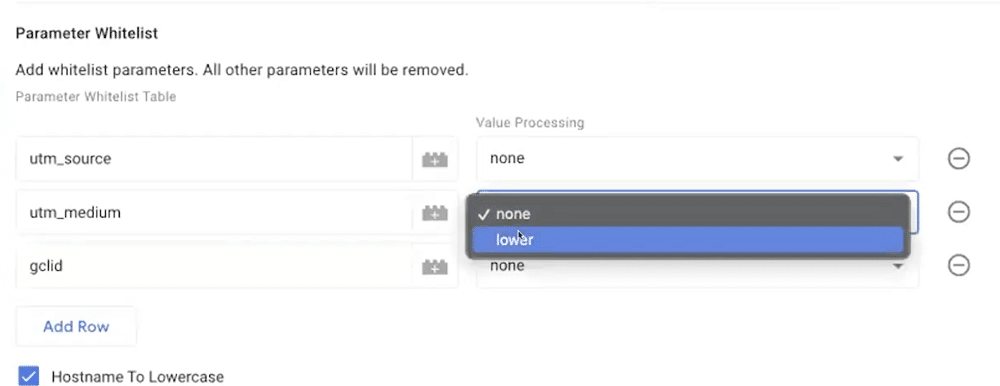
The whitelist template repository recommends some default query parameters. For this example, we’ll add just two ‘utm_source’, ‘utm_medium’, and ‘gclid’. For ‘utm_medium’, we’ll also choose the value processing as ‘lower’ as this normalises the value.
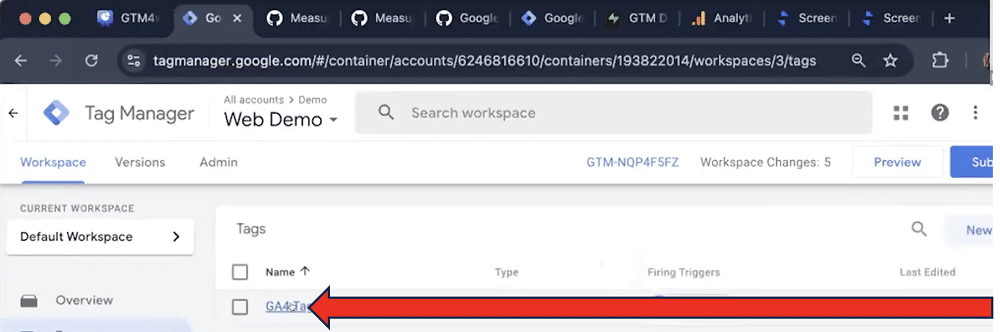
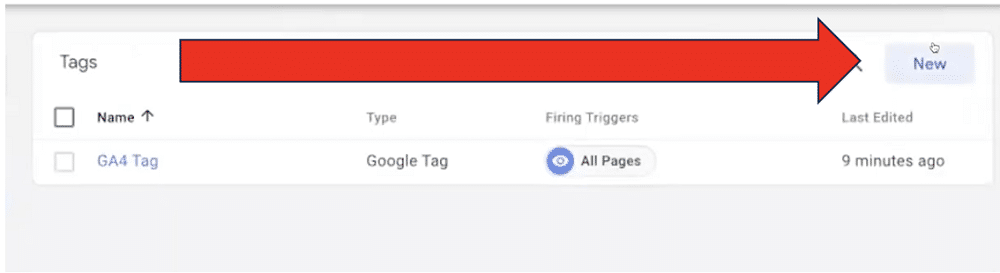
Lastly, we need to send our newly created variable to Google Analytics. For this, we’ll go to ‘Tags’ and select the GA4 tag.
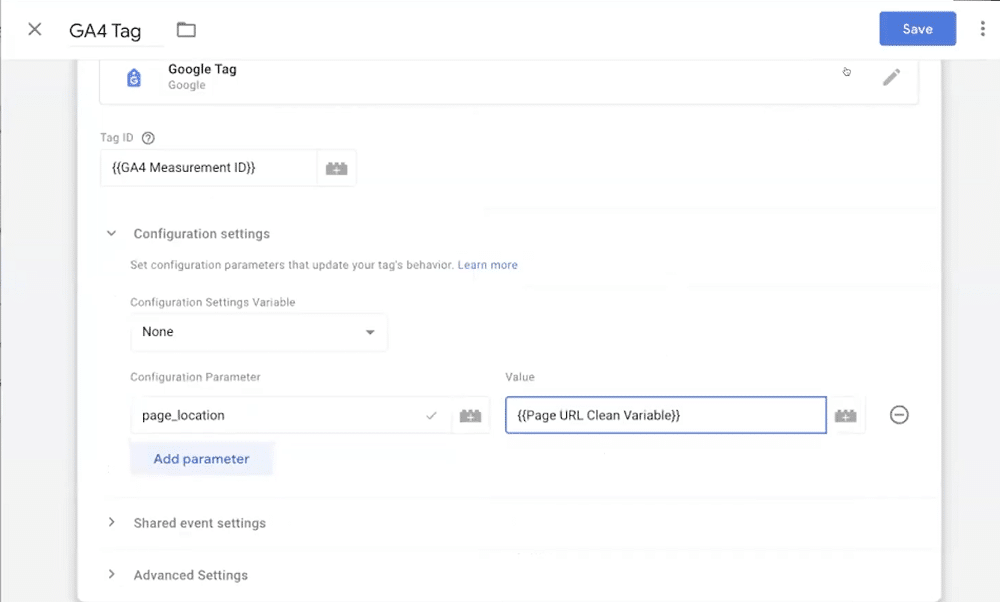
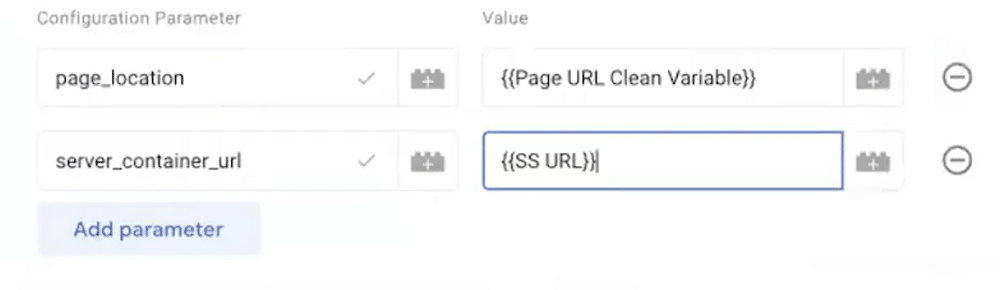
From within the GA4 tag, we’ll set the configuration parameter `page_location` as this is the variable we want to override. For value, we’ll select ‘{{Page URL Clean Variable}}. Lastly, we’ll click save.
And that’s everything we need to add to our settings. Now, we just need to confirm that our template is functioning as it should be.
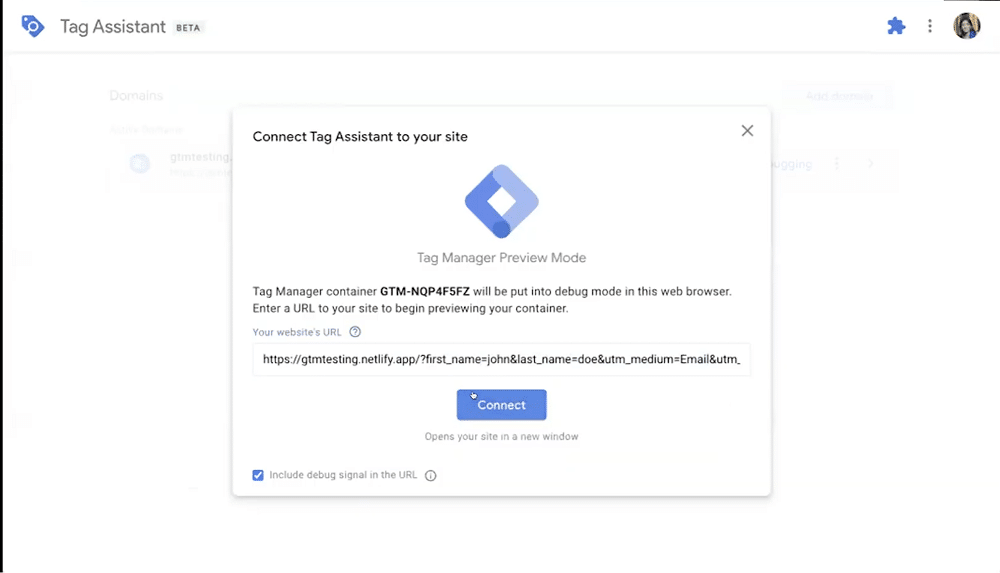
To do so, we’ll load up GTM preview mode and a website URL containing PII.
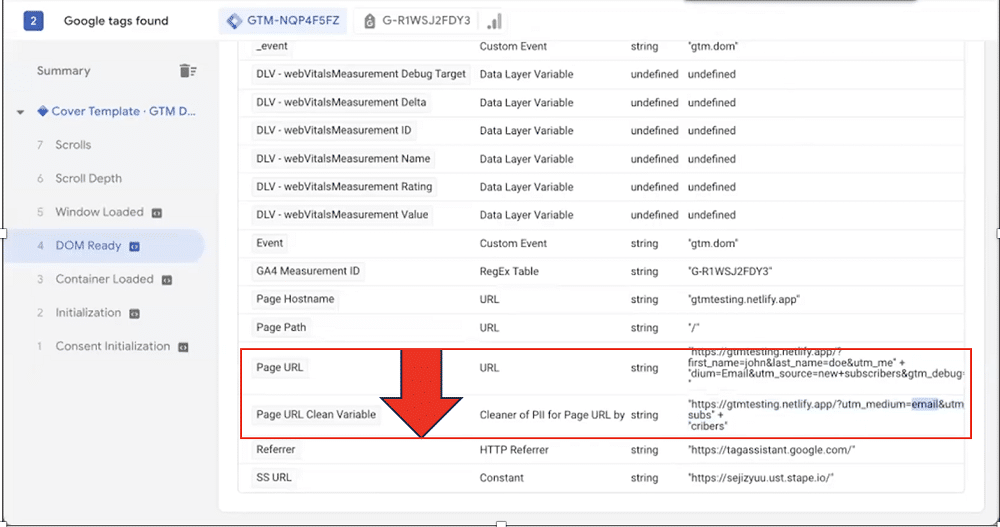
From the data layer, we can see the original request, containing the first name, last name, UTM medium, and UTM source. We can also see the page URL clean variable, removing the PII and lowercasing the email.
And there we have it, the template is working as it should be. We simply need to repeat this process for each event that contains PII.
Blacklisting example
To import the blacklisting template, we follow a similar process.
First, we import the template.
Then, we create the variable by clicking ‘New’ and choosing the template.
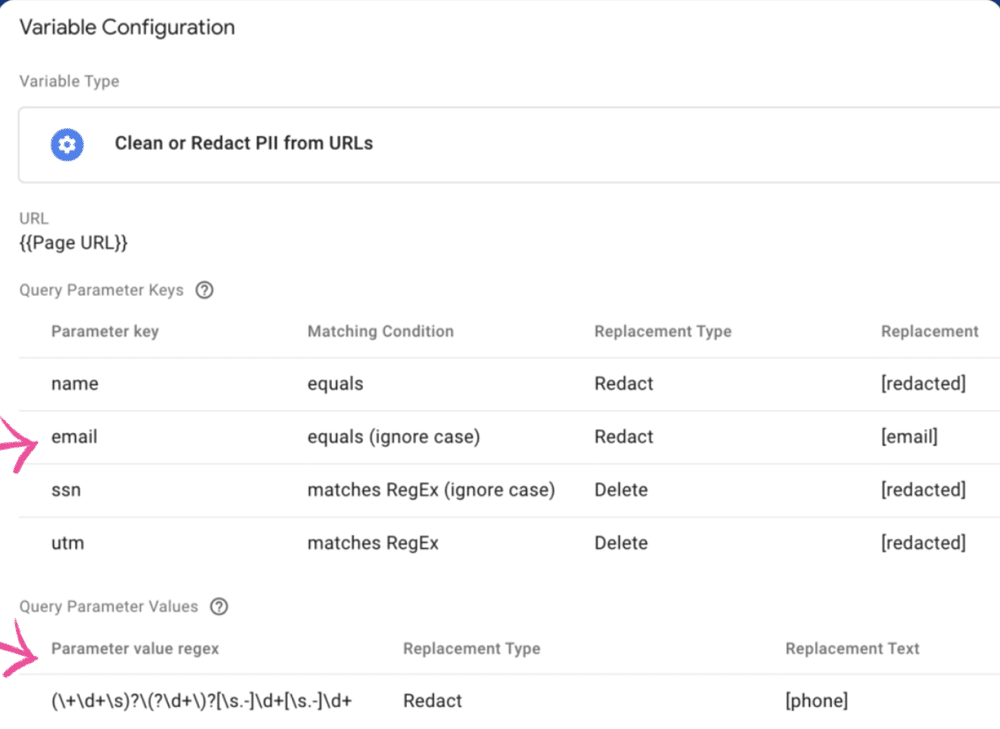
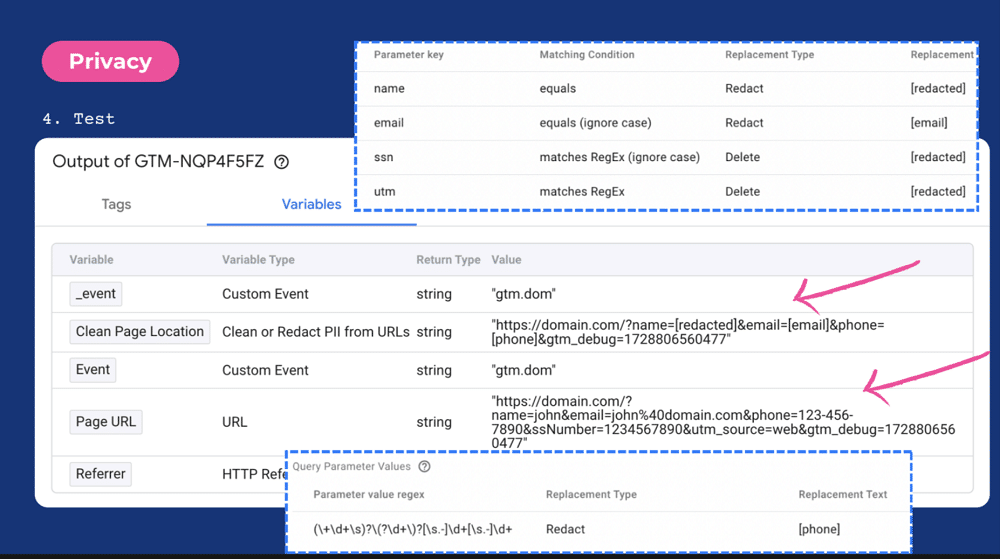
Next, we’ll configure the template. We’ll input the URL and also choose a ‘parameter key’. This enables us to add ‘matching’ conditions. For instance, this might look for a parameter that contains a matching RegEx.
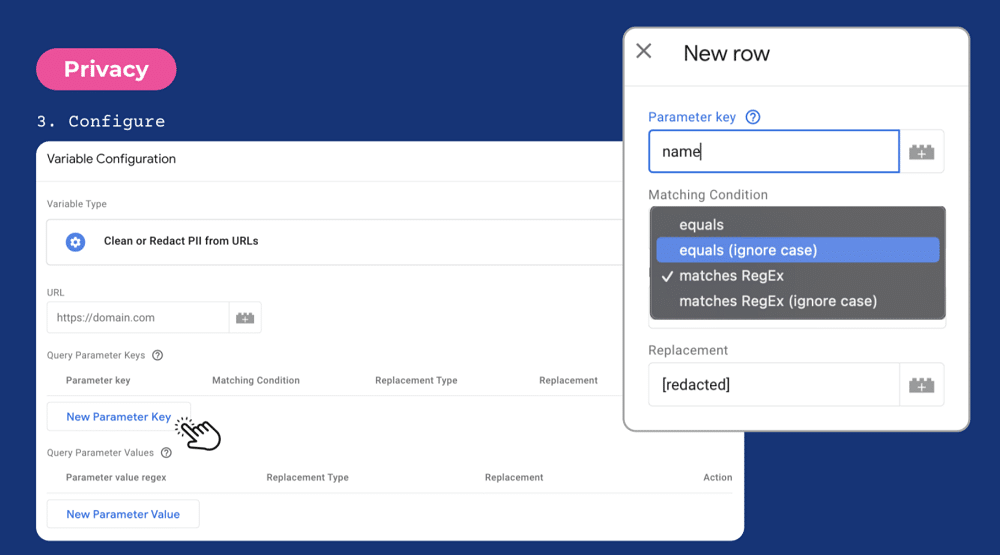
We can also choose to redact rather than simply remove blacklisted values. In this case, the value would appear as ‘[redacted]’ in reports.
Lastly, let’s test the template once again. We can see that blacklisted values have been removed from the variable.
Server Side example
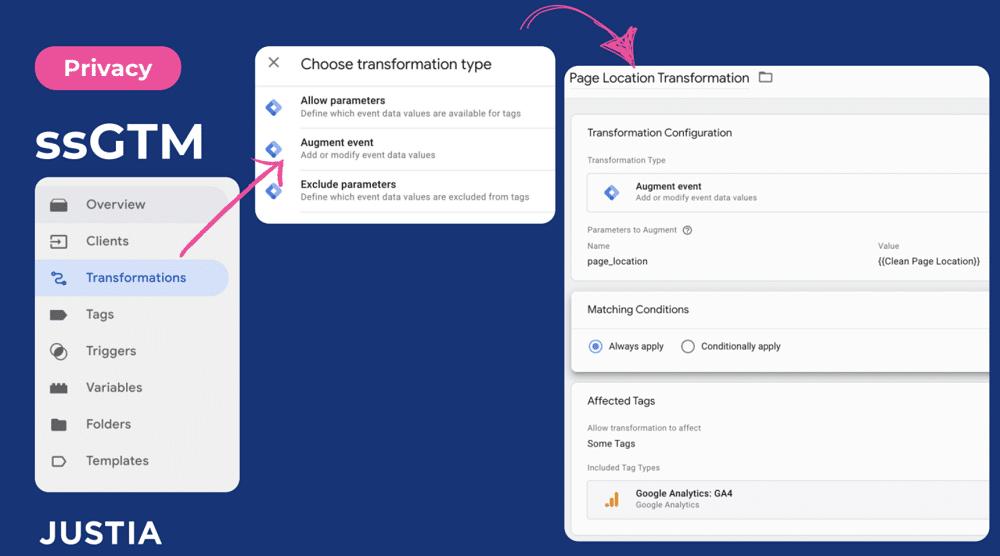
There’s a third option for users that have set up GTM server-side. Using Server-side, you can use a feature called ‘transformations’, which allows you to modify events or remove parameters.

In this instance, we’ll modify the page location to a variable. We could choose to apply this to all tags or only certain tags. For example, we might have separate configurations for GA4 and Facebook.
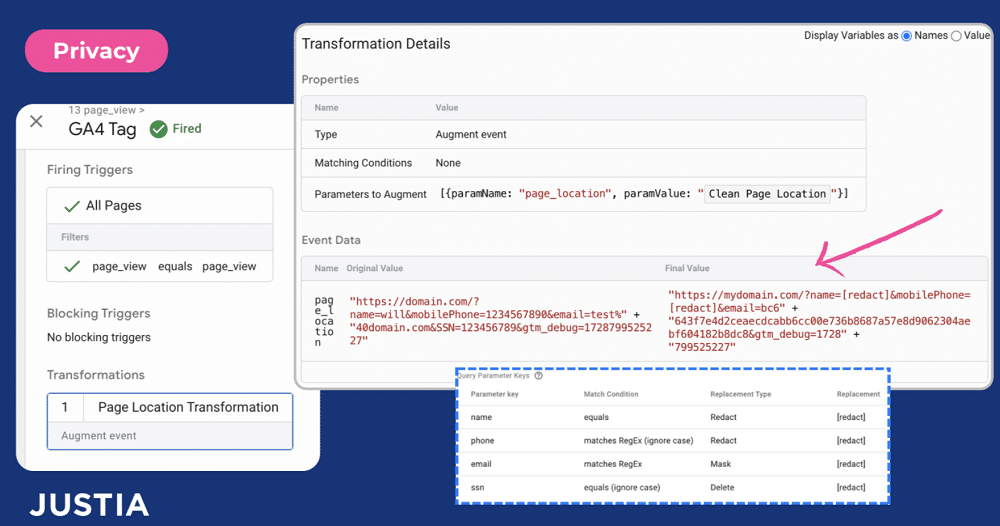
Lastly, we’ll once again test the template. We can see that PII has been removed from the final value.
Which should you pick?
Both templates contain pros and cons. When choosing any template it’s important to check the template, description, documentation, and home page to verify the quality.
Extra tip
Around October 2023, Google added a tool to redact data inside the GA4 interface.
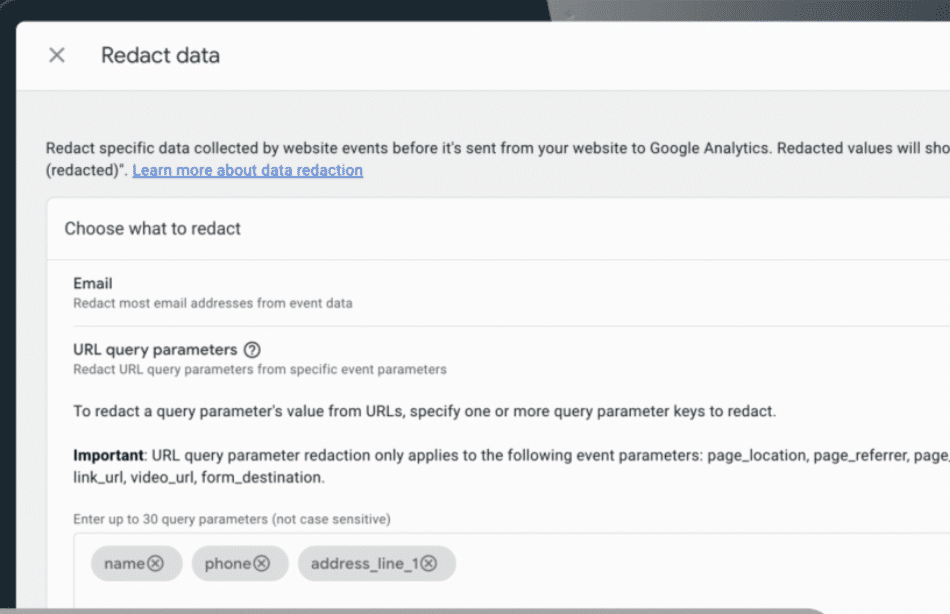
There are, however, some limitations to this approach. These include:
- GA4 only allows redacting, not deleting
- GA4 does not allow customising the redaction text
- GA4 does not support partial matches or regular expression matches
Performance
Core web vitals tracking
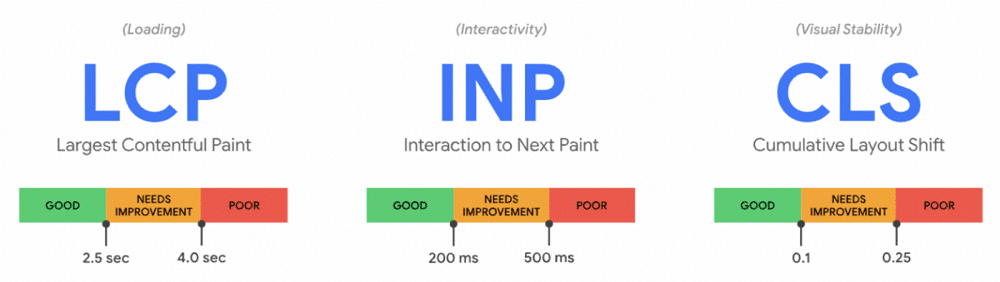
Core Web Vitals are user experience metrics that measure a website’s speed, interactivity, and visual stability of a webpage.
There are three core web vitals: Largest continental paint (LCP), INP (interaction to next paint), and cumulative layout shift (CLS). In each area, Google provides a score of ‘Good’, ‘Needs Improvement’, and ‘Poor’.
There are debugging tools that can be used to support your core web vitals. A user could connect Google Search Console to GA4 or use PageSpeed Insights. These tools:
- Report data by either monthly or previous 28-day periods.
- Can only be segmented by a limited number of dimensions, such as device category (desktop or mobile).
Tracking with a Google Tag Manager template
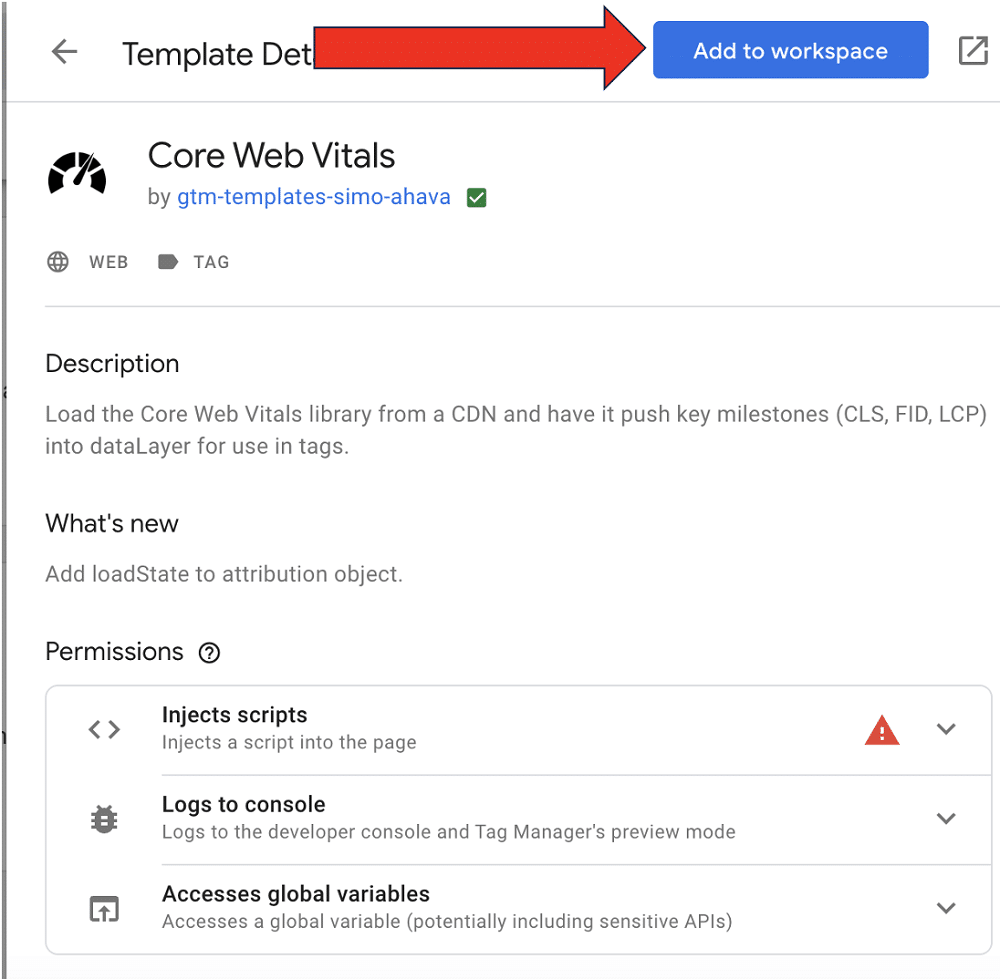
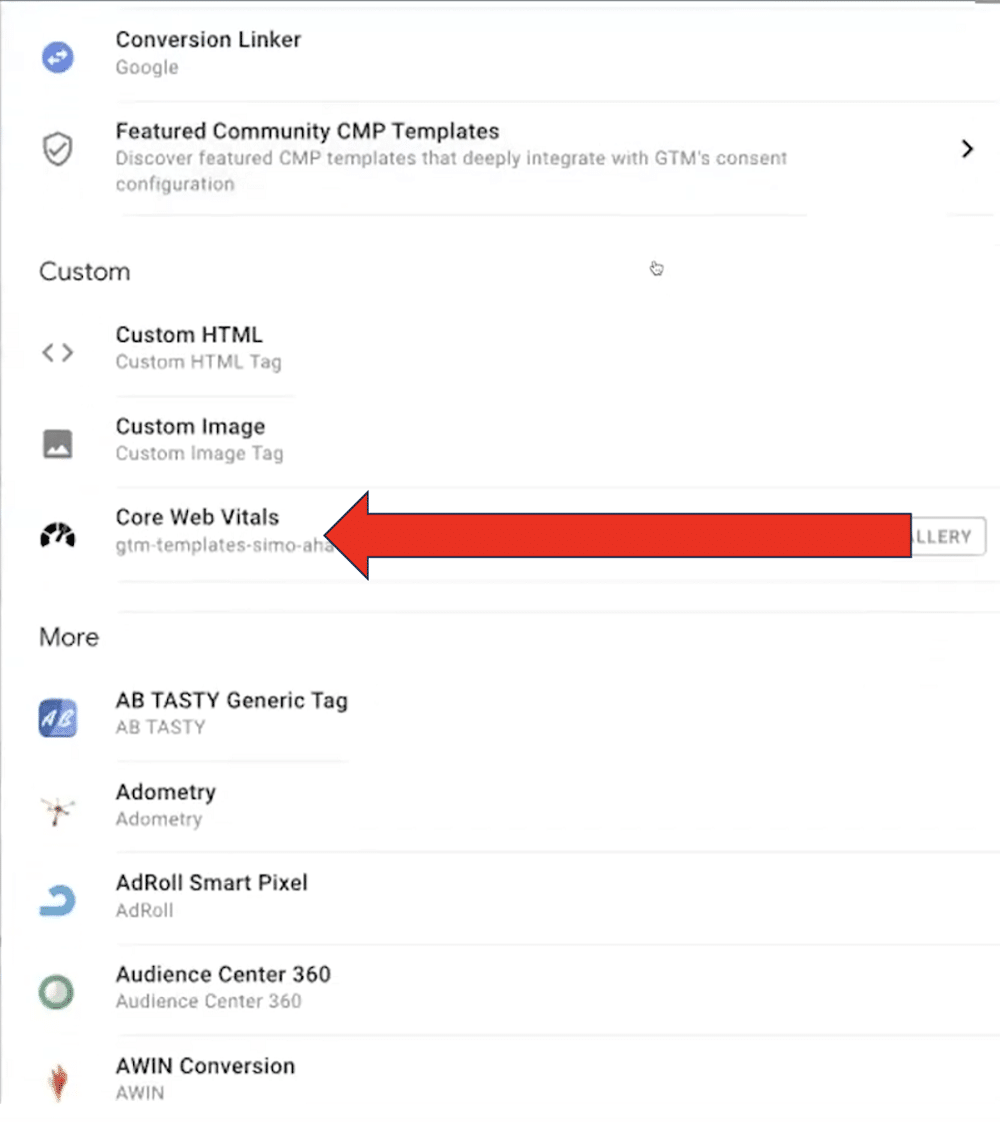
To begin, we need to import a template into our container. For this example, we’ll be using the ‘Core Web Vitals’ template from Simo Ahava.
Note: This template is only a wrapper from the official Javascript library. It loads an external script from unpkg.com. Be careful if your website has a lot of traffic. It could add a lot of extra events. A metric callback may not be called if the user never interacts with the page, or, if the page was loaded in the background.
Let’s go to the search gallery as we did in the earlier example. Once again we’ll choose ‘Add to Workspace’.
Now, we need to add the template to our tags. We’ll choose ‘New’ and ‘Tag Configuration’.
Let’s select our new tag from the list.
We’ll name our tag and choose ‘Send Attribution data’.
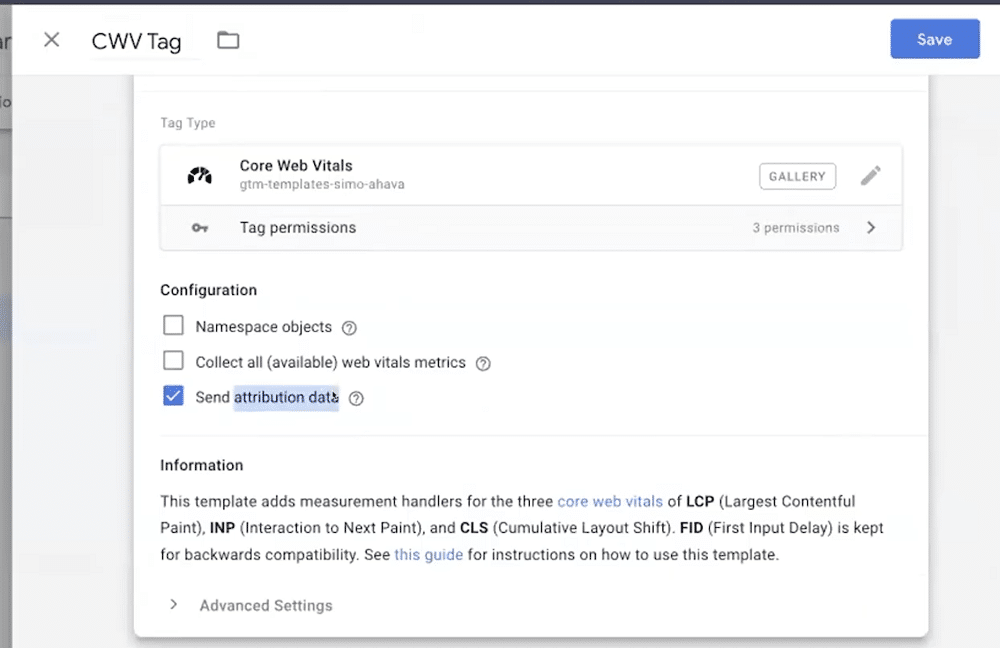
Lastly, we need to set a trigger. Let’s choose the ‘All pages’ trigger.
And, just like that, we have set up the container template. Here again, let’s test that everything is working properly.
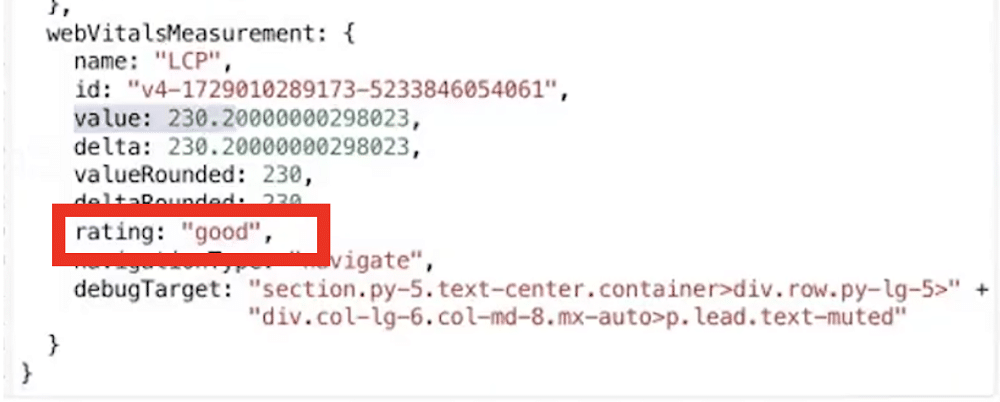
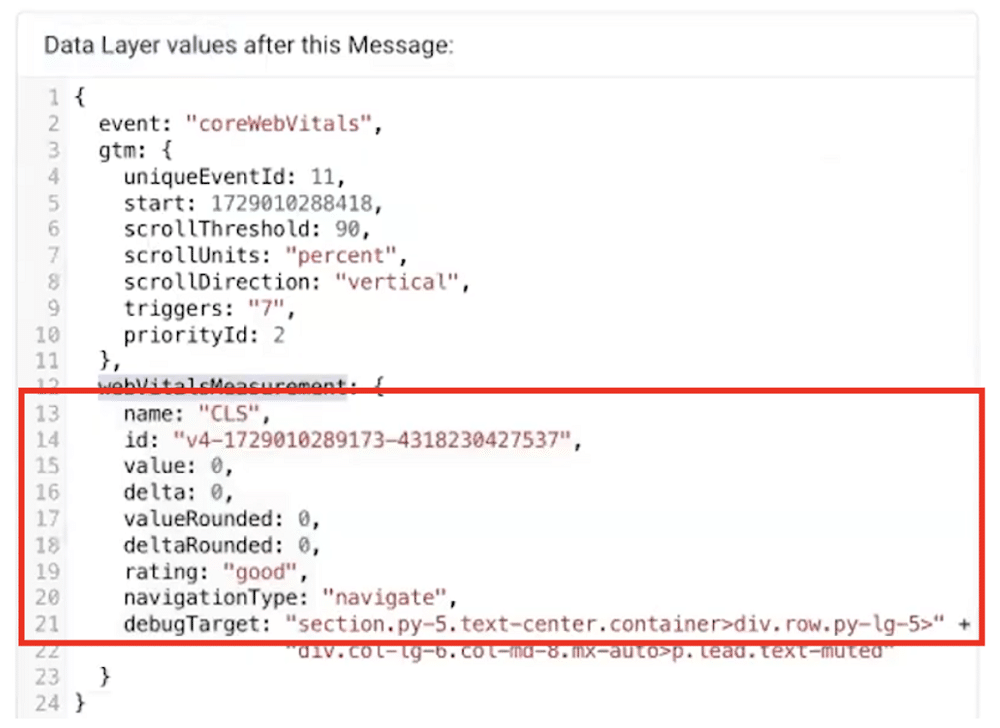
After navigating a website, we can see that the coreWebVitals are displaying within preview mode.
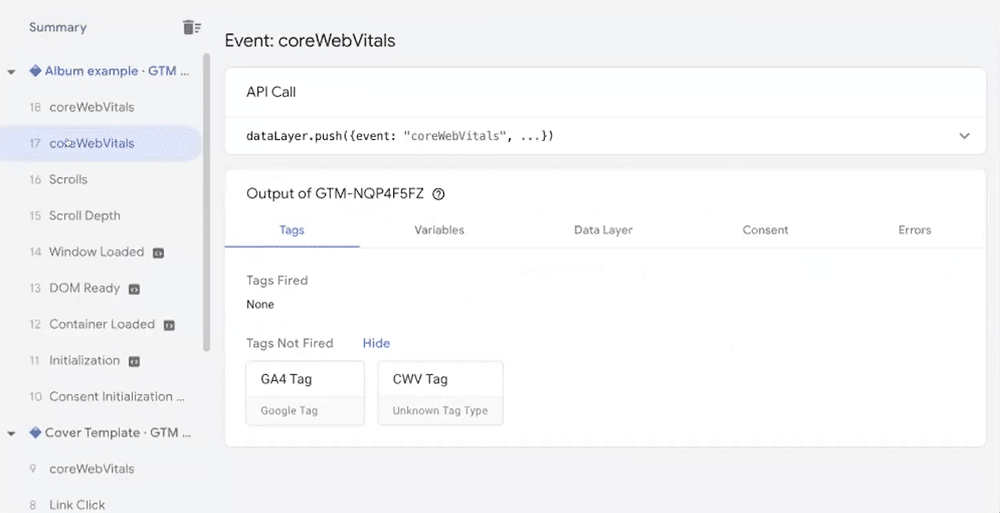
We can see that we have received an LCP rating of ‘good’.
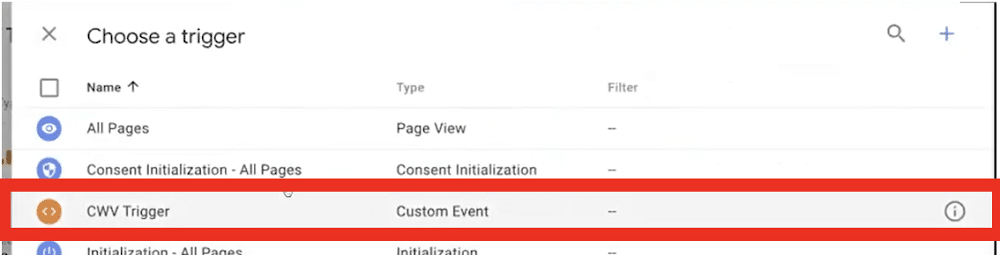
Now, let’s send this information to GA4. To do so, we’ll need to create a trigger that watches this event.
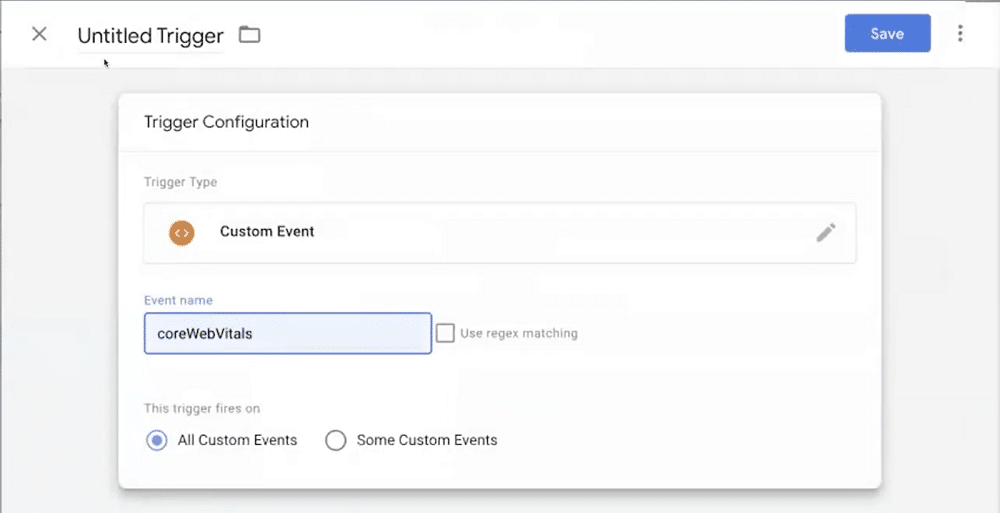
Once again, let’s head to Triggers>New>Trigger Configuration. Here, we’ll choose ‘Custom Event’.
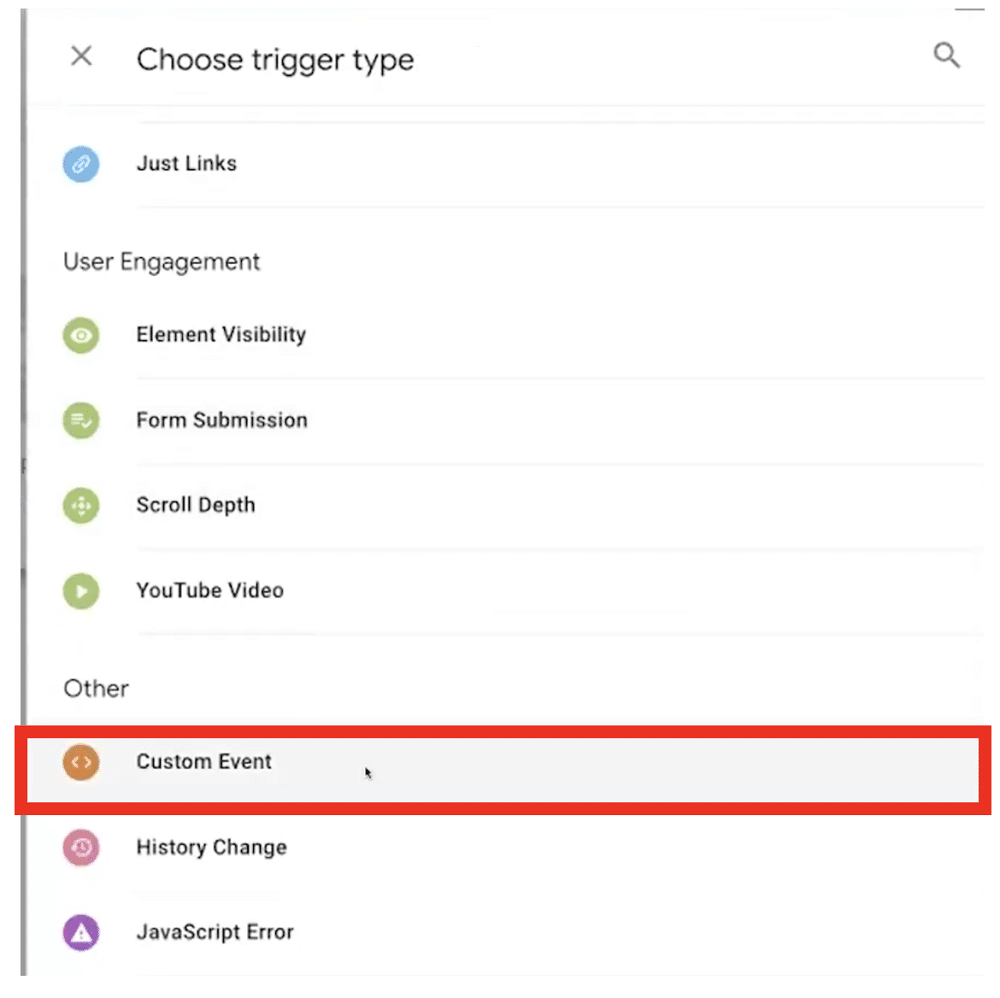
We’ll now input the name as ‘CoreWebVitals’.
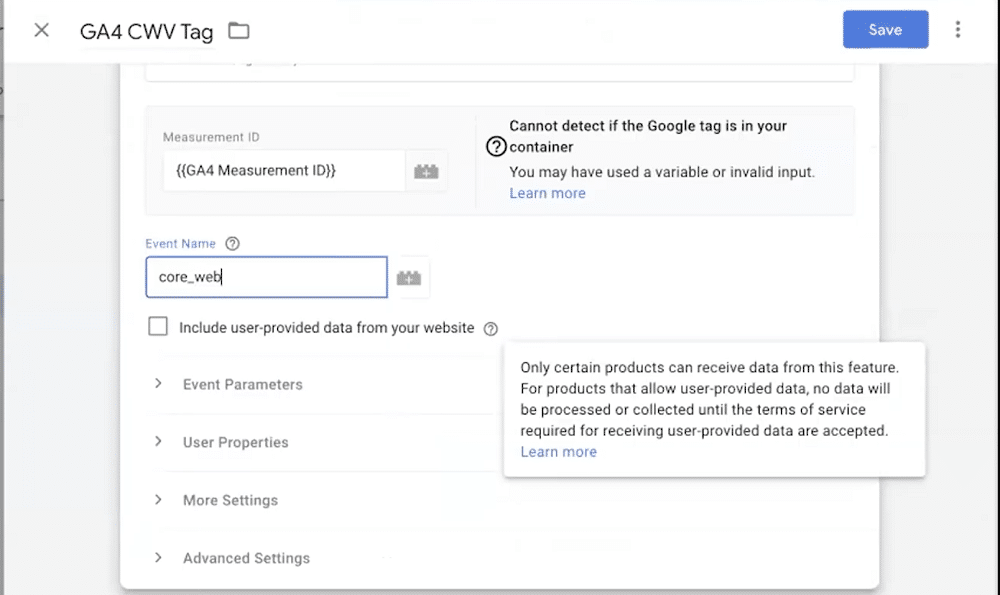
Next, we’ll go to Tags>New>Tag Configuration. Then, choose Google Analytics>Google Analytics: GA4 event.
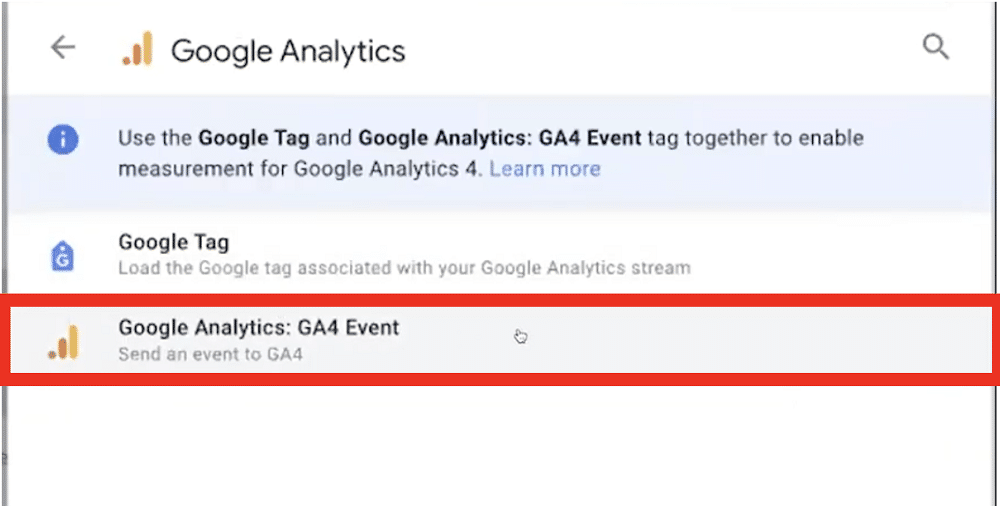
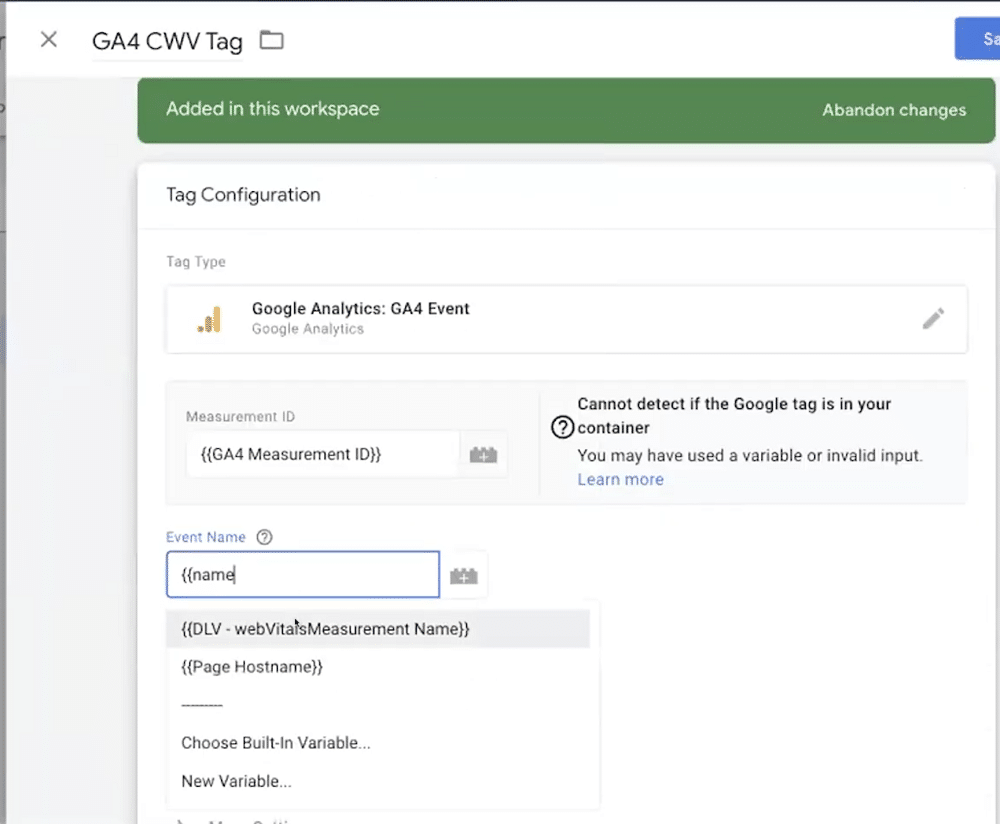
Again, let’s name our tag (we’ll alter this later). We’ll also need to input our GA4 measurement ID, and the name of the event we’d like to track. In this field enter ‘core_web_vitals’.
Lastly, let’s add our recently created trigger. Once this is selected, we can hit save.
In order to view the data from the data layer in Google Analytics, we must create a variable for each of the elements in the DL (eg. name, ID, value, etc).
To create a new variable, we need to go to Variables>New> Variable Configuration. Now, choose ‘Data Layer Variable’ from the list.
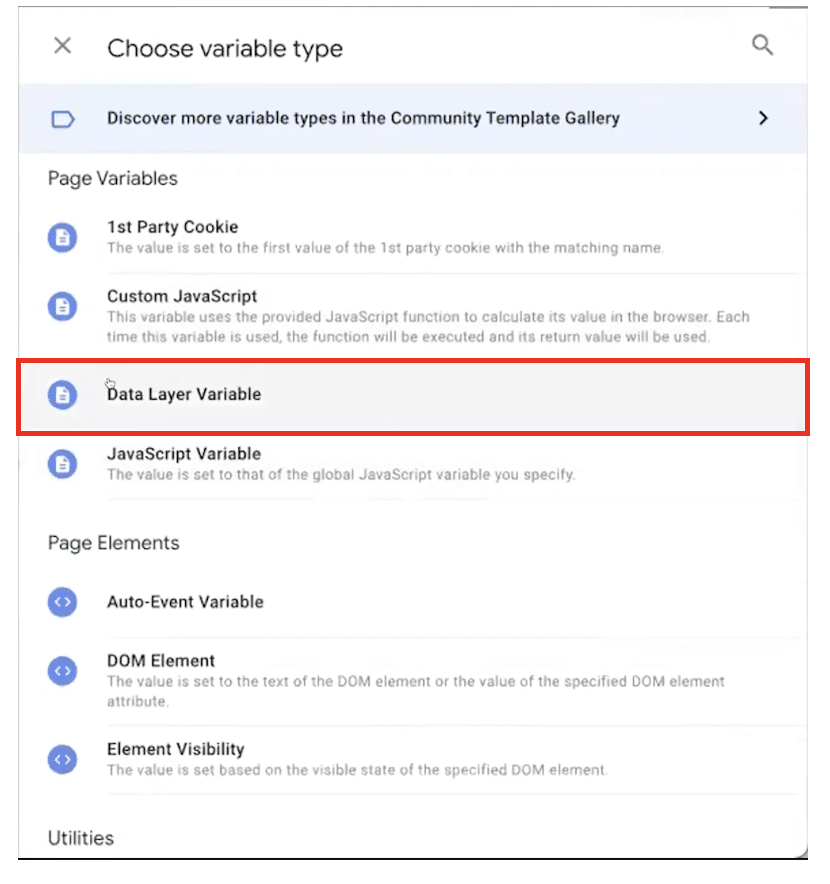
Now, let’s input the name of the DL element within ‘Data Layer Variable Name’. Here, we should first input ‘webVitalsMeasurement’ followed by a full stop, and then the name of the element. For example ‘webVitalsMeasurement.rating’.
Next, name your variable, and click save. We’ll need to repeat this process for each of the elements within the DL.
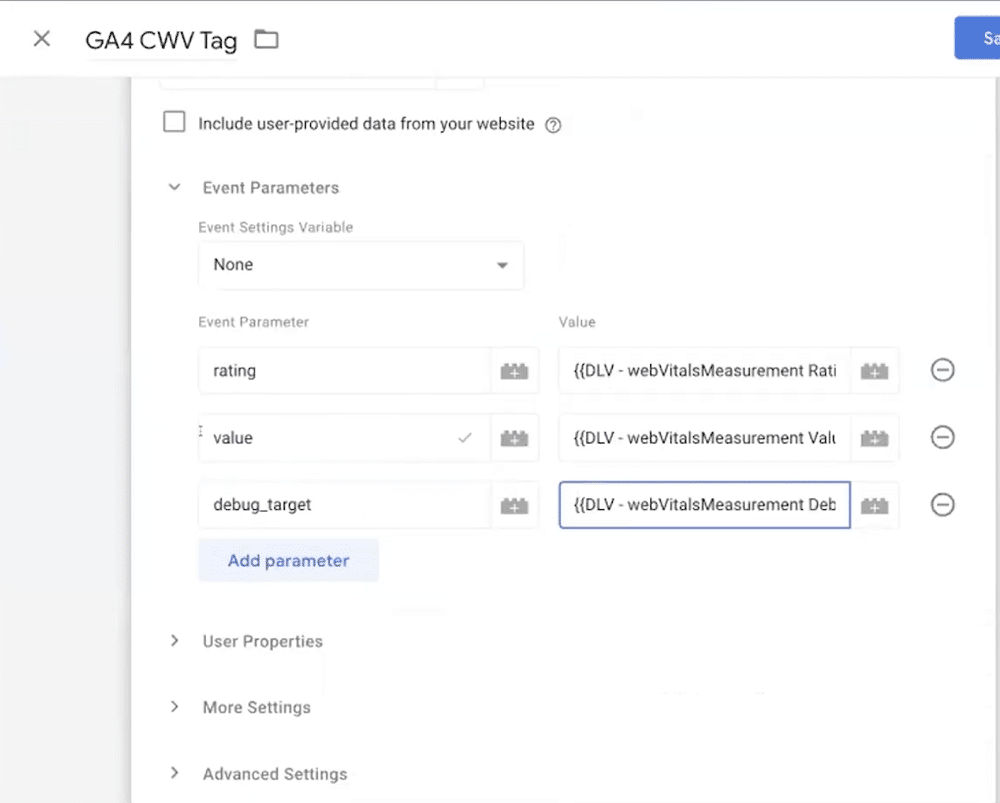
We’ll need to return to our GA4 tag to make sure this information is being sent to Google Analytics. So, go to Tags>GA CWV tag (the tag we created earlier). We’ll change the event name from ‘core_web_vitals’ to a metric name ‘{{DLV – webVitalsMeasurement Name}}.
Next, let’s add parameters to correspond with each of our recently created variables.
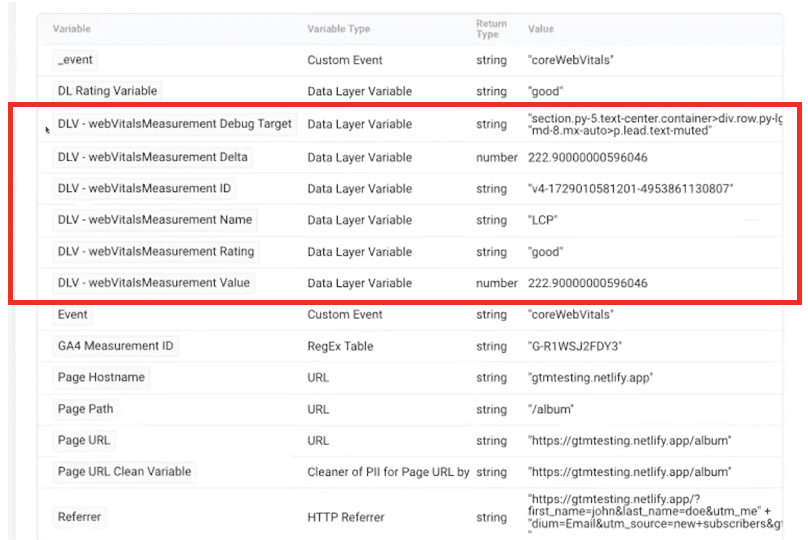
With our variables successfully set up, they should now start to appear within preview mode. We should also start to see CWV information appearing within Google Analytics.
Sending data to an external database
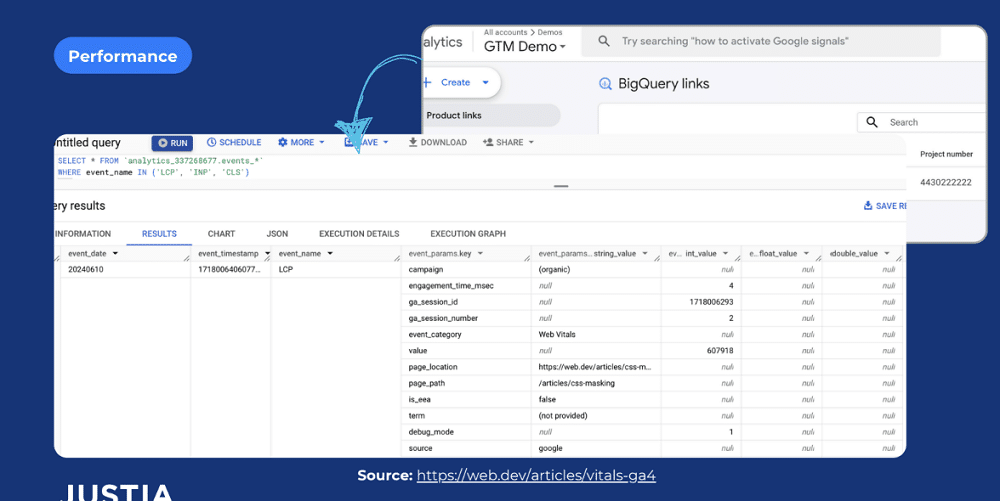
One of the most handy aspects of the web core vitals template is that it sends data directly to BigQuery (if you have GA4 linked to BigQuery).
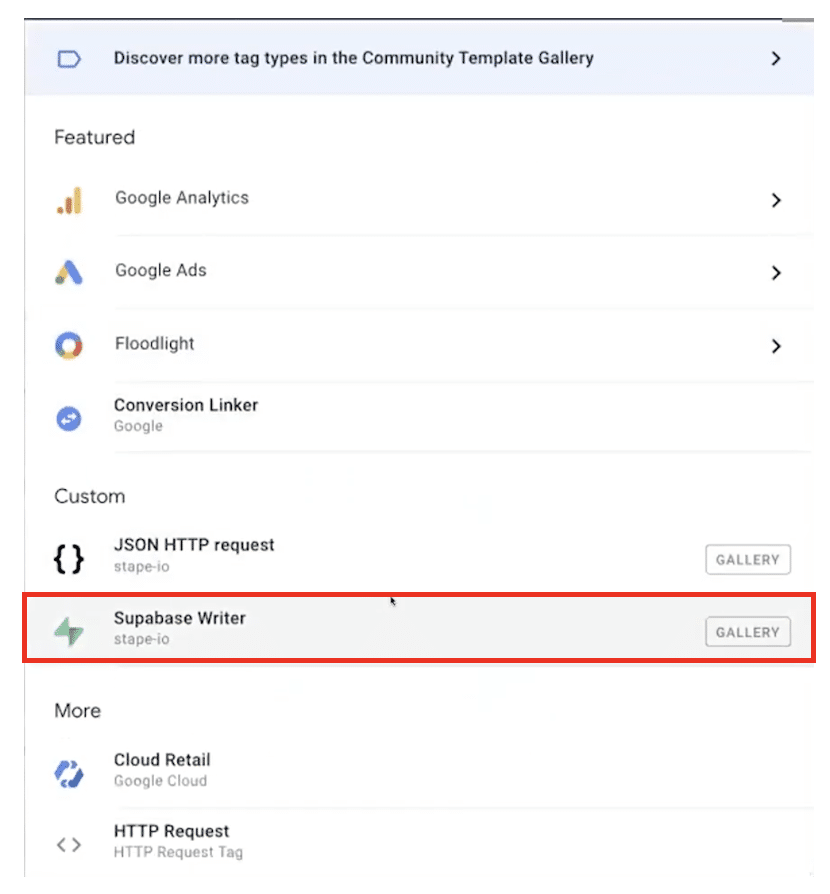
But what if you’d rather send data to an external database? For this, you can use Supabase Writer. This is a Stape template for Supabase, an open-source database infrastructure.
In this example, we’ll use a server-side container. To do so, we need to change the container within GTM (as shown below).
Now, we can go to Templates>Search gallery. Now search for Superbase Writer from the list.

Now, we need to add a tag. We’ll choose ‘Superbase Writer’ from the tag configuration screen.
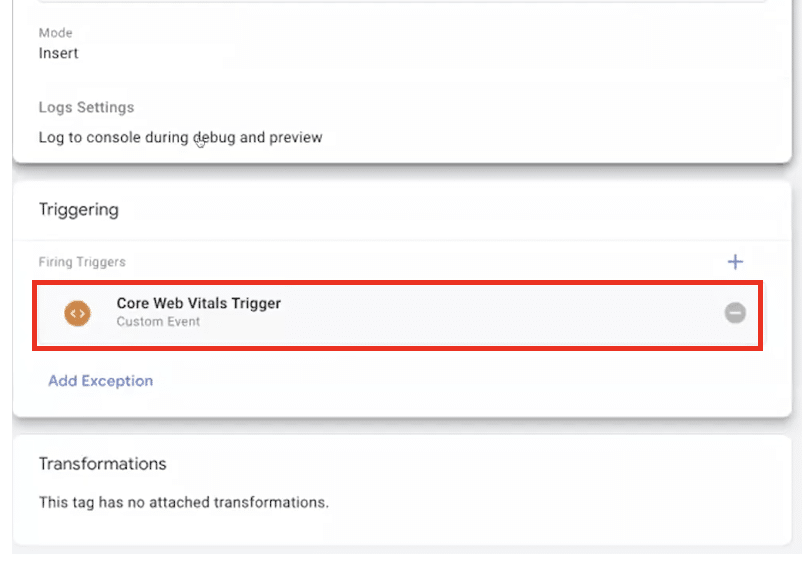
We’ll choose to trigger the new tag on our core web vitals.
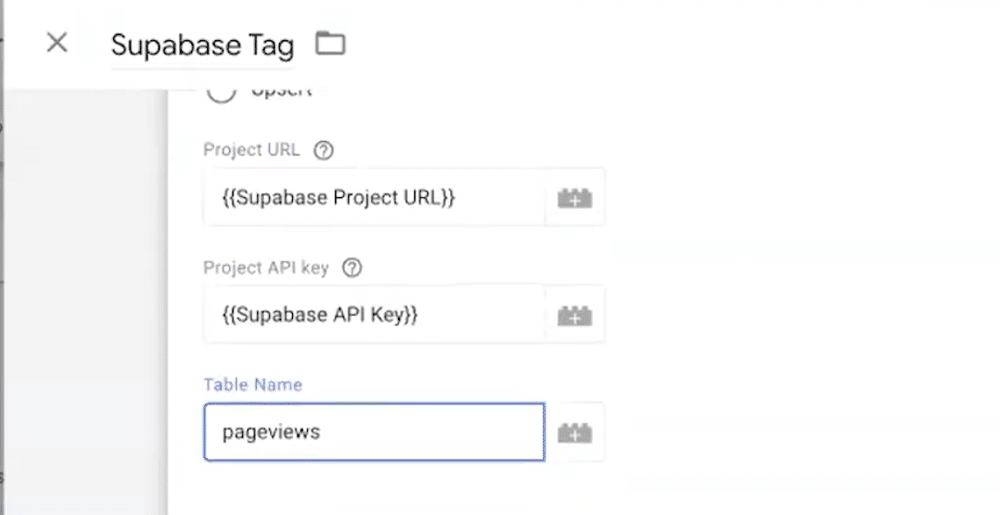
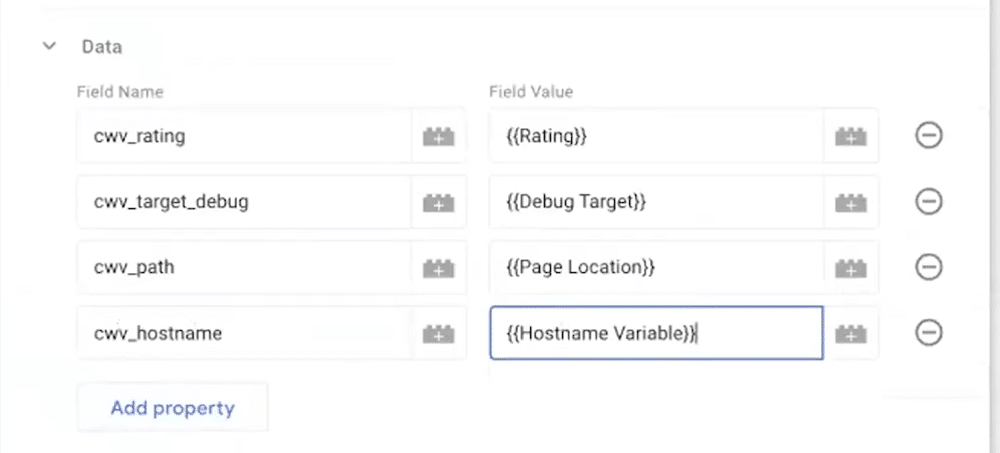
We need to fill the Project URL as ‘{{Supabase Project URL}}’, the project APi key as ‘{{Supabase API Key}}, and table name as ‘pageviews’.
Lastly, we must add properties from the event data. When set up, this should look similar to the image below. Once ready, hit save.
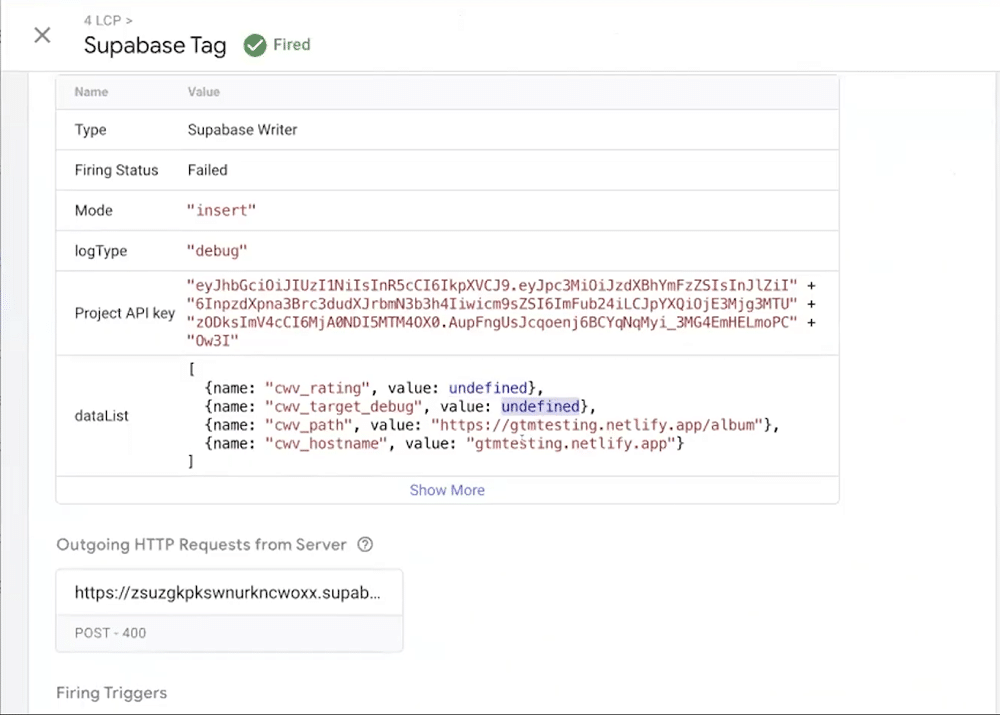
Events should now be sent to Superbase. You should see the Superbase tag appearing in preview mode.
Scalability
Scaling with HTML 5 data attributes
Some containers can house millions of tags. People often have tags that look the same but have slightly different event names.
For example, let’s imagine you want to track buttons on a signup form. When you inspect the HTML, each button looks the same.
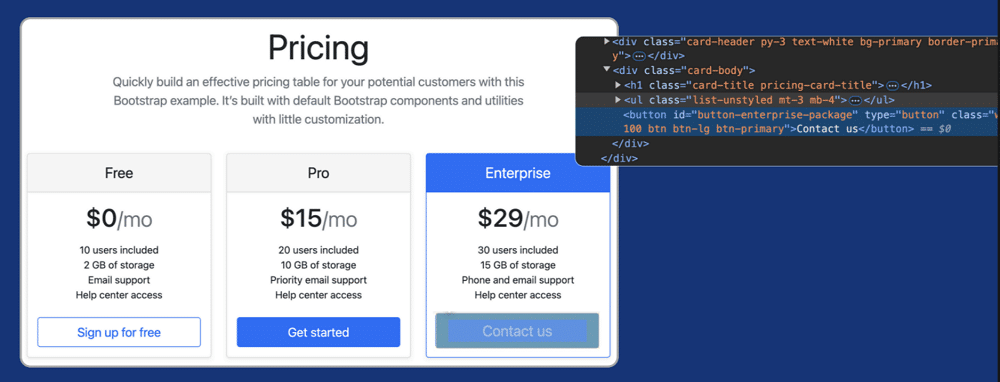
This means you have the same trigger three times, and the same events for each trigger. You could change this by having regular expressions based on the ID or the classes. In other words, you’d have one tag that does everything.
But HTML can change, leaving you with many different variations. Once again, you end up with millions of tags. But what’s the solution?
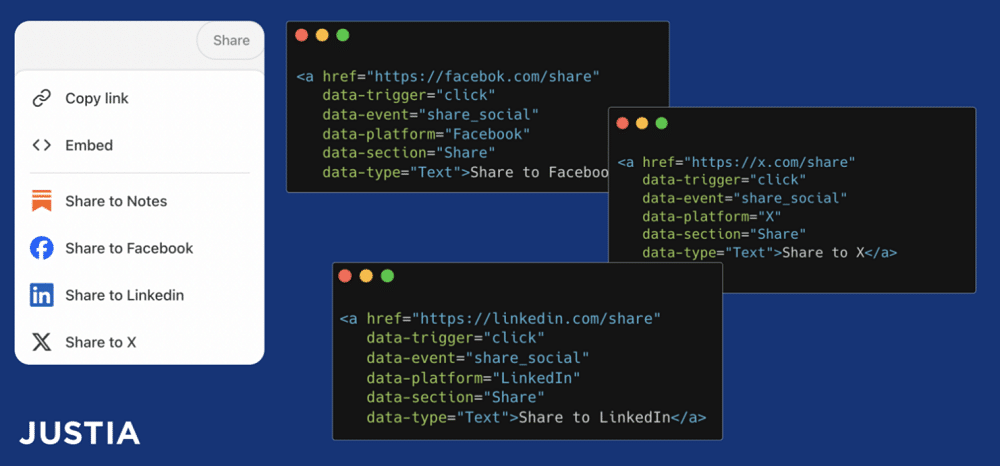
Data attributes allow us to store extra information on standard, semantic HTML elements without other hacks, such as non-standard attributes or extra properties on DOM.
If you have buttons on your website (like those shown below) you can add data attributes to HTML.
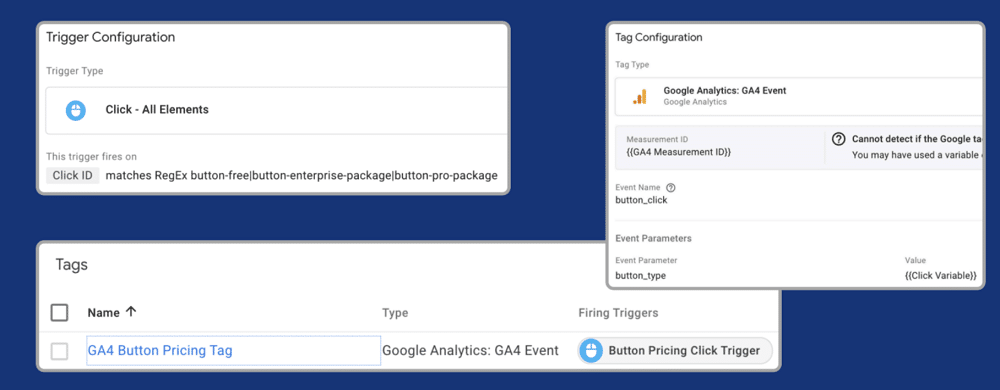
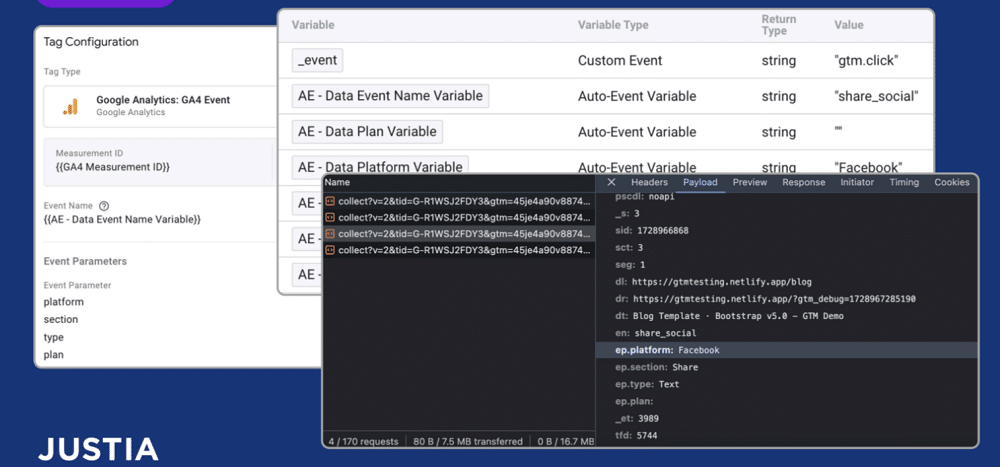
This involves creating an Auto-Event Variable and choosing a variable type of ‘Element Attribute’.
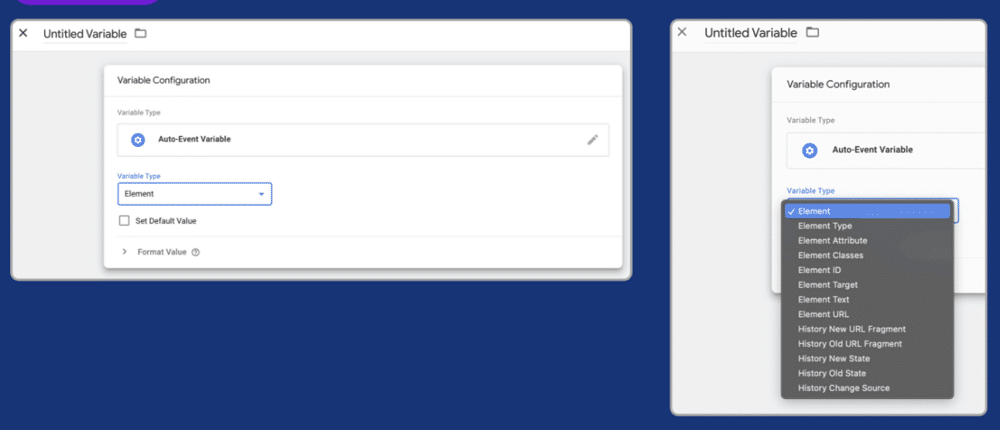
The element attribute will provide you with a name, in this instance ‘data-trigger’.
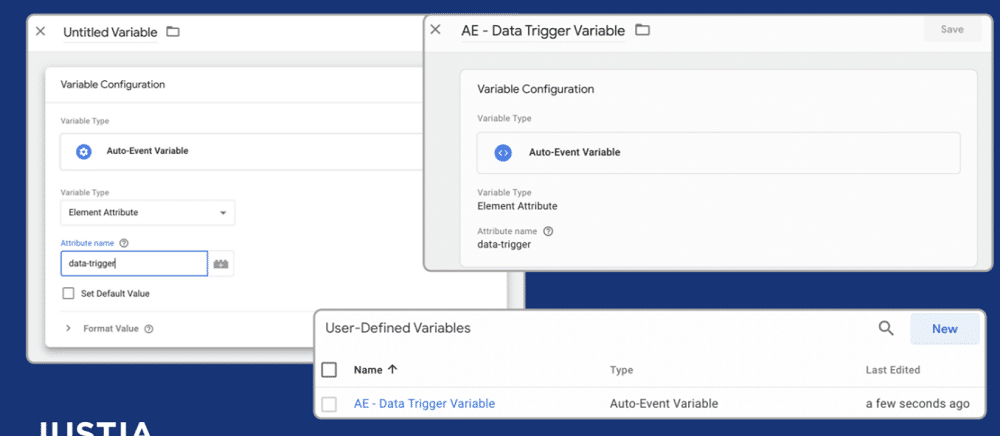
You can now create a variable so that whenever a trigger contains a click, it will be added to all elements. This will then fire a tag.
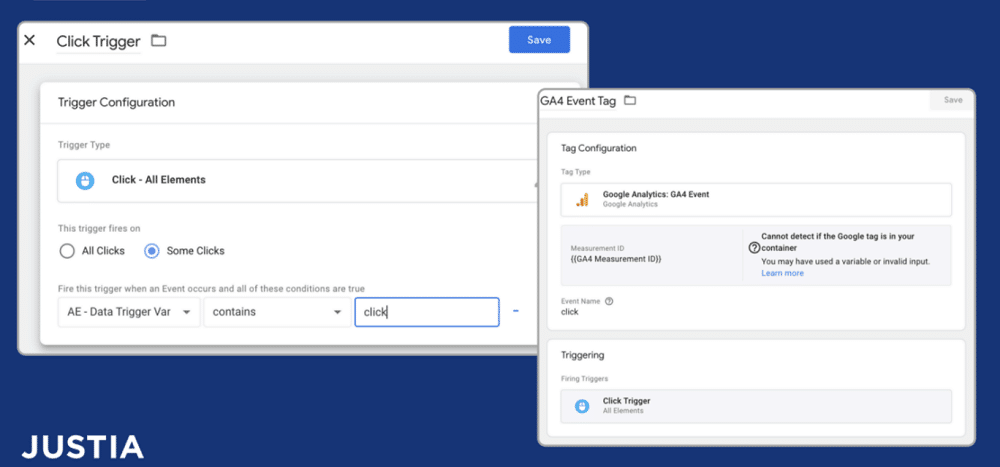
This process will involve copying and pasting lots of user-defined variables, but you will only have one trigger and one tag.
That’s it!
Whether it’s for privacy, performance, or scalability, GTM templates are powerful tools. Why not experiment and see how they can help you?
About Mayra Valdes
Mayra is a Director of Data Analytics at Justia. She holds a Master’s Degree in Data Analytics from the University of Glasgow and has 14 years of experience in software development and digital marketing. Mayra has worked with Google Tag Manager since 2016.

![]()
![]()
Great run-thru!